LA Respiratory Issues
How to – Temporary tracheotomy
Indications
Temporary tracheotomies are performed when airflow is significantly impaired through the upper airway. The obstruction MUST be proximal to the tracheotomy for it to help. Indications of airflow obstruction include nostril flaring, open mouthed breathing, no flow through nostrils, audible respiratory noise and inability to eat and breathe at the same time.
Temporary tracheotomies are also used for intubation for upper airway or dental surgery and when airway access need is immediate (eg animal acutely needs to be intubated).
Tracheotomies can also be useful for diagnostics. In some animals, diagnostics may further impair the airway and the risk is removed by performing a tracheotomy before the diagnostics. Alternatively, an endoscope can be inserted via the tracheotomy to visualize the inner aspect of the larynx.
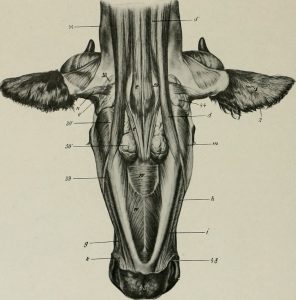
Relevant anatomy
The larynx is at the proximal aspect of the trachea. Cut distal to this unless you are performing a laryngotomy.
The tracheal rings are cartilaginous. If cut, they tend to form chondromas. Chondromas can obstruct airflow. In LA species, we try really hard to NOT CUT the cartilage. Cut between the rings, not through them. Yes, the jugulars are in the same ballpark but not really that close. The closest important structure is the esophagus.
The neck strap muscles cover the surface of the trachea. The muscles do not cross midline. If your incision is centered, you can (and should) separate the muscle bellies and avoid cutting any muscle.
Preoperative management
Food restrictions: Not required
NSAIDs/analgesics: Preoperative NSAID is recommended
Antibiotics: Not required
Tetanus prophylaxis is recommended.
Local blocks: Lidocaine line block if the animal is conscious
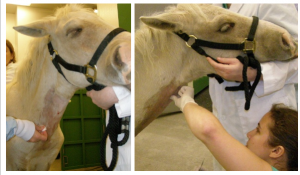
Position/preparation: Standing is easiest. The head can be elevated in a dental harness. However, standing isn’t always an option. Having the animal’s neck as straight as possible helps keep the incision midline. If the animal is conscious, the area is clipped and prepped routinely. If the animal has collapsed, just make an incision.
Surgery Supplies:
- Scalpel blade
- Hemostats (mosquitos or kellys)
- Tracheotomy tube or endotracheal tube
Surgical procedure
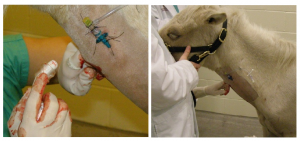
- Make a 10 cm vertical incision centered at the junction of the proximal and middle thirds of the palpable trachea (ignore the thoracic component). Incise through skin to the muscles.

Dissect bluntly between the muscle bellies until the tracheal is directly palpable and visible
- Insert a scalpel blade between the cartilage rings and incise 180 degrees horizontally between the rings.
- Repeat if you didn’t actually do that

Dissecting between the muscles; incising the tracheal membrane horizontally - Push the tracheotomy tube or endotracheal tube into the area. The hemostat can be used to open the site first, providing a guide. Make sure the tube has gone into the trachea rather than subcutaneously. If you don’t have a tube, you can use a piece of garden hose or stomach tubing.
Inserting the tracheotomy tube and verifying it is in the trachea, not just SQ - Secure the tube in place. This is crucial if you don’t have a self-retaining device; it is possible for tubes to slip into the trachea and this further complicates breathing.
Postoperative care
- The tube should be cleaned twice daily for the duration or at least the first two weeks. It is safe to remove the tube and clean it.
- Many clinician prefer to have two tube inserts per patient so that one can soak while the other is in use. Soaking helps clean off the cement-like exudate.
- Avoid ponds and baths – no water into the tracheotomy site.
- When the animal has recovered, the tracheotomy tube is removed and the wound left to heal by second intention. No closure.
- Closure would involve closing a contaminated or dirty wound and increasing the risk of abscessation and/or cartilage damage. The surgical sites heal well when treated as a contaminated wound and allowed to heal on their own.
- Daily cleaning is sufficient care until the wound closes
Complications
- If the skin incision is made off midline, the animal may suck the muscles/skin over the tracheotomy opening when the tube is removed. This may make changing the tube more challenging. A second set of gear is helpful so that the airway can be maintained open even during cleaning.
- The airway is compromised with a tracheotomy. Larger particles can make it into the lungs and cause respiratory illness. Water could get into the airway and cause drowning.
Videos
Narrated tracheotomy
Key Takeaways
If the animal is dying, skip the clip and prep
Make a vertical incision in the skin, staying on midline
Make a horizontal incision between the rings, extending about 1/2 way around.
Do NOT cut cartilage.
Leave to heal by second intention.
Resources
Tracheostomy, Merck- PS Chondritis is usually unilateral and doesn’t often require a tracheotomy unless severe or surgical treatment
Tracheotomy and tracheostomy tube placement in cattle, 2008 VCNA- how to reference for cattle
Manual of Clinical Procedures in the Horse – great how to reference for horses
More tracheotomy videos -vet students in action
Study break : sloths – really worth the time
