Bovine musculoskeletal disorders
How to – Cast application
Indications
Casts are used to stabilize areas for healing. This includes wounds (horses), bones, and tendons.
Relevant anatomy
Casts should typically extend from the sole of the foot (encasing it in large animal species) and include the joint above the destabilized area (or above the wound if possible). Casts should end at the top of a bone and just below a joint. Ending in the diaphyseal region creates a fulcrum and could lead to a new fracture.
Ruminants heal well and can tolerate a cast that does not include the joint above if the injury is distal enough. E.g. a half limb cast (ending below the carpus or tarsus) is often sufficient for a distal cannon bone fracture, even though the joint above (carpus or tarsus) is not included in the cast. If needed, transfixation pins can be used to stabilize the distal limb or even the tibia, avoiding the need for joint above and below.
Preoperative management
Food restrictions: Often NA. If possible, species and age specific food withholding is recommended.
NSAIDs/analgesics: NA for the cast; recommended for fractures and acute wounds.
Antibiotics: NA for the cast; may be recommended for the primary issue.
Local blocks: NA. IVRA can lead to initial swelling. This can lead to a loose cast when the swelling resolves.
Position/preparation: Lateral. If the limb is unstable, it can be placed on the down side to minimize angulation. If the limb is very unstable, wire through the hoof can be held by an assistant to help maintain normal alignment. Radiograph equipment is useful if available.
Supplies:
- Stockinette sized to be snug on the limb; 3x as long as the area to be casted
- 3M cast foam (larger animals) or thin cast padding
- Felt band for top of cast
- White tape
- Towel clamps (for felt band)
- Fiberglass cast material (3-5 rolls for a lower limb; 4-8 rolls for full limb)
- Gigli wire (>3x length of cast) x 2
- AI pipettes or tubing for gigli wire
- Wire cutters for gigli wire
- Inner tubing or technovit for the bottom of the cast
- Elasticon for top of cast
- Water
- Exam gloves
- Scalpel blade or scissors
- Heavy gauge wire for foot (optional)
Procedure
- If applicable, the fracture is reduced and the limb is positioned so that the cast will hold it in reduction or in healing position (e.g. tendon ends apposed). The foot is left in a neutral position with the toe pointing away from the spine (ballet dancer).
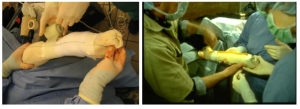
- One to two assistants support the limb. The limb is supported by holding the upper limb above where the cast will stop while the other holds the foot. A table leg brace can be useful, as well.
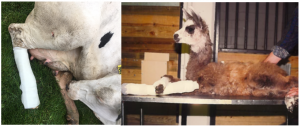
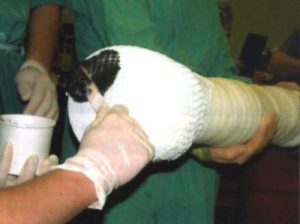
- The stockinette is placed on the limb in a double layer. One half is rolled up the limb, the foot end twisted and the second half rolled up the limb. This should result in a covered foot.
- The felt is placed at the top end of the cast. Cut the felt to fit snugly, ends just meeting. Secure with towel clamps or tape.
- If used, a thin layer of cast padding is placed on the limb from coronary band to felt.
- If used, the 3M foam is dunked in water and placed gently on the limb, overlapping only minimally. This layer should extend from the coronary band to the felt.

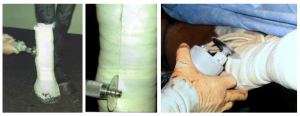
- Place gigli wire if being used. One strand should extend up the medial side and one up the lateral side. Enough wire should extend out both proximally and distally to make sawing possible later. To avoid the gigli wiring sticking in the cast material, it can be passed through tubing (iv tubing) or AI pipettes. The tubing and pipettes should be cut to the length of the cast. Tape in place. Just above the felt, pass the proximal end of the wires through through the stockinette so between the stockinette and skin (this will make it possible to fold down the stockinette later).
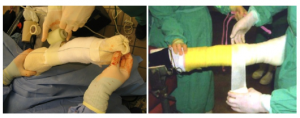
- Cast application(3 layers, distal limb +/- splint)
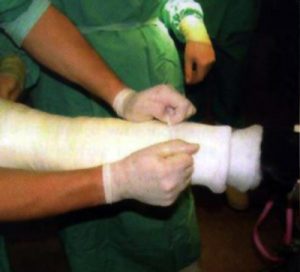
- The cast material will start to activate as soon as the package is open. Warm water sets better and faster; cool water gives you a bit more time. Dunk the cast material and hold for a few seconds. Squeezing once is okay but not necessary.
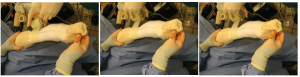
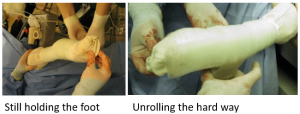
- The first layer of cast material will start on the felt and proceed toward the foot. Do not try to cover the foot with this roll. The person holding the foot should not need to let go.
- At the felt level, make 3 full revolutions with the casting material before moving distally. This will make a strong top. A slight amount of force can be used over the felt.
-
- Move distally, overlapping the prior revolution by 50%. Just unroll the cast material onto the limb, do not pull it taut or use force. Keep fingers off the cast. Surface indentations are internal bumps (and cast sore creators).If there is enough casting material, move back up the limb after reaching the coronary band. Extra revolutions should be placed over joints.
-
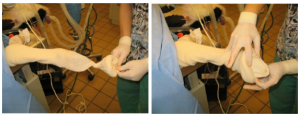
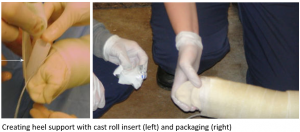
- The second layer of cast material will cover the foot. Start at the fetlock and move down with the same 50% overlap. Cover the foot in any way possible. This will not look good or smooth. Twist the cast material as needed to change direction. Do not cast in your gigli wires. Once the foot is covered, move back up the limb, providing extra support over joints. Alternatively, create heel support.
-
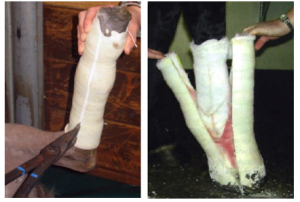
- Heel support: The animal is currently only going to be weight bearing on the toe. Use cast material, the inner plastic roll from the cast material or any other material at hand to create a larger weight bearing surface for the hoof (fill in from heel to ground). Cast this in place with additional cast material.
-
- Splinting: Most casts will break on the dorsal surface. The cast can be strengthened without much additional weight using a splint made from the fiberglass cast material. Unroll a length of cast material equal to the 3-x the length of the cast. Fold into thirds. Wet if not already. Apply to the front of the cast and cast in place with additional cast material.

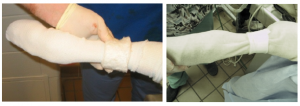
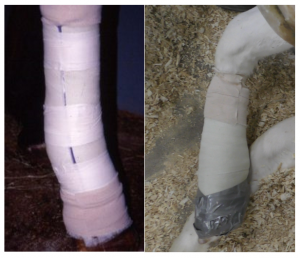
- Polishing : Trim the stockinette above the cast so 2-3″ and fold down over the cast, pulling snugly. With the remaining cast material from the last layer or with a new roll, cover this material. Include 2-3 revolutions at the top to make a solid region that won’t bend.
- Apply technovit or inner tubing to the bottom of the cast to prevent it from being damaged.
- Once the cast is dry, tape the gigli wire to the cast so it doesn’t get caught and pulled. Place Elasticon over the top of the cast to keep debris out.
Postoperative care
- Keep the animal stall rested without hand walking.
- Monitor the cast twice daily for the development of cast sores : warm areas, strike through, flies, swelling above the cast or decreased weight bearing.
- Monitor the cast twice daily for breakage
- Remove or change the cast in 2-3 weeks for fast growing animals, 4-6 weeks for adult horses and small ruminants; 6-8 weeks for cattle (thick skin).
- Cast removal
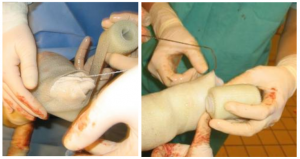
- use gigli wire to saw from the inside out

-
- use cast cutters and splitters to cut down to the limb
- keep the saw perpendicular to the limb, cutting medial and lateral (not over the flexor tendons)
- keep in contact with the limb so if the limb moves, you move (see far right image below)
- cut until you feel a give
- slide 1/2 way down the current cut and repeat
- use cast cutters and splitters to cut down to the limb
-
-
- If the cut is deep enough, the cast will start to gap. Both sides need to be fully cut to see the separation
- Place the splitters in the gap and open to separate the sides
- The limb can be lifted out of the cast; no need to separate the foot
-
Complications
- Acute injuries can be associated with edema. As the edema resolves, the cast will not fit as well. Loose casts lead to cast sores.
- Cast sores are common and are hard to detect. If signs are seen, the cast should be removed ASAP.
- Osteoporosis is common in younger animals (all animals <1 year and horses <4 years casted for wounds only – no bone stimulation). Avoid immediate weight bearing when the cast is removed. Replace the cast with a bivalved cast (both halves or one half) or support shoes and gradually remove support.
- It is possible to cut skin with the cast cutters.
Videos
