5: Woodland Improvement Practices
5. Woodland Improvement Practices
Eli Sagor, Extension Specialist, University of Minnesota
Melvin J. Baughman, Extension Forester, Retired, University of Minnesota
John G. DuPlissis, Silviculture Program Coordinator, University of Minnesota Natural Resources Research Institute
Reviewed and revised in 2019 by Eli Sagor and John DuPlissis
This chapter focuses on ways to improve existing stands of trees. Removing undesirable species and poor quality trees, increasing tree growth rates, improving wood quality, and protecting trees from pests are common goals. You can continually improve your woodland with small steps in short time blocks. Practices are organized by tree size classes: seedling (less than 1-inch stem diameter at breast height [DBH]), sapling (1- to 4-inch stem DBH), poletimber (5- to 9-inch DBH), and sawtimber (10-inch DBH and larger).
Seedling Stands
Releasing Seedlings and Controlling Competing Vegetation
Seedling release can be done manually by hoeing or mulching, mechanically by mowing or cultivating, or chemically by using herbicides. For any of these, you must be able to locate the tree seedlings among their competition. If you are planting seedlings where you may need to do follow-up weed and brush control within a year, place a wire flag next to each seedling or periodically along the tree rows to help you locate the seedlings later.
Mowing is practical on old field plantations where trees are in straight rows with regular spacing, but mowing must be done frequently and it still allows weeds and woody brush to survive. Some form of cultivation offers better weed control than mowing. Hand hoeing weeds is practical only when you have just a few seedlings to manage. Cultivate field plantings with a tractor-drawn rotary hoe, harrow, disk, or in-row tiller. Seedling damage may occur if the tillage equipment cuts any seedling roots or if the equipment runs over seedlings due to operator carelessness or irregular tree spacing. Wet ground may prevent either mowing or cultivating when they are needed the most. You can use a hand-held brush hook or motorized brush saw to cut small woody shrubs and trees in small areas, but remember that many species, especially hardwoods, will resprout after cutting.
Mulch is usually effective at controlling weeds and conserving soil moisture. Its moisture conserving benefit is most helpful on the prairie and woodland fringe where precipitation is a limiting factor for tree growth. Many types work, including sheets of plastic or woven fabric, wood chips, straw, ground corncobs, paper sacks, or other organic materials. Mulch is difficult to transport and apply, so it may be appropriate only for relatively small plantations in open fields. Organic mulches may provide habitat for small rodents that can eat bark off trees in the winter.
The most common method of releasing seedlings from herbaceous or woody competition is to use herbicides. Usually a single application provides season-long control. Herbicides may be applied aerially or from the ground. Ground application using backpack or hand-held sprayers is more common on small plantations. For larger plantations, spray equipment can be mounted on skidders or other large equipment. Herbicides may be applied in spots around trees, in bands down tree rows, or be broadcast across an entire area. Spot and band treatments leave some herbaceous vegetation to help control soil erosion.
Select an herbicide labeled for the types of plants to be killed and those to be protected. Read the label carefully and follow the directions for application rates, timing, and precautions to take. Different herbicides kill vegetation in different ways. Some are growth regulators, while others destroy chlorophyll or other essential plant tissues. Herbicides must be applied at a time when the target species are most susceptible. When applying herbicides by hand in hardwood plantings, hold a shield around important seedlings to prevent herbicide contact. To protect hardwood seedlings that resprout readily (such as oak), cut them off at ground level before applying herbicide to the area. They will sprout again after the herbicide danger has passed.
Use caution when applying herbicides so that spray does not drift onto adjacent areas or contaminate surface or ground water. Use drift-control additives if there is any possibility of wind-drift. Soil-activated herbicides can flow downslope and kill nontarget vegetation. Carefully observe environmental protection warnings on the label and maintain adequate buffer strips near water and nontarget areas.
Seedlings and saplings also may need liberation–the removal or killing of large, undesirable trees that would interfere with the development of a new stand beneath the canopy. (See the section “Deadening Unmerchantable Trees” below.)
Providing Shelters for Seedlings
Tree shelters are hollow tubes about 4 to 6 inches in diameter and 2 feet to 6 feet tall that are placed over seedlings and held in place by stakes. Each seedling requires its own shelter, so they are expensive and cumbersome to install, but you can remove and re-use them.
Plastic shelters create a miniature greenhouse over each seedling that raises the humidity and carbon dioxide levels to increase the rate of tree height growth. They also may increase tree survival on difficult planting sites with low rainfall. When held snug to the ground, they keep rodents away from seedlings. Tall shelters prevent deer browsing–one of their most useful purposes. Hollow tubes may attract birds that fall inside and cannot escape, but placing a plastic net over the top of the tube will keep birds out. Shelters should be left in place until trees have grown through the top of the shelter. Shelters designed (and installed) to prevent rodent damage near the ground should be left until bark is thick enough to resist rodent damage. However, non-biodegradable shelters must be removed once trees have outgrown them in order to prevent damage or even tree death.
Woven wire shelters held in place by stakes protect seedlings from deer and rabbit browsing, but do not modify the atmosphere around the seedlings. Where equipment will be operated to harvest mature trees, desirable tree seedlings must be protected from damage as much as possible. Strategies to protect the seedlings might be to:
- Tell equipment operators where seedling stands are located so they can try to avoid them.
- Harvest during the dormant season when hardwood seedlings have stored food reserves in their roots and thus have the capacity to resprout the next spring.
- Harvest when the ground is frozen to prevent seedlings from being uprooted.
- Harvest in winter when there is heavy snow cover.
Deer Browse Protection
Deer browse can quickly kill, set back growth, or disfigure seedlings. Deer browse on tree seedlings tends to be greatest in fall and winter, when otherwise preferable foods are less available. Deer tend to be voracious browsers of white pine, northern white cedar, and oaks, although many species can be impacted. Of greatest concern, particularly for conifer seedlings, is browse on the terminal leader, or tallest part of the main stem. Browse on side branches may look unsightly, but is far less likely to meaningfully impact tree growth. Several treatments can reduce deer browse damage to seedlings including budcapping, deer repellents, individual tree fencing, or larger deer exclosures.
Budcapping refers to fastening a piece of paper over the terminal bud to deter deer browse. Index cards or similarly sized pieces of paper held in place by staples are commonly used. Staples should be applied to hold the budcap firmly in place around the terminal bud. While it is important to avoid stapling through the terminal leader, on conifers it is fine to staple through some needles near the terminal bud, which can help secure the budcap in place. Because paper naturally biodegrades, seedlings have no trouble growing through properly installed budcaps, so they don’t need to be removed in the spring.
Deer repellents come in a number of forms. Some formulations include blood meal as the primary repellent. Others include capsaicin, the chemical that gives chili peppers their characteristic heat. The effectiveness of repellents varies based on local deer populations, weather conditions (some repellents are water soluble and can be washed away by heavy rain), and other factors.
Physical barriers, while perhaps the most effective option, are also the most costly to install and maintain. As noted above, tree tubes or shelters can protect seedlings from deer browse. Welded wire or chicken wire fencing is also commonly used around individual seedlings, but generally only on relatively small plantings due to the high cost and work involved in installing and maintaining them. Fenced deer exclosures are ideal, but are cost prohibitive for most landowners and frequently require maintenance when trees fall onto and damage the fence.
Sapling and Poletimber Stands
Competition among trees eliminates poor quality and low-vigor trees throughout the life of a stand. In sapling and poletimber stands, focus your management on identifying potential crop trees and encouraging their growth. Typical objectives are to:
- Improve species composition.
- Control stand density.
- Improve tree quality.
- Increase tree growth rate.
- Harvest trees before they die.
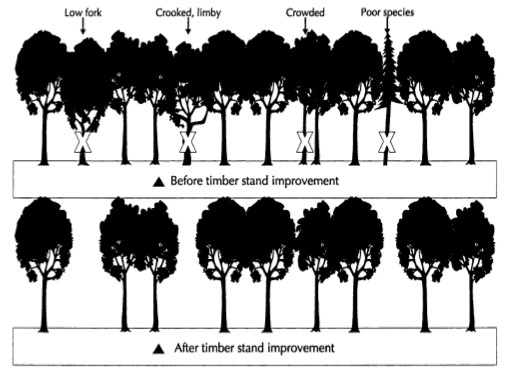
Weeding is the practice of removing undesirable tree species that take up valuable growing space. Culling is the removal of trees that have no commercial value because of poor form, damage, or other physical defects. Thinning involves selectively cutting trees of a desirable species to give the remaining trees more growing space. Pruning removes limbs to straighten saplings or to allow knot-free wood to develop on poletimber trees. These practices collectively are called timber stand improvement (TSI). In TSI, your first step is to pick the objective, then determine which trees should be left in the stand and how to maximize their growth and potential.
For general woodland health:
- Retain tree species best suited for your site.
- Retain a diversity of tree species to protect biodiversity as a hedge against serious pest problems.
- Remove trees with insect and disease problems.
- Remove trees with severe damage to bark or crowns.
- Thin the stand to maintain adequate growing space and sustain vigorous growth on the best trees, thereby helping them resist insects, diseases, and weather extremes.
- Remove invasive, exotic species that may take over the stand and suppress the regeneration and growth of desirable native species.
If timber production is your goal, determine what products you wish to grow (for example, fuelwood, pulpwood, sawtimber, or veneer), then learn what tree species, size, and wood quality are required for those products. During TSI (Figure 5-1), encourage the growth of potential crop trees that:
- Are desirable species in the marketplace.
- Have tall, straight stems.
- Have few branches on the main stem.
- Have healthy crowns in dominant or codominant positions in the canopy.
- Are relatively free of insect and disease problems.
- Show no signs of bark damage or wood decay.
If your goal is to improve wildlife habitat, decide which wildlife species or groups of species you want to encourage and learn about their habitat needs. Use TSI to create appropriate habitat, such as:
- Food (fruit, nuts, seeds, buds)
- Shelter (hollow trees, thickets, brush piles, dead standing trees, downed logs, large woody debris in streams)
- Escape cover (dense thickets, hollow trees, large trees)
- Breeding sites (permanent openings, dense thickets, mixed hardwood and conifer stands)
- Nesting sites (Several horizontal layers of vegetation–ground cover, understory, mid-story, large dens or trees with den potential such as large-diameter aspen)
If visual quality is a concern during TSI:
- Remove trees or prune off lower branches to provide a pleasing vista.
- Save trees with beautiful flowers, fall leaf color, or interesting bark.
- Protect trees with interesting shapes.
- Save large trees.
- Encourage species diversity, especially a mix of hardwoods and conifers.
TSI may be commercial or pre-commercial, depending on whether cut trees can be sold for a profit. Pre-commercial TSI, however, is often economical in the long run because it sustains tree growth, shortens the time to harvest, and improves tree quality.
The following TSI recommendations are aimed at sustaining a healthy forest primarily for timber:
- Where stump sprouts occur on desirable species, wait until they are three to five years old, then thin them with loppers or a handheld, motorized brush saw to one or two vigorous, straight stems that are more than 10 inches apart.
- Thin sapling stands with a motorized brush saw, leaving 1-inch diameter stems three feet apart.
- When thinning dense sapling and small pole-sized stands, it may be more practical and economical to remove whole rows or swaths of trees than to selectively remove scattered trees. In stands with large pole-sized trees and enough space between trees to maneuver logging equipment, selectively harvest trees, leaving the best and largest trees. Leave potential crop trees with dominant or codominant stems. Intermediate and suppressed trees have fallen behind in the competition for growing space and are unlikely to ever become quality dominant trees, even after release.
Sawtimber Stands
Commercial thinning is the principal TSI treatment in sawtimber stands.
Optimum stand density varies by forest type because of the different growing space requirements of the tree species found in them. Manage stand density by the crop-tree release method.
A simple method for regulating stand density is to identify potential crop trees and remove any surrounding trees that are interfering with the crown of the crop trees. Based on your stand objectives, leave the most desirable species and best quality stems with
dominant and codominant crowns.
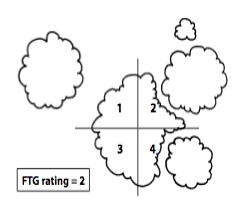
When applying the crop-tree release method, leave crop trees at least 20 to 25 feet apart. If crop trees are scarce or unevenly distributed, leave two trees as close as 10 feet but treat them as one tree when thinning. Remove trees with crowns that encroach on the crop trees (Figure 5-2).
The free to grow rating is a simple way to evaluate the level of crown competition. Ideally, crop tree crowns should be free to grow on all four sides; however, in dense, young stands, no more than two crowded sides should be released at once. Additional release can shock a tree, leading to epicormic sprouting and degraded tree form. Provide additional crown release in later treatments.
In general, do not remove more than one-third of the basal area from a stand at any one time. A heavier thinning may lead to wind damage, sunscald, and epicormic branching on residual trees. Epicormic branches (also called water sprouts) arising from dormant buds beneath the bark on hardwood trees create knots and lower wood quality.
It is common practice to spray a spot or band of paint on trees to be removed during TSI.
Trees growing below the main canopy will not affect crop tree growth, but cut them if they are of marketable size or of undesirable species. Do not damage crop tree crowns, stems, or roots while thinning stands. Repeat thinning every 15 to 20 years.
During a commercial thinning, it may be necessary to remove more trees than you prefer to, including some high quality trees, to enable logging equipment to reach the trees to be removed and to provide enough wood volume to attract a logger. A professional forester can help you understand these tradeoffs and plan your harvest appropriately.
Deadening Unmerchantable Trees
During a TSI operation, you can kill undesirable trees by chemical or mechanical means. If the trees are cut mechanically and you expect them to resprout, treat the stumps with an herbicide labeled for that use.
When undesirable trees have no commercial value, it often is faster and easier to kill them standing rather than to cut them down. Trees can be killed by girdling, frilling, herbicide injection, or basal spray (Figure 5-3). Dead standing trees are useful to many wildlife species and cause little damage to the remaining trees when they break up. For safety purposes, trees that could fall across roads or trails or on buildings should be felled rather than killed standing.
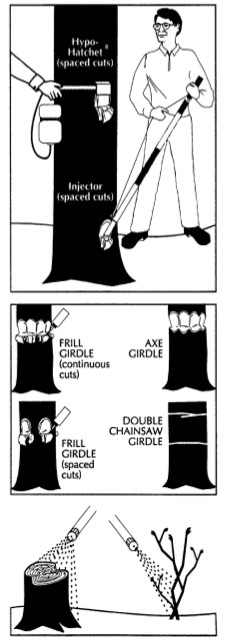
Girdling involves the complete removal of a 3- to 5-inch band of bark around the trunk with a hatchet or chain saw. Girdling also can be accomplished by encircling the main stem with two parallel chain saw cuts that are 1 inch deep and 3 to 5 inches apart. This is time-consuming, hard work; a tree may not die for several years; and live shoots may sprout below the girdle. Girdling often is used if sprouts are needed for wildlife browse and the resulting sprouts won’t interfere with more desirable tree seedlings. Girdling is easier to do in spring when bark separates easily from the wood.
A frill girdle is a single line of downward axe or hatchet cuts that completely encircle the trunk and are then sprayed with an herbicide. Treatments during the growing season are more effective than treatments in winter or at the time of heaviest sap flow. The effectiveness also will vary with the concentration of the chemical used.
An herbicide injection can be used on trees over 5 inches in diameter. Some injectors are modified hatchets, while others resemble pipes with chisel points on one end. An injector cuts through the bark and injects a measured amount of herbicide into each cut. Space cuts 1 to 3 inches apart and apply this treatment any time from May through early fall.
To kill scattered shrubs or small trees, spray the lower 12 to 15 inches of the stem with an approved herbicide until it runs off. Apply chemicals during the growing season, and note that control may be poor on root-suckering species.
Do not apply chemicals near desirable plants or contaminate surface or groundwater.
Pruning
Individual tree quality can be improved by pruning. It is time consuming and expensive, so undertake pruning with a careful eye on costs. Prune only 50 to 100 crop trees an acre that have the form and vigor to produce high quality sawtimber or veneer.
Corrective Pruning
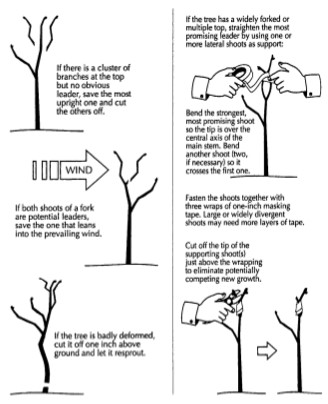
Perform corrective pruning only on high-quality hardwood seedlings or small saplings, (primarily black walnut) to encourage a single straight leader (Figure 5-4). Most trees will correct themselves. Those that don’t are probably genetically inferior and no amount of pruning will correct their form.
Clear-stem Pruning
The purpose of clear-stem pruning is to remove lower branches on the stem to produce knot-free wood (Figure 5-5). Clear-stem pruning is justified when it raises the tree grade enough to increase its stumpage value beyond the pruning cost. Clear-stem pruning may be appropriate for red pine, white pine, black walnut, red oak, sugar maple, and yellow birch. Have a forester teach you appropriate pruning techniques, especially before you prune young hardwood trees.
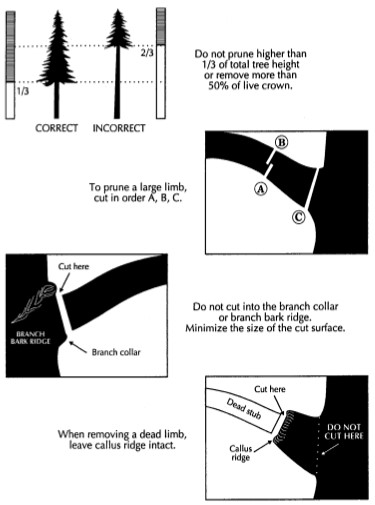
You can begin clear-stem pruning when trees are just 10 feet tall, and should complete it before trees reach 8 inches DBH. Prune at least 9 feet high, but remove no more than one-third of the live crown at any one time. Additional pruning through the pole stage should increase the total clear stem up to 17 feet, if 16-foot logs are the objective.
Prune during the late dormant season just before spring growth begins. Pruning at this time helps prevent diseases from invading the pruning wounds before they dry out or glaze over with pitch. Do not prune oaks from mid-April through mid-July because the pruning cuts may attract oak sap beetles that carry the oak wilt fungus, a serious pathogen of oaks. The dormant season also is a comfortable time to work in the woods because it is cool, visibility is good, and there are few insect pests. If possible, time pruning to coincide with thinning so the accelerated tree growth quickly grows over pruning cuts and maximizes knot-free wood production.
Cut branches close to the trunk, but do not cut into the branch collar–a swelling of the main stem around the base of the branch. Cutting into the branch collar wounds the main stem and may lead to decay in the tree.
Tree paint and wound dressings do not promote healing. Use them only when an emergency such as storm damage requires that trees (particularly oaks) be pruned in May or June.
Work safely. Wear the appropriate personal protective equipment for the tool being used. At the very least, wear a hard hat, eye protection and gloves. Sharp tools cut cleanly and require less effort to use than dull ones. Tools commonly used for pruning include hand pruning saws, pole saws, shears, and pole pruners (shears). Using a chainsaw is dangerous for pruning because you must hold it above shoulder level where it is difficult to control. A chain saw easily damages trees by cutting into the branch collar and by nicking bark on the main tree stem near the pruning cut.
