14: Recreational Trail Design
14. Recreational Trail Design
Melvin J. Baughman, Extension Forester, Retired, University of Minnesota
Terry Serres, Former Graduate Research Assistant, University of Minnesota
This chapter provides simple, inexpensive solutions for designing, building, and maintaining sustainable trails for hiking, horseback riding, bicycling, cross-country skiing, snowmobiling, all terrain vehicles (ATVs), and off-highway motorcycles (OHMs). Sustainable trails hold up to intensive recreational use and severe weather conditions, and require minimal maintenance.
Determine Trail Uses
The first step in trail design is to determine how the trail will be used, how much it will be used, and what quality of user experience you want to offer. Multi-use trails work if:
- There are many primary users but only a few secondary users.
- The trail is used in different seasons by different users.
- The trail is designed and maintained to accommodate all users or the corridor contains parallel treads.
- Clear rules are posted about how to behave (pass, regulate speed, etc.) when encountering other types of trail users.
Consider a single-use trail if:
- Different types of users have different levels of tolerance for noise, effort in using the trail, speed of travel, or influence on the tread.
- You want to offer a high quality trail experience for one type of user.
How much will the trail be used at any one time, day, season or year? As trail use increases, widen the tread and clearing width, make the tread more durable, and decrease grade. These actions make the trail more durable and easier to use by a wide variety of users.
Design your trail to fit the user experience that you want to offer. Consider:
- Physical ability of trail users. For example, reduce trail grade and smooth the trail surface to accommodate people with a range of physical abilities.
- Exposure to personal risk (such as injury, getting lost) the trail offers.
- Duration of the experience. Is it 30 minutes or 3 hours?
- Purpose for the trail. If the trail simply leads to a destination, choose the shortest and easiest route. If the trail itself is the destination, choose the most interesting route.
Select the Corridor
Perhaps the most enjoyable step in trail design is exploring the corridor to determine where to place the trail. A trail corridor is a wide swath through the landscape that will encompass the trail. Analyze the entire area, refining the trail location as you gather more information.
Use Photos and Maps
Aerial photographs help you identify land uses on your property and neighboring properties (such as cropland, pasture, forest, river, lake), roads, trails, buildings, and utility rights of way. Topographic maps (1:50,000 scale or larger) are helpful in hilly and mountainous terrain, especially if your trail covers a large geographic area. They show elevation changes, forest and open areas, rivers, lakes, wetlands, buildings, roads, trails, cemeteries, and other features.
Soil maps and accompanying data tables describe soil physical characteristics such as depth, texture, erosion potential, and flood frequency as well as soil suitability for roads, structures, farming, forestry, etc.
When evaluating large sites, online mapping tools or geographic information system (GIS) data may provide information on water resources, rights of way, utilities, land uses, roads, land ownership, vegetation cover types, wildlife habitat, flood zones, etc.
Scout the Trail Corridor
Scout the corridor in the trail’s primary season of use. To clearly see landscape features, scout when deciduous trees have lost their leaves. If possible, scout in all seasons to reveal attractive features and hazards that may affect trail location, construction or maintenance. Depending on the season, look for:
- Spring: High water, ephemeral ponds, flowers
- Summer: Dense foliage, normal water level
- Fall: Foliage color
- Winter: Icicles, snow scenes, frozen water
Note existing trails and roads, control points, obstacles, points of interest and anchor points (Figure 14-1). Take notes and mark locations on a map or record GPS coordinates.
Existing trails and roads may be good links to new trails. Also look for natural pathways that require little clearing or construction (such as a ridge top, hillside bench, or river bank terrace).
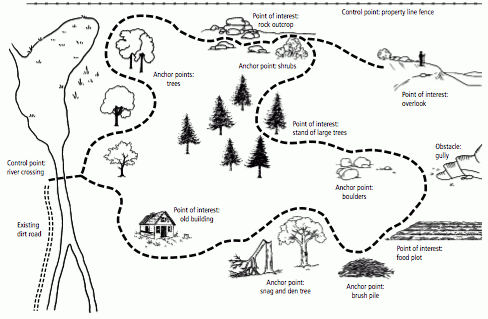
Control points are physical or legal constraints on a trail’s location. Ownership or management unit boundaries, a steep slope forcing a trail through a narrow section of hillside, a cliff that forces a trail around one end, a wetland forcing the trail along a narrow upland ridge, or a stream that can be crossed easily in only a few places are examples of control points.
Obstacles can include a steep slope, rocky soil, boulder field, rock slide, sand dune, cliff, rock ledge, eroding bank, steep-sided gully, gorge subject to flash floods, water body, wetland, habitat for rare species, historic and cultural sites, fence, highway, sources of objectionable sound, and objectionable views. Obstacles often require expensive crossing structures.
Run your trail past significant points of interest, such as unusual landforms (sink hole, esker, sand dune, hill, valley, gorge); different forest types or ages; forest opening; grassland; farm land, especially if it attracts feeding wildlife; scenic vista; boulders; rock outcrop; wetland; ephemeral pond; lake; river, creek, waterfall; historic site (may also be an obstacle); archaeological site (may also be an obstacle); and wildlife habitats (den trees, rock piles, dense thickets, layers of forest vegetation, water sources, sand banks, cliffs, caves, crevices). Attract wildlife to the trail corridor with nesting boxes, breeding sites, food plots, feeding stations, roost poles, watering devices and other constructed habitats.
At frequent intervals, take the trail past subtle anchor points (such as large or unusual tree, rock, patch of shrubs) that add interest and draw attention to landscape features.
Additional Points to Consider
Avoid placing your trail in areas with threatened or endangered flora, fauna, geology, and natural plant communities. Ask your state’s department of natural resources whether these resources exist or are likely to be found on or near the trail location.
Protect cultural resources such as historic structures (buildings, dams, bridges, fire towers, etc.), archaeological sites (above and below ground), cemeteries (including unplatted historic cemeteries, burial mounds, and other ancient burials), and traditional use areas where natural resources are gathered for food, medicine, or ceremonial uses. Cultural resources can be damaged by soil disturbance, soil compaction, rutting, change in public access, and change in vegetation and other features. Whenever a government permit, license, or funding is needed for a project, a cultural resources management review may be required. To learn about locations of cultural sites, contact a state archaeologist.
Discuss your trail project with neighbors to learn about the impact on their properties and potential linkages to other trail systems.
Consider your budget for land and right-of-way acquisition, trail construction, and maintenance. This will put a reality check on your design plans.
Establish Design Standards
After exploring the trail corridor, but before flagging the exact trail location, set your design standards. Base the standards on the trail uses; the quality of experience you want to offer, including the level of risk; and your construction resources, including budget and expertise. As a starting point, use the Recommended Trail Design Standards found at z.umn.edu/traildesign. Modify these recommendations to fit your needs.
Consider these aspects of trail design: trail configuration (Figure 14-2), trail length, tread surface, tread width, clearing width, clearing height, grade, turning radius, sight distance, water crossings, and special requirements.
Linear trails are appropriate for long distance travel (several miles) or where the land ownership (right-of-way) is too narrow to permit development of a loop trail.
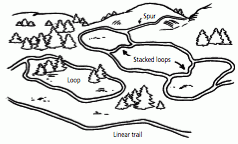
- Spur trails are short linear trails that take users to points of interest or connect different loop trails.
- Loop trails permit the user to begin and end at the same location without repeating any part of the trail.
- Stacked loop trails (a series of interconnected loops) permit users options for different distances, routes, or destinations.
Trail length is the distance that users could travel in one day.
Tread surface refers to the material (such as soil, gravel, rock) on the usable part of the trail, and its condition (such as smooth, rolling, rough). High-use trails require more durable materials and smoother surfaces than light-use trails.
Tread width is the width of the usable trail surface. In general, the tread width that is suitable for light use or one-way travel should be doubled for heavy use or two-way travel.
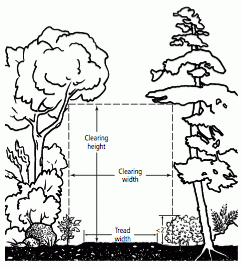
Clearing width is the total width to which rocks, trees, tree limbs, and other obstacles should be removed (Figure 14-3). As a general rule, clear at least two feet on each side of the tread. Where a trail passes through dense vegetation, vary the clearing width to avoid an unnatural tunnel effect. In general maintain clearing width from the ground up to the clearing height, except you may leave vegetation, rocks, and other objects less than two feet tall near the tread edge. Center the tread within the clearing width, except on hillside trails where clearance may be less on the downhill side.
Clearing height is the height above the tread surface to which overhanging rocks, tree limbs, and other obstructions must be removed. As a general rule, clear two feet above the user’s head. Keep in mind that leaves will bend deciduous tree branches one to two feet lower in summer than in winter while snow will bend evergreen tree branches and raise the tread surface.
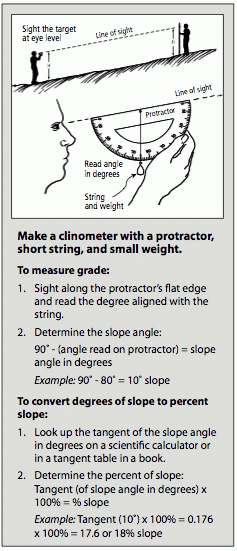
Grade is the slope angle (expressed in degrees or percent) along the trail’s centerline.
It is easy for trail users to travel long distances on low grades. High grades require more work and should extend for shorter distances. Measure grade with a commercial or homemade clinometer (Figure 14-4).
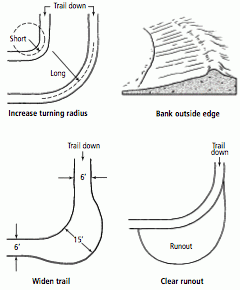
Turning radius is the radius of an arc drawn through the centerline of the tread where the trail curves. As travel speed increases, lengthen the turning radius, bank the trail higher on the outside edge, widen the trail, or clear a runout zone (see Figure 14-5 below).
Sight distance is the distance that a trail user can see down the trail from any point on the trail. Adhere to the recommended minimum sight distance, but vary sight distances to add interest, lengthen sight distance to allow faster travel, and reduce sight distance to slow travel.
Water crossings refer to the type of structures recommended for crossing bodies of water. A ford, stepping stones, culvert, boardwalk, or bridge may be appropriate. Your choices will be affected by the type of user, type
of experience you want to offer, type of water body, length of crossing, legal status of the water body, your ingenuity, and your budget.
Mark Trail Location
As you mark the trail, keep your design standards in mind.
Mark the centerline of the trail using one of these materials:
- Rolls of plastic flagging (tie 15-inch strips to branches).
- Wire flags (stiff wire, 2 feet or longer, with plastic flag).
- Wooden stakes (12 to 18 inches or longer) topped with brightly colored flagging or paint.
Space the markers approximately 20 feet apart in dense vegetation and up to 100 yards in open fields. Write cumulative distances on markers every 100 feet to make it easy to match markers with trail maps and notes.
Map the route. Use a global positioning device or a compass to develop a trail map. Mark structures and special instructions on the map. Make special note of places that require deviations from trail standards. Photograph sites where trail structures are needed to assist in planning materials and equipment or show potential contractors what these sites look like.
Obtain permits for crossing streams, wetlands, railroads, highways, rights-of-way, etc. Begin constructing the trail soon after flagging, before markers are moved or damaged.
Clear the Trail
Clear the trail in these stages:
- Remove small trees, shrubs, and limbs from large trees.
- Cut large trees.
- Remove stumps and boulders.
- Move soil to level the tread.
The extent of clearing needed depends on the clearing height and width of the trail, the quality of the user experience (such as a rough, challenging trail or a smooth, easy trail), and the primary season of use (such as snow will cover some obstacles in winter).
Construct the Tread
Create a tread surface that is smooth and durable enough for intended users. Save effort by placing the trail on soils that withstand trail use.
Factors Affecting Tread Choice
Consider how tread materials will react to compaction, displacement, and erosion.
- Compaction comes from downward force from feet, hooves, wheels, etc. When a tread is fully compacted, it holds its shape and resists displacement and erosion. Compact the tread as much as possible during initial construction. Some materials have better compaction properties than others. Tread materials that do not compact (such as sand, organic soil, water-saturated soil) or that compact too much (such as peat) will not retain a desired shape. Excessive compaction tends to lower the tread and encourages water to collect in depressions.
- Displacement is sideways force that moves tread material off the trail, raising trail edges over time. Displacement also lowers the tread, enabling water to collect in depressions.
- Water and wind erosion remove tread material, destroying the tread. The potential for erosion from running water increases as the slope and/or volume of water increases.
If possible, use materials for the tread from the immediate surroundings. Natural materials are inexpensive and blend well with the landscape.
Consider hardening the tread with rock pavers, or other materials as a last resort when:
- Drainage is poor and mud is a problem.
- Flowing water causes unacceptable erosion.
- Tread material compacts or displaces too much to retain the desired tread shape over the long term.
- Tread must be narrow and clearly delineated to protect the surrounding area.
Tread Materials
Bedrock
If available, smooth bedrock makes a very durable tread. It can be slippery for horses, especially on slopes. Avoid using bedrock where snow retention is desirable. Sites with vegetation retain snow longer.
Soil
Mineral soil is composed primarily of sand (0.05 to 2.0 mm—coarse texture), silt (0.002 to 0.05 mm—medium texture), and clay (0.002 mm—fine texture). Soil with a high percentage of silt, moderate percentage of sand, and small percentage of clay makes a very durable tread. Such a soil resists excessive compaction and erosion while allowing internal drainage.
Soil composed mainly of sand will not erode with water or become muddy but, because sand does not compact, it is subject to displacement and wind erosion. Soil with a high clay and silt content is subject to water erosion and mud. Soil composed mainly of clay retains water and can be muddy and slippery when wet and, unless it is highly compacted, it is also subject to water erosion.
Organic soil (humus) is composed of decomposing plant materials that compact and erode, and can become water saturated and muddy. It is not desirable for trails and likely will need artificial hardening (such as boardwalk) unless the trail receives light, low-impact use only when dry or frozen. Soil composed mainly of undecomposed organic material, such as peat, compacts too much to be suitable tread material.
Vegetation
Try to maintain natural vegetation (primarily grass) for hikers and horses, and for snow retention for skiing, snowmobiling, or snowshoeing. Vegetation survives best on a lightly used trail in full sunlight. Vegetation is difficult to sustain in sandy soil (which is dry and nutrient poor), on steep slopes (where there is more abrasion from trail users and erosion), and in deep shade.
Duff is undecomposed organic matter (such as leaves, twigs, moss, pieces of bark and wood) that litters a forest floor. Duff does not compact well and is easily displaced. During construction, remove duff to expose the ground surface for shaping the tread. However, a light duff layer can help soak up moisture and break the erosive force of rainfall. If a natural surface is desired, you may allow duff to accumulate on a finished trail.
Wood Chips
Use wood chips to define the tread on newly constructed foot trails, to suppress vegetation growth, and to raise the tread in muddy areas. Apply a 3- to 4-inch layer of large wood chips that do not contain leaves or small diameter twigs (which decay rapidly). Hauling and spreading wood chips requires extensive labor, and wood chips need to be replaced every three years as they decay or are displaced. In most situations, wood chips should be a temporary tread material.
Rock
Rocky material includes gravel (from sand to 3-inch diameter), cobbles (3- to 10-inch), stones (10- to 24-inch), or boulders (greater than 24-inch).
Rocks are useful on trails that receive heavy use, especially by horses or heavy motorized vehicles, or where a very firm, smooth tread is needed such as for touring bicycles or wheelchairs. Rocky material resists excessive compaction and displacement and provides a very strong tread. If protruding rocks are hazardous or too bumpy for your quality standards, excavate rocks or chip off the protruding piece.
Crushed rocks compact and resist displacement better than rounded rocks (such as from beaches, river beds, and glacial till). Crushed rock made from hard rock is more durable than from soft rock. A tread composed entirely of rounded cobbles is prone to displacement, but when embedded in clay, cobbles add durability to the tread. If used in a mixture of sizes including plenty of small particles to fill voids, rocks interlock well. To achieve a smooth, firm surface, mix small gravel with rock dust from a commercial-scale rock crusher.
For small jobs, haul a portable rock crusher to the work site. To produce a small quantity of gravel for chinking crevices, crush rocks with a sledgehammer or the rounded end of a steel pry bar.
Paving Stones/Bricks
Concrete paving stones and bricks are available in many sizes and shapes. Interlocking pavers may be most useful. These manufactured materials are uniform in size, easy to handle, and easy to acquire. Pore spaces between pavers may be filled with soil then seeded with vegetation. Pavers are heavy to transport and their uniform geometric shapes and colors may not match native materials.
Porous Pavement Grids
Sectional grids made from plastic or steel are laid directly on the ground to provide traction while protecting underlying soil from erosion. Vegetation can grow through the grid. Consider grids for ATV trails on moderately steep slopes that are prone to erosion.
Solid Pavement Panels
Easy to install plastic panels (approximately 4 feet square and 2 inches thick) that lock end-to-end can provide a firm walkway over sand or gravel.
Asphalt
Asphalt is a good choice where a hard surface is needed, such as for wheelchairs, touring bicycles, in-line skaters, or heavy hiking use. Asphalt is expensive compared to natural surfaces and crushed rock, and the site must be accessible to the equipment needed to apply and roll it. Tree roots may uplift and fracture asphalt laid on shallow soil over bedrock. Asphalt applied with heavy equipment is most durable, but tread width is limited by the equipment, typically eight feet or wider. Where a narrow tread is desired, asphalt may be laid by hand but it will be less durable. Use a hot mix for new construction or large repairs. Use a cold mix for small repairs, less than one cubic yard. Asphalt can be colored to some extent by the gravel used in the mix.
Concrete
Use concrete in the same situations mentioned under asphalt. Concrete is more durable than asphalt, but also more expensive. Haul large quantities to the site by truck; mix small quantities on-site. You can color concrete to blend with the surrounding site. For better traction on steep slopes, broom the surface, trowel grooves across the tread, or leave the surface unfinished.
Tread Edging
Tread edging (such as rocks, logs, timbers) that creates a visual/psychological barrier helps to:
- Prevent trail users from getting lost when the tread is not distinct from the surrounding ground surface.
- Encourage users to stay within the tread, protecting surrounding natural resources.
If tread edging is intended to hold tread fill material in place (such as sand, gravel, asphalt), install hard, continuous edging (such as preservative-treated 2” x 4” lumber, 4- to 8-inch diameter round logs or sawn timbers) along both sides of the tread. Where the trail curves, cut shorter pieces or use edging material that can be bent. Also see references to curbs under Boardwalks (below) and Curbs and Railings (below).
Install Structures
The structures you need to cross obstacles on a trail depend upon the conditions you encounter, the type of user experience you want to offer, the amount of use, and your budget.
Crossing Flat Land
Flat land may seem like an easy place to build a trail, but if the soil is mainly clay or silt, or the water table is high, poor drainage may lead to muddy puddles. Solutions include relocating the trail where there is side-hill drainage (see Crossing a Hillside below) or raising the tread above the surrounding flat ground (see Crossing Wet Soil).
Crossing a Hillside
A hillside trail must quickly drain surface water off the tread while maintaining its shape and a grade that is comfortable for trail users. Options for crossing a hillside include full-bench and cut-and-fill trails, retaining walls, diverting water across the tread, and diverting water flowing down the tread.
Full-Bench and Cut-and-Fill Trail
A flat trail bed cut from a hillside provides a safe and comfortable crossing for users (Figure 14-6). In a full-bench trail, the full width of the tread is cut from the hillside. A full-bench trail usually has a well-compacted base because the underlying material has been in place for thousands of years.
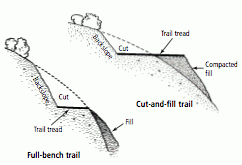
If part of the tread is built upon fill material that was cut from the hillside, it is a cut-and-fill trail. Fill material may be difficult to compact, especially with hand tools. If fill material is not well compacted, horses and vehicles may destroy the tread. If fill material must be used for part of the trail bed, use large rocks to form the trail bed and serve as edging, and cover them with tightly compacted soil.
Backslope is the area above a trail where material has been cut from a hillside in the process of leveling the tread. The backslope grade necessary to prevent soil erosion depends on the material. A backslope of 1.5:1 (horizontal run: vertical rise) is adequate for stable materials whereas a backslope of 4:1 may be needed on erodible materials.
Retaining Wall
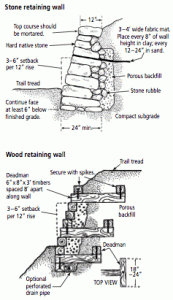
Where a trail cuts across a slope and vegetation does not stabilize exposed soil above or below the tread, a retaining wall will prevent soil erosion (Figure 14-7). A retaining wall below the tread may be more durable than one along the backslope (perhaps because trail crews are more careful in building walls that support the tread). Building a retaining wall to support the tread may negate the need for cutting into the backslope, thus preserving natural vegetation that holds the soil. Tie walls into the embankment with a deadman (such as geotextile fabric, logs, or large rocks). Build walls without mortar, or install drain pipes, to allow water to seep through a wall.
Outslopes and Inslopes
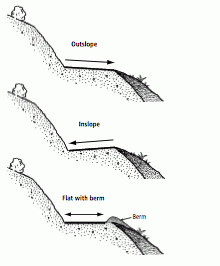
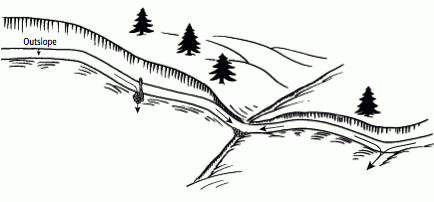
Where a trail crosses a hillside with medium- to coarse-textured soil, outslope the tread to quickly drain off surface water. A 2 to 5 percent outslope is quite common and suitable for most trail users. In heavy rainfall areas, outslope up to 10 percent, provided trail users can safely negotiate this slope without slipping or rolling off the trail.
Some trail designers recommend no outslope on horse trails. Horses tend to walk on the outside edge of a tread and will crumble the edge over time. A sloped tread also increases the likelihood that horses will slip when the surface is wet. If you build a flat-cross-section trail, divert water from the tread using rolling grade and water bars (described below.) On flat-cross-section trails that traverse steep slopes, you may wish to create an edge berm (raised shoulder), except at grade dips, to protect the outside edge of the tread from erosion and to create a safer trail for users. Strengthen an edge berm with vegetation or rocks.
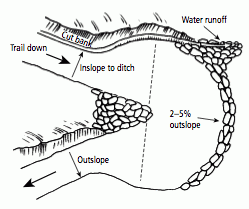
Where a trail crosses a hillside that has fine-textured, erodible soil, inslope the tread to a ditch, then divert water in the ditch across the trail and downhill through grade dips or culverts (Figure 14-8).
Divert Water Flowing Down the Tread
Where the tread has a relatively flat or concave cross-section, some water will run down the length of the trail. To prevent soil erosion, divert water off the tread with rolling grade or waterbars.
Rolling Grade
A rolling grade divides the trail into narrow watersheds with undulating crests and dips like a gentle roller coaster. Water drains off at the dips. Ideally, no part of the tread is completely level. Outslope the bottom of each dip and make the outlet wide enough to drain off water without clogging. Place tread dips at natural drainage ways and at other locations as needed. Rolling grade is most appropriate when traversing hill slopes (fall lines) of 20 to 70 percent. On hill slopes less than 20 percent, water does not drain well at the dips.
Drainage dips can deposit sediment into waterways. To reduce sedimentation, consider these alternatives: maintain a low tread grade on the approach to the drainage; design a small tread watershed with a short slope toward the waterway; harden the tread; or maintain a nearly level tread and install a boardwalk, bridge or culvert over the waterway.
Also use rolling grade to ascend/descend hillsides. In those situations, rolling grade is most effective when the tread grade is less than 1/4 to 1/3 of the hill slope. For example, if the hill slope is 45 percent, the tread grade should not exceed 15 percent, and 10 percent is preferred. As the trail climbs, periodically reverse the grade downhill for a few steps to create a dip that allows water to drain off.
Even when a trail is outsloped, insloped, or center-crowned, a rolling grade is desirable (Figure 14-9). These cross-sectional shapes are difficult to sustain over long periods without substantial maintenance.
Adjust the size of each tread watershed based on these factors:
- When the watershed above the tread is large, increasing the potential for runoff, make tread watersheds small.
- If the water infiltration rate of the upslope soil is slow, resulting in more potential runoff, make tread watersheds small.
- If the potential for erosion is high, make tread watersheds small. Hardening the tread, placing the trail beneath a tree canopy that will intercept precipitation and reduce splash erosion, or reducing tread width to minimize exposed soil will also reduce risk of erosion.
- Where trail grade is steep, make tread watersheds small or reduce the trail grade by lengthening the trail or adding switchbacks or turns. Tread erosion risk is relatively low when tread grade is less than 5 percent, moderate when tread grade is 5 to 10 percent, and higher when tread grade is greater than 10 percent.
- When hill grade is steep, make tread watersheds small. Tread dips drain best when there is a substantial difference between the tread grade and hill grade.
Waterbars
A waterbar is an obstruction placed across a trail tread to divert surface water off the tread. Waterbars may be needed on a sloping trail with a flat cross-section (no outslope) or where rolling grade is not adequate to divert water at tread dips. Because most waterbars create a significant bump in the trail, they are not desirable on trails used for bicycling, skiing, or snowmobiling. A rubber waterbar (Figure 14-10) can be used for bicycle trails. When waterbars are placed on horse trails, horses tend to compact the soil immediately above and below the water bar leading to depressions that collect water and mud. Horses also can damage waterbars because of their weight and strength. When used on horse trails, anchor waterbars well.
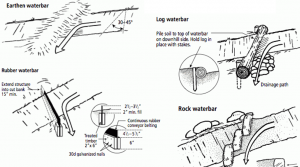
Place waterbars at a 30 to 45 degree angle across a trail. Where heavy runoff is expected, place stones at the outflow to disperse water without causing soil erosion.
If a waterbar diverts water into a ditch, make sure the bar does not protrude into the ditch where it might catch debris and block the ditch.
Use judgment and experimentation in spacing waterbars. Closer spacing is needed where the trail grade is steep, the soil is erodible, or you want a high quality tread without the expense of hardening materials.
Climbing and Descending Steep Slopes and Cliffs
Switchbacks
A switchback reduces trail grade by lengthening the trail in a zigzag pattern (Figure 14-11). Design each trail segment to conform to the desired grade as much as possible. Place a switchback where the trail reaches an impassable obstacle or begins to run too far in the wrong direction. Avoid closely spaced switchbacks to discourage trail users from taking shortcuts, leading to erosion. To further reduce shortcuts, locate switchbacks at interesting focal points (such as conspicuous tree, boulder, or rock outcrop) and place barriers (such as boulders, logs, thorny bushes) in the cutoff zone. Build the switchback platform with a 2 to 5 percent grade. On a very steep slope install a treadwall to support the platform, or install steps. If the main trail has a substantially higher grade than the platform, create a transition grade as the trail approaches the switchback platform. Divert surface water off the trail above the switchback by means of inslope to a ditch. The switchback turning radius must work for the intended users. Switchbacks may not be practical for skiers and snowmobilers because of the long turning radius they require.
Fixed Ropes
On a lightly used foot trail with a steep slope and soil that becomes slippery when wet, tie a rope (1/2” or larger diameter) to a firm object at the top of the slope and lay the rope along the tread or tie it to trees along the trail as a handrail.
Climbing Causeways (Turnpike)

When a slope has an uneven surface or is composed of erodible materials, a climbing causeway can build up the tread in short sections (Figure 14-12). A climbing causeway is useful on hiking and horse trails, but hazardous for skiers, snowmobilers, bicyclists, motorcyclists, and ATVs. Place 6- to 10-inch diameter logs or sawn timbers along each side of the tread to hold fill material in place. Using the same material, place crossbars at four-foot or longer intervals to prevent fill material from migrating downhill. Fill the spaces between logs with soil or gravel, varying the fill depth to create long steps that provide the desired grade. A climbing causeway is most useful on grades of 10 to 20 percent. For steeper grades, see the section on Steps, below.
Steps
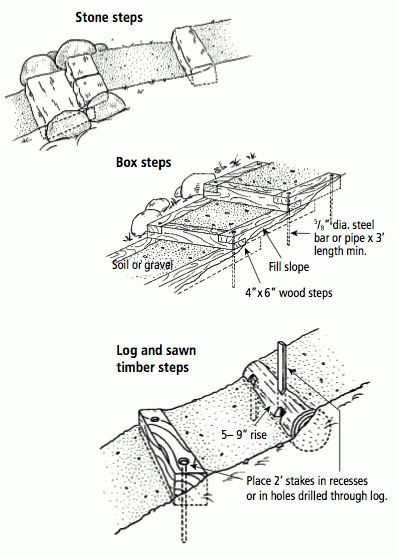
Where trail grade exceeds 20 percent, steps help prevent erosion while aiding hikers and horses (Figure 14-13). Make step height (rise) 5 to 9 inches (7.5 inches is ideal) and step depth (run) at least 10 inches. You can vary step depth up to several feet to fit the hill slope. Make simple steps by anchoring logs, sawn timbers, or large stones across the tread and back-filling with soil. Make more durable steps from 6- to 8-inch diameter logs or sawn timbers positioned into a three-sided box fastened with steel rods and backfilled with soil or gravel.
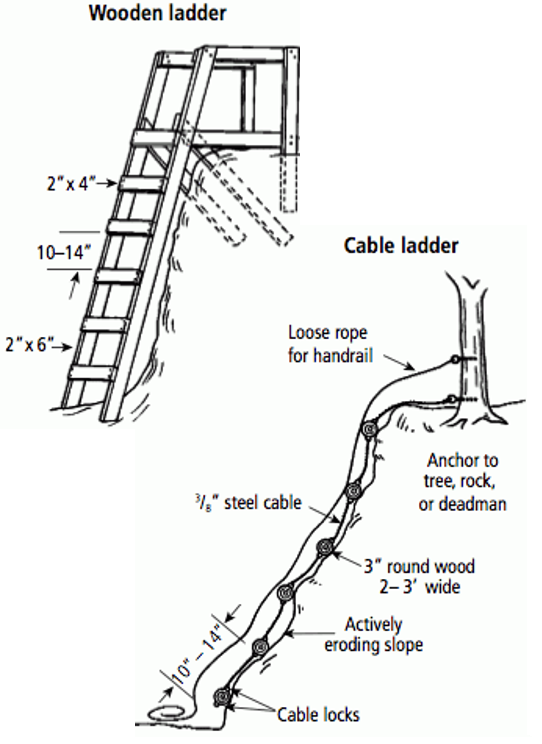
Ladders
A wooden ladder can be a good solution for helping hikers climb a steep slope or cliff (Figure 14-14). If you need a ladder longer than 16 feet, butt two long pieces of lumber together and nail an over-lapping reinforcement of 2” x 6” lumber across the joint. For longer ladders, build a platform at intervals of about 32 feet that allows users to get off the ladder and rest before ascending/descending another ladder. A platform at the top of a ladder permits users to safely get on and off.
On a primitive trail a flexible cable ladder that conforms to changing land contours can be used to climb a steep, actively eroding slope.
Crossing Wet Soil
Poorly drained soil on flat land may develop mud or water puddles after snowmelt or rainfall or where groundwater seeps from a hillside and flows across the trail. The solution is to raise the tread.
Corduroy Logs and Tree Cookies
On a primitive trail, corduroy logs, 6- to 10-inch in diameter, placed side by side across the trail will raise the tread and allow surface water to flow naturally between the logs (Figure 14-15). For added buoyancy in waterlogged soil, place log stringers along trail edges beneath the ends of corduroy logs. A corduroy tread is uneven and somewhat slippery but may be used for short distances by hikers, ATVs, skiers, and snowmobilers.
Tree cookies are cross-sections of tree stems cut at least 4 inches thick and 12 inches wide. On primitive trails, tree cookies may be used as steps for hikers, but they are extremely slippery when wet and often tip downward in soft soil causing the hiker to slip or fall. Corduroy logs or firmly imbedded stepping stones are safer!
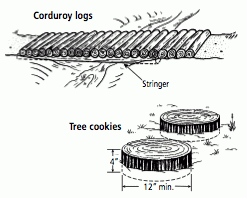
Select naturally decay-resistant wood for corduroy logs and tree cookies, although they may still last only a few years. These are primitive, low cost, temporary solutions to crossing muddy areas.
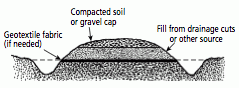
Drainage Lens
If surface water continually seeps slowly across a section of trail creating a perennial mudhole, a drainage lens that enables water to seep beneath the tread may be required (Figure 14-16). First excavate several inches of water-saturated soil in the trail bed, then backfill with a layer of large rocks. Add layers of progressively smaller rocks on top of the first layer, leaving large pore spaces between rocks at lower levels. Top this rock fill with soil or gravel to form the tread.
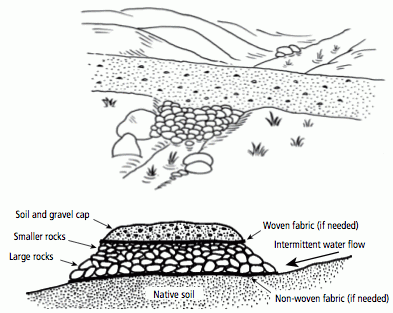
If saturated subsoil is extremely deep or unstable, first lay geotextile fabric on the ground, then add rock layers. Place additional geotextile fabric on top of the rocks and top with soil or gravel. Geo-textile fabric separates rock fill from the substrate, preventing soil from clogging pores between the rocks yet allowing water to percolate through the fabric and the fill material.
Causeways (Turnpike)
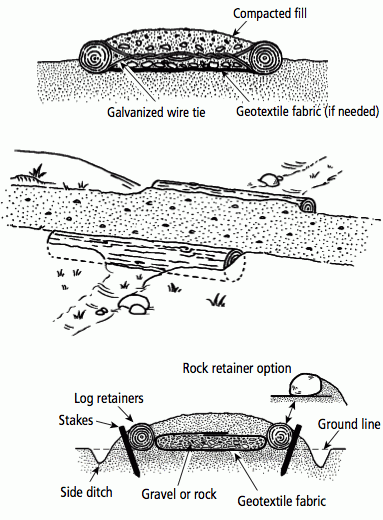
A causeway produces a raised tread that is suitable for all trail users (Figure 14-17). Place curbs made from logs, cut timbers, or rocks along both sides of the tread and fill the space between curbs with soil or gravel. If fill material is expected to sink into the substrate, first place geotextile fabric on the ground surface, then install curbs and fill material. If surface water actively flows across the site, place a ditch on one or both sides to divert water to culverts through the raised tread.
Center Crown with Ditches
A center crown is constructed like a highway with a raised tread and ditches on one or both sides (Figure 14-18). Use material from the ditches to raise the center tread if it is the appropriate texture. On very wet soils, place geotextile fabric on the ground surface before adding fill.
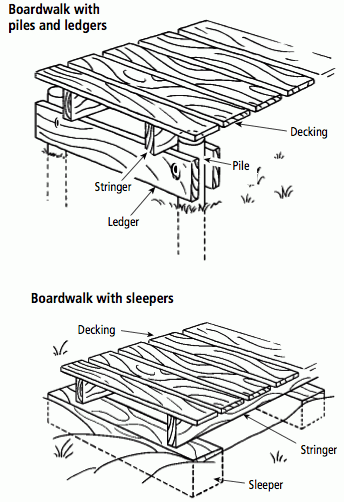
Boardwalks
A boardwalk enables trail users to cross over wetlands, fragile vegetation, or unstable soil.
On hiking trails make the boardwalk deck (tread) from 2” x 6” lumber. Use thicker lumber on boardwalks intended for heavier users, such as ATVs or horses. Full-sized boards are stiffer and last longer than typical 2” x 6” lumber that really is 1.5” x 5.5” (Figure 14-19).
Boardwalks are slippery when wet. To increase traction, orient deck boards at a 90-degree angle to the direction of travel and consider using rough-surfaced lumber (unplaned or split rather than sawn) or cover boards with a roughening product. Leave gaps between planks to further increase traction and to facilitate air movement that dries wood more quickly, lengthening its useful life. A 3/8” to 1/2” gap works well for most users. Closer spacing helps retain snow for skiing and snowmobiling. Wider spacing may be acceptable on primitive trails and for OHVs. Build the deck as level as possible for safety. Install steps on sloping ground, if compatible with trail uses.
Support the deck with stringers running beneath the deck. Orient stringers with the direction of travel. For weather protection, inset the stringer from the ends of deck boards. Space the stringers according to the stiffness of the materials–the stiffer the material the further the spacing (typically 18 to 30 inches). For example, wood-plastic composite lumber is not as stiff as sawn lumber, thus requiring closer stringer spacing.
Use one of the following to support stringers:
- Sleepers oriented 90° to the direction of travel and resting on the ground.
- Cribbing made from rocks or logs.
- Vertical posts (such as wooden poles or helical screws) sunk into the ground and spanned by ledgers. Sunken posts are the most stable, but there may be situations where you do not want to dig into the ground (such as rocky ground or organic soil).
On high-use boardwalks or those built more than two feet above ground, add a raised curb along each edge to help prevent users from stumbling off the boardwalk. Install a railing on one or both sides of a boardwalk that is more than four feet above the ground, crosses open water, or is intended for use by persons with mobility impairments. See more information about curbs and railings in the section on Bridges.
For decay resistance, select preservative-treated lumber, wood-plastic composite lumber, or naturally decay-resistant wood for boardwalk components. Some tropical hardwoods have a durable life of more than 50 years without chemical treatment, but are very expensive.
To cross deep water or connect trail users more closely with water environments, use a floating boardwalk. Make floats from thick styrofoam contained in wood or plastic, or from more durable sealed plastic or steel airtanks. Commercially available floating docks offer easy installation.
Crossing Waterways and Gullies
Stepping stones, fords, culverts or bridges help users cross open water in springs, streams, and rivers.
Stepping Stones and Fords
On a primitive trail, hikers might appreciate stepping stones that are firmly imbedded in the stream bottom (Figure 14-20). They might also wade across a slow-moving stream (less than two feet deep) through a ford. Horses can ford a slow-moving stream (less than three feet deep). Place a ford where the streambed has firm sand or gravel. On horse trails remove large rocks from the streambed to prevent tripping. If a small dam is installed to stabilize water depth and bottom structure, a government permit may be required.

Culverts
Install a culvert to channel water across a trail, allowing trail users to cross a narrow stream (Figure 14-21). An open-top log or rock culvert is easy to clean when it becomes clogged, but creates a hazard for some trail users.
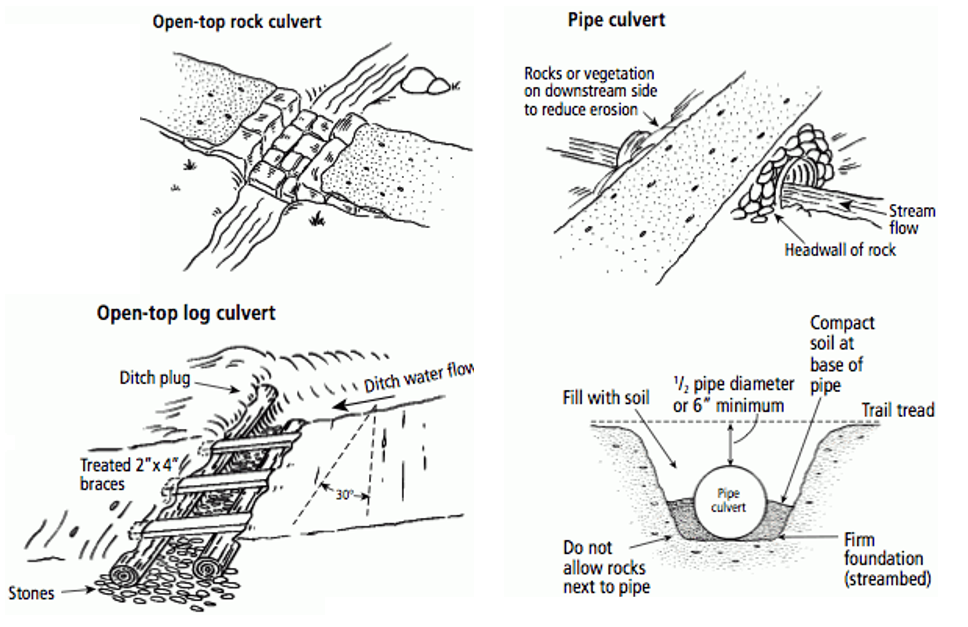
A pipe culvert covered with soil can be used by all trail user. Pipe culverts may be steel (durable, but heavy) or plastic (less durable, but lightweight for transporting into areas with difficult access). To permit fish movement on streams, a culvert should slope no more than 1 percent and its end must be flush with the stream bottom. Place rocks around the culvert’s upstream end to armor the bank against erosion.
Seek professional advice from a soil and water expert to gauge the appropriate diameter culvert to install. If the culvert is too small, high water will wash it out or flood land upstream from the culvert.
Bridges
Bridges are expensive to build and require a high level of expertise. Use them where necessary for safety or to protect natural resources. First consider other alternatives, such as trail re-alignment, culverts, causeways, or boardwalks. This section provides only general guidelines; seek engineering assistance for any bridge that is long or high. Because of cost, make bridges as short as possible by installing them where gaps are narrow. Select a location where the approach is relatively level and straight, and where you can build firm abutments at each end above the normal high water level.
Any construction in waters and wetlands that drain into or are connected to a navigable stream requires a U.S. Army Corp of Engineers 404 Permit. Bridges that span navigable waters must have a 3-foot minimum clearance above the ordinary high water level. Temporary bridges must have a 3-foot minimum clearance between the lowest portion of the bridge and normal summer stream flow.
Abutments

Abutments support the ends of the bridge and provide intermediate support for long bridges (Figure 14-22). If the terrain is subject to flooding, raise end abutments to elevate the bridge above flood level. On a primitive, lightly used trail, a very small bridge may be anchored with a cable on one end with the expectation that it will break loose during a flood, but can be retrieved and repositioned. Construct abutments from durable materials since they are in contact with ground moisture, and may deteriorate more quickly than stringers, decks, and railings. A sill is a simple abutment made from a single structure, such as log, sawn timber, gabion, or concrete. Sills require little excavation, but should be used only for small bridges that can move with frost heaving. A crib is a box-like structure made from logs or sawn timbers and filled with rocks. A retaining wall is an earth-retaining structure tied into the banks with a deadman. A retaining wall may be made from logs, sawn timbers, gabion, or concrete. Piles are wood or steel posts that are pounded or screwed down to a firm footing and cross-braced to prevent sway. To estimate the depth required to obtain a firm footing, drive a small diameter steel rod into the substrate.
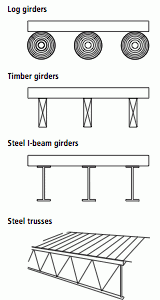
Girders and Trusses
Girders and trusses rest on top of the abutments and support the deck (tread). On a simple deck, they also may serve as the deck (Figure 14-23).
On a deck girder/truss bridge, the deck is fastened directly to two or more girders or trusses that span the gap. Girders may be logs, timbers, glue-laminated timbers, or steel I-beams. Trusses usually are steel beams with steel cross-braces.
Suspension Cables
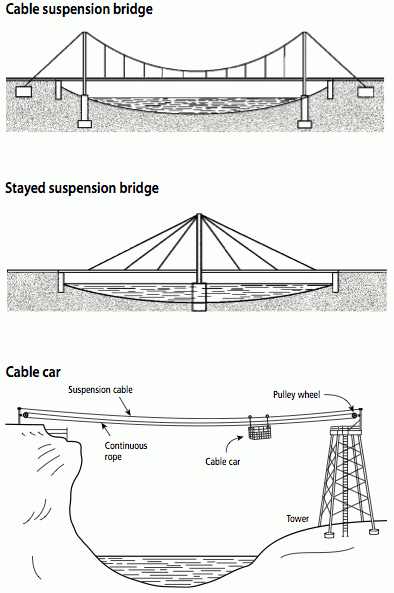
A suspension bridge is supported by two steel cables, one on each side of the deck, that span the gap. Suspender cables or steel rods hang down from the two support cables to support the deck below (Figure 14-24).
A stayed suspension bridge has multiple steel cables spread from the top of a tower down to the deck to support it.
A suspension cable car has a cargo box suspended by rollers from a single steel cable that spans the gap. A continuous loop rope, passed through pulleys at both ends of the bridge, can be grasped by the users while sitting in the cable car to pull the car across the gap.
Decks
The tread on a bridge is called a deck. If possible, build the deck to the same width as the tread on other parts of the trail. If railings are used, make the deck two to four feet wider or slant the railing outward at the top to provide more shoulder width. If the bridge deck is a different width from the approaching trail tread, gradually adjust the trail tread width as it approaches the bridge (Figure 14-25).
To prevent water from flowing down the trail and onto the bridge deck, create a drainage dip in the trail approach or elevate the bridge deck. Hikers can step up to a deck, but for other trail users the ends of the bridge deck must be flush in elevation with the approaching trail tread.
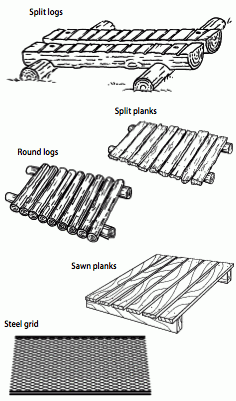
When estimating the strength needed for the deck, consider not only the weight of trail users, but snow loading, wind loading, and the weight of equipment that will cross the bridge. Select materials that will not be slippery when wet. Options for decks materials include split logs, sawn planks, wood-plastic composite lumber, steel grids, or fiberglass sheets bonded to shallow fiberglass structural shapes with coarse sand embedded into the gel coating to increase roughness. For more information on deck materials and placement, see Boardwalks.
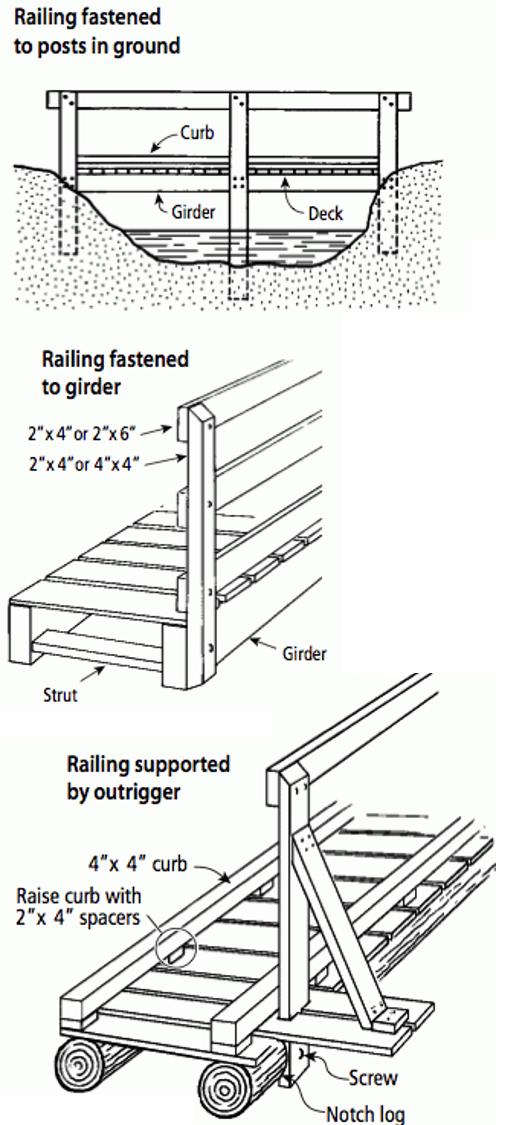
Curbs and Railings
Curbs or railings may be needed on boardwalks and bridges to protect users from hazards (such as steep drop-off, hot spring) and/or to protect trail-side resources (such as archeological sites, fragile vegetation, rare species; Figure 14-26).
On decks built more than two feet above ground, add a raised curb along each edge to help prevent users from stumbling off the edge. Fasten a 4″x 4″ timber or round log on each side of the deck held 2 inches above the deck by short sections of 2″x 4″ lumber. Gaps beneath the curb allow water and debris to wash off the edge.
In highly accessible areas where a deck is more than four feet above ground, crosses open water, or is used by persons with mobility impairments, install a railing on one or both sides. In more remote areas you might do without rails on decks less than eight feet above ground. If a railing is provided on only one side, place it on the side that exposes trail users to the greatest risk or where users turn to view an interesting scene. If the drop from a bridge or boardwalk is no more hazardous than other unprotected drops along the trail, a railing probably is not needed.
In remote areas design railings to match the level of risk and trail experience that you want to offer. In general make such railings at least 42 inches high for pedestrian traffic and at least 54 inches high for bicycle or horse traffic. Install one or more intermediate rails so the vertical distance between rails does not exceed 15 inches.
Railings attached to buildings, such as visitor centers, and on trail bridges in urban settings that are expected to attract unsupervised children must meet local building codes. The Uniform Building Code (UBC 509) requires a handrail at least 42 inches high that a 4-inch sphere will not pass through.
Railings on trail bridges frequently used by unsupervised children, especially near trailheads, must meet the American Association of State Highway and Transportation Officials (AASHTO) Standard Specifications for Highway Bridges. This code requires a handrail at least 42 inches high for pedestrian traffic and at least 54 inches high for bicycle or horse traffic. A 6-inch sphere must not pass through the railing in the bottom 27 inches and an 8-inch sphere must not pass through the area higher than 27 inches.
On a wheelchair-accessible trail where the grade is steeper than 5 percent, place a rail 30 to 34 inches above the deck so that a person in a wheelchair can grasp it to pull their wheelchair along or rest without rolling downhill, and place a second rail 42 inches above the deck.
Bridges for OHVs and snowmobiles must have reflective hazard markers visible above the snow level at each end of the bridge.
The strongest railings have vertical support posts that are anchored into the ground and fastened to the girders or stringers before extending up to the top railing. Somewhat less sturdy, but still strong railings can be fastened to the girders or supported by outriggers.
Cut vertical support posts lower than the top railing to encourage use of the railing.
Materials for Bridges
Select bridge construction materials for durability, strength, aesthetics, economics, and environmental acceptability.
Select wood that is naturally decay resistant or is treated with environmentally safe chemicals. On portions of trail bridges or boardwalks that trail users touch frequently, such as railings, use wood treated with waterborne chemicals or light solvent oilborne chemicals. Wood without a chemical preservative may last 2 to 12 years depending on its natural decay resistance, though some tropical woods resist decay for over 50 years.
Use steel that is painted or galvanized, unless it is a corrosion-resistant weathering steel. Do not use uncoated weathering steel in coastal areas or in areas with high rainfall, high humidity, or persistent fog. Concrete should have an air entrainment of 4 to 6 percent and a minimum design compressive strength of 3,000 pounds per square inch. Concrete can be texturized, colored, stained, or painted to better match esthetic values.
Fiberglass should have a waterproof, colored surface treatment to protect it from ultraviolet radiation.
Use screws and bolts, not nails. Use non-corrosive fasteners that are hot-dipped galvanized, anodized plated, or stainless steel.
Inspection
Inspect bridges at least twice a year. A qualified bridge inspector should evaluate bridges with long spans or complex designs.
Trails that Cross or Utilize Roads
Crossing Roads
As a trail approaches a road crossing, add a tight turn, ridges and dips in the tread, and/or narrow the clearing width to slow down users. On the final approach, the trail must be at a right (90 degree) angle to the road, nearly level, and have a sight distance adequate for trail users to see the oncoming road in time to stop. Expand the clearing width 1 1/2 to 2 times its normal width or thin forest trees to provide good visibility from the trail toward the road.
Install warning signs if trail users include horseback riders, skiers, snowmobilers, bicyclists, motorcyclists, or other motorized vehicle users that may not be able to stop suddenly. Work with the road authority to determine what signs to use and where to place them. If both the trail and road are lightly used and good sight lines are present, install a Yield or Stop sign on the trail at the road intersection. A Stop sign is not required for non-wheeled and pedestrian-speed users. If traffic along the trail or road is moderately heavy, add a Stop Ahead sign on the trail. If traffic along both the trail and road are heavy, add a Trail Crossing Ahead sign along the road to warn vehicle drivers.
If the trail may be entered from a public road, install a barrier (such as posts, a gate, boulders, mound of dirt) to prohibit unauthorized entry. Install a sign visible from the road that indicates which trail uses are prohibited or permitted.
Ditch Trails
Regulations governing trails in public road ditches vary by state. In some states, for example, low-use trails are permitted between the ditch and the outside edge of state and county road rights-of-way. Off-highway vehicles and snowmobiles may not use the inside slope, shoulder, and road surface of state and county roads. Motorized vehicles in a ditch are expected to travel in the direction of road traffic, so ditch trails are needed on both sides of a highway to permit two-way traffic. However, a bi-directional, non-motorized trail can be provided on one side of a highway only. Along designated ditch trails, utility poles, guy wires, and other trailside obstacles must be marked with a hazard marker. For safety purposes, ditch trails that are within 10 to 20 feet of the road edge should be separated from the road by a different elevation, fence, or guard rail. Separation is more critical where the road curves. All ditch trail design and construction is subject to approval by the local road authority.
Modifying Logging Roads
If a logging skid trail or haul road will be used both for logging and recreational use, it must be designed to accommodate logging equipment. If the skid trail or road will not be used for 10 years for logging purposes, then design it more like a recreational trail. When the time comes to use it for logging, make temporary modifications, such as harden the tread, install temporary stream crossing devices for heavy equipment, expand the clearing width, and install more durable culverts or other drainage devices.
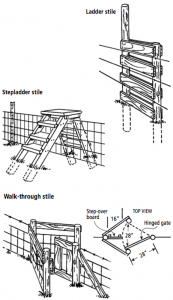
Crossing Fences and Gates
Fences may be necessary to restrain trail users from entering an area, to designate a property boundary, or to contain livestock. Hikers can cross a fence at a stile or a gate (Figure 14-27). A gate is necessary for all other users. Trail users may leave a gate open when it should be closed or closed when it should be left open. To keep a gate open, fasten it so that it cannot be closed. To keep a gate closed, place a spring or counterweight on the gate or tilt it to close automatically from its own weight. Install a latch that locks automatically when the gate closes and place a sign on the gate, Please Close Gate.
Gate width can help regulate the types of users. For example, a 2 1/2-foot-wide gate will admit hikers, skiers, and bicyclists, but exclude snowmobilers, horses, and ATVs. A 6-foot-wide gate will admit all users except full-sized SUVs and pickup trucks.
Some gates are more a visual barrier than a physical barrier, such as a single horizontal bar (log or steel pipe), steel cable, or several vertical posts spaced across the tread. This type of simple gate, along with a sign that defines what types of trail users may enter, will discourage some potential users, but some unauthorized trail users may go around or under the gate. If you are serious about keeping out certain types of users, your gate and adjoining fence must create a physical barrier. Other barriers also may be appropriate, such as an earthen berm, trench, or large boulders.
Reflectors are especially important safety features on gates that may be entered by motorized vehicles when gates are made from a single horizontal pole or cable that is not clearly visible at night.
Sign the Trail
Four types of signs may be needed: trailhead sign, confidence markers, directional signs, and warning signs.
Trailhead Sign
A trailhead sign may be needed when you have frequent visitors or allow public use on trails (Figure 14-28). It may include some or all of the following information:
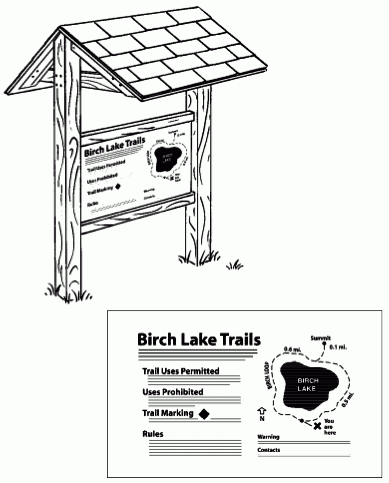
- Map showing trail route, key features along the trail, a “you are here” mark, north arrow, and map scale or distances along major trail segments.
- Name or number of trail—if there is more than one trail.
- Types of trail uses permitted (such as hiking, skiing, etc.) and uses specifically prohibited.
- How the trail is marked (such as paint marks, signs, rock cairns).
- Rules for trail use (such as stay on the trail, only skiers may use the trail when there is snow cover, pets must be on a leash, hikers get off the trail to let horses pass).
- Warnings, including hazards along the trail (such as poisonous plants, poisonous snakes, dangerous animals, steep cliffs, falling rocks, unsafe drinking water) and environmental features that must be protected (such as fragile vegetation, rare animals, natural spring).
- How to contact the landowner and emergency help (such as sheriff, fire, hospital).
Post trailhead information on a large rectangular board, sized to include all relevant information. To protect signs from weather, build a small roof over the sign board and/or enclose signs in a shallow box with a window.
Lay out the trailhead sign in components that can be changed without remaking the entire sign. Print signs in fade-resistant ink. (Photographs and some inks fade when exposed to sunlight.) Make letters at least 1 inch (72-point typeface) for headers and 1/4 inch (18-point typeface) for body text.
Confidence Markers
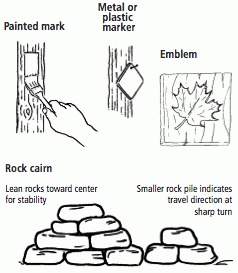
Confidence markers placed strategically along the trail reassure users that they are on the trail (Figure 14-29). Place them at least every 1/4 mile in open country and much closer where the trail could be lost, such as at significant turns, where the trail crosses roads or other trails, or where the tread is indistinct from the surrounding landscape.
- Paint marks on trees or rocks; use a template to create a geometric design, and change colors for different trails in the same area.
- Use aluminum nails to fasten 4″—6″ square steel, aluminum, or plastic diamonds to a tree, or preferably a post, so they are visible in both directions along the trail.
- Inscribe a board or order pre-fabricated markers with an emblem, trail number, or name routed, painted, or burned into it.
- Pile rocks to form a cairn. Such markers are easily destroyed by weather and vandals.
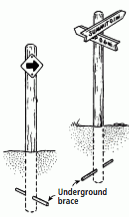
Directional Signs
A sign with an arrow may be needed in a parking lot to direct trail users to the trailhead or at a sharp bend, fork or trail crossing (Figure 14-30). At trail intersections, place a sign that provides information about where each trail leads and how far away the next significant feature can be found. Rounded posts provide the most flexibility in positioning directional signs to point in the correct direction. Fasten a crossbar beneath the soil to prevent vandals from twisting the post.
Warning Signs
The trailhead sign should alert trail users about hazards along the trail or environmental resources that require protection (Figure 14-31). Along moderately to heavily used trails place warning signs where trail users actually encounter hazardous situations or fragile environmental resources. A good warning sign will tell trail users what to do or not do, why, and what the consequences are. Be friendly, but persuasive. Consider using humor through your words or drawings. Drawings are as good as words if their meaning is clear.
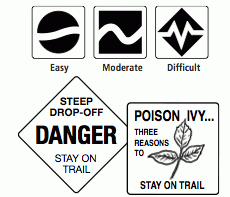
The following are poor warning signs because they give no reason for the required action:
- Stay Out!
- Keep Off
Here are better warning signs:
- Be polite, give a reason: “Please stay on the trail. Protect the fragile plants!”
- More forceful: “Stay behind the fence, dangerous water, strong currents!”
It may help to give a warning and explain the consequences: “$100 fine for walking on cryptobiotic soil!”
Trail users appreciate humor and still get the message:
- “Please stay on the trail so you don’t disturb the rattlesnakes.” (The real purpose is to keep people from trampling fragile vegetation.)
- “Please stay on the trail so you don’t trample the poison ivy.” (This may be the reason or it may be a way to keep trail users from short-cutting a switchback.)
You also can provide a mixture of signs along a trail, some that are polite and others that are more forceful:
- “Please stay on the trail to protect fragile wetland plants”
- “Walking on the trail is free. Walking on wetland vegetation costs $100”
Install Facilities
The most popular facilities and structures that support trail users include: access road, parking lot, toilet, box of trail maps, trash container, drinking water, picnic area, campground, and bear-proof food storage.
