8.7 Software and Technology Exercises
Learning Objectives
- Use dedicated project management software to manage changes to the work breakdown structure (WBS).
- Use the outline and subtotal features in a spreadsheet to create a low-complexity WBS.
- Use the outline feature in a word processor to create a low-complexity WBS.
Using Dedicated Project Management Software
General purpose software such as word processing or spreadsheet programs are not capable of managing changes in relationships between activities or determining the critical path. They might suffice for the simplest projects, but more sophisticated interactive programs are needed for determining the effects of changes to interconnected activities. Small projects performed by groups with limited budgets can use open-source software such as OpenProj.
To complete this exercise, you must have permission to download and install software on your computer or use a computer that has OpenProj installed on it.
Install OpenProj
Complete the exercise by following these instructions:
- Open a web browser and go to http://openproj.org. The program may be downloaded from this site, as shown in Figure 8.18 “Single User and Collaborative Versions”.
Figure 8.18 Single User and Collaborative Versions
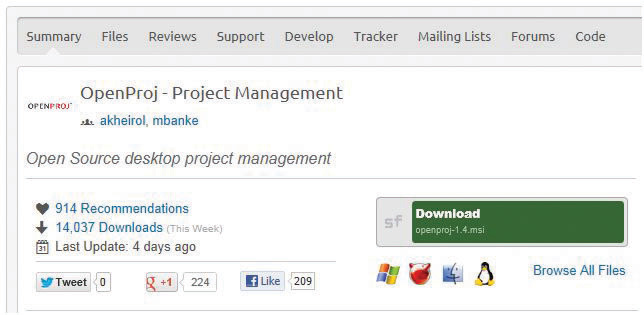
Source: Courtesy of Serena Software.
OpenProj is an open-source project management software that resembles Microsoft Project.
- Click the Download now button. You must have administrative privileges to install software on the computer you are using.
- Click the arrow next to the Save button, and then save this program to your computer in a location where you can find it again.
- Open Windows explorer or your file finder program, locate the file you downloaded, and then double-click on it. Run the installation program and follow the directions on the screen.
Figure 8.19 Single User and Collaborative Versions

Source: Courtesy of Serena Software.
- Open Windows explorer or your file finder program, locate the file you downloaded, and then double-click on it. Run the installation program and follow the directions on the screen.
- After OpenProj is installed, start the program. Choose to create a new project. In the New Project dialog box, in the Project Name box, type Ch08StudentName replacing StudentName with your name without spaces.
- In the Manager box, enter your name. The current date will display in the Start Date box by default. Your date will differ from the example shown in Figure 8.20 “Identify the Project and Its Manager”.
Figure 8.20 Identify the Project and Its Manager
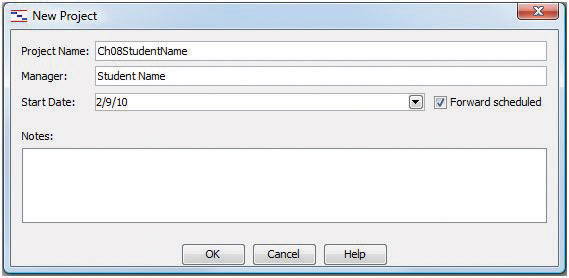
Source: Courtesy of Serena Software.
- Capture this screen. Paste it into a blank word processing document named Ch08OpenProjStudentName and save the file using the Word 2003 .doc file format.
- In OpenProj, click OK. Leave this program running for use in the next section.


Import WBS from Excel
- Use Windows Explorer to navigate to the location where the supplemental files for this chapter are stored. Download the Excel spreadsheet Ch08JohnsMove.xls and then open it in Excel.
- Select cells B3 through C36, as shown in Figure 8.21 “List of Activities and Their Durations Selected in a Spreadsheet”.
- Copy this range of cells to the clipboard. (Use CTRL+C in Windows.)
- Switch to the OpenProj window. In row 1, below Name, click the empty box. Paste the content. (Use CTRL+V in Windows.) The activities and their durations are placed in the project window, as shown in Figure 8.22 “List of Activities and Their Durations Pasted into OpenProj”.
Figure 8.22 List of Activities and Their Durations Pasted into OpenProj

Source: Courtesy of Serena Software.
- Capture this screen and paste it into Ch08OpenProjStudentName.doc.
- In OpenProj, move the pointer to the vertical line to the right of the Start column heading. Drag this line to the left to minimize the width of the Start column. Repeat this process to minimize the width of the End column to minimize both columns, as shown in Figure 8.23 “Reduce Size of Start and End Columns”.
Figure 8.23 Reduce Size of Start and End Columns

Source: Courtesy of Serena Software.
- In the first column, click the cell with a 2 in it. Press and hold the Shift key. In the first column, click the cell with a 5 to select rows 2 through 5.
- On the toolbar, click the Indent button. The four selected activities are indented as subordinate activities, and the activity in the row above becomes the group name. A black group symbol spans the group in the chart at the right, as shown in Figure 8.24 “Group Defined”.
Figure 8.24 Group Defined
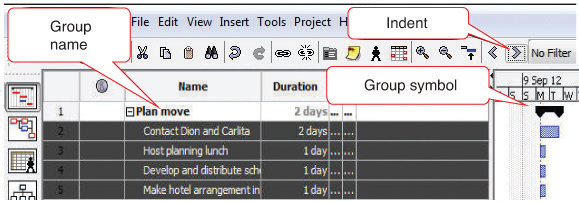
Source: Courtesy of Serena Software.
- In the Predecessor column, in rows 3–5, type 2, 3, and 2.
The Gantt chart at the right adjusts the positions of the bars automatically and connects them with arrows to indicate their finish-start relationship, as shown in Figure 8.25 “List of Activities and Their Durations Selected in a Spreadsheet”. Notice that Saturdays and Sundays are gray. They are not included as workdays. This will be addressed in a later step.
Figure 8.25 List of Activities and Their Durations Selected in a Spreadsheet
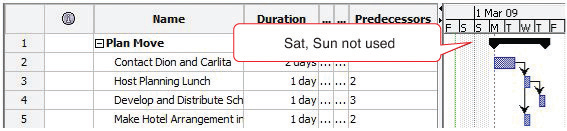
Source: Courtesy of Serena Software.
- Repeat this process to indent the activities under the Prepacking, Packing, Moving, Unpacking, and Project Closeout headings.
- Indent activities 16–19 another level to make them subactivities under Pack Apartment.
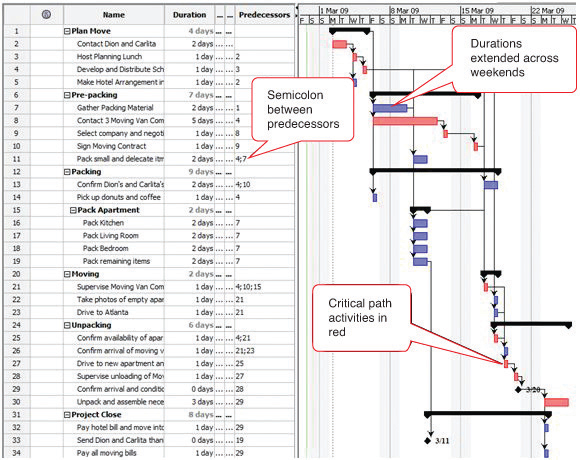
- Fill in the remaining predecessors. Refer to the Predecessors column on the John’s Move worksheet or Figure 8.25 “List of Activities and Their Durations Selected in a Spreadsheet” . Notice where two predecessors are indicated, they are separated by a semicolon. Notice that activities that span the weekend days are extended by two days, as shown in Figure 8.26 “Bar Chart Showing Durations and Relationships”.
Figure 8.26 Bar Chart Showing Durations and Relationships
Source: Courtesy of Serena Software.
- Capture this screen and paste it into Ch08OpenProjStudentName.doc.
- In OpenProj, on the menu bar, click File and then click Save. Navigate to a folder where you save your files for this class and save the project file. Notice the project file name extension is .pod. Leave the project open.
- Review your work in OpenProj and use the following rubric to determine its adequacy:
Element Best Adequate Poor File name Ch08StudentName.pod Ch08StudentName.pod Used a different name Use dedicated project management software to manage changes to the WBS Activities imported from Excel; correct groups; correct predecessors; dates will differ from figures Same as Best Mistakes with multiple predecessors; incorrect groupings - Review your work in Ch08OpenProjStudentName.doc and use the following rubric to determine its adequacy:
Element Best Adequate Poor File name Ch08OpenProjStudentName.doc Same name saved as .docx file Used a different name Use dedicated project management software to manage changes to the WBS Three screen captures that show the development of the WBS in OpenProj Same as Best Missing screens or lack of student name in first screen - Save the files and submit them as directed by the instructor.


Using the Subtotal and Outline Features in Excel 2007 for a Low-Complexity Work Breakdown Structure
Some advanced spreadsheet programs such as Microsoft Excel can sort tables of text and data. If the text is used as category labels, the sorting feature can be used to bring all the same type of expenses together, after which they can be subtotaled by category. The individual rows in each category can be hidden, and the category text and a subtotal for each column that contains numeric data such as durations or costs are displayed. This feature may be used to manage the costs or durations associated with each item in a work breakdown structure for a low-complexity project.
Create a WBS using the subtotal and outline features of Microsoft Excel 2007:
- Navigate to the folder where the student files for this chapter are located and then open Ch08JohnsMove.xls. Do not save the file—it will not be submitted.
- Observe that a group name has been given to each row of the WBS in column E.
- Click cell E1, and then type your name.
- On the Data tab, in the Outline group, click Subtotal. The Subtotal dialog box displays.
- Under At each change in click the arrow button. The program shows a list of column headings, as shown in Figure 8.27 “Subtotal Dialog Box”.
- On the list of column headings, click Group. A subtotal is calculated each time the label in this column changes.
- In the Subtotal dialog box, under Use function, click the arrow button and then click Sum.
- In the Subtotal dialog box, under Add subtotal to, next to Duration, click the check box. Click to remove any other check boxes under Add subtotal to if necessary. The durations will be summed for each group. Refer to Figure 8.28 “Subtotal Dialog Box Set to Sum the Durations for Each Type of Group”.
- Capture this screen. Open a blank word processing document and save it as Ch08WBSExcel2007StudentName.doc using the Word 2003 file format. On the first line, type your name and the current date. Below the date, paste the screen capture. Leave the file open.
- In Ch08JohnsMove.xls, in the Subtotal dialog box, click OK. Subtotals are inserted below each type of group label, as shown in Figure 8.29 “Subtotal Dialog Box Set to Sum the Durations for Each Type of Group”.
- Capture this screen and then paste it into Ch08WBSExcel2007StudentName.doc.
- In Ch08JohnsMove.xls, at the upper left corner of the worksheet, click the number 2. The detail of each type of group is hidden and the subtotals are displayed, as shown in Figure 8.30 “WBS Subtotaled and Collapsed”.
- Capture this screen and then paste it into Ch08WBSExcel2007StudentName.doc.
- At the upper left corner of the worksheet, click 3. The outline is expanded.
- On the Data tab, in the Outline group, click Subtotal. In the Subtotal dialog box, click the Remove All button. The subtotals and outline are removed.
- Close the spreadsheet. Do not save the changes.
- Review your work and use the following rubric to determine its adequacy:
Element Best Adequate Poor File name Ch08WBSExcel2007StudentName.doc Same as Best Chapter number or student name missing Use the outline and subtotal features in a spreadsheet to create a low-complexity work breakdown structure Name and date in first row; three screen captures that show the use of subtotal and outline Same as Best Name not in first line; name not shown in screen captures - Save the file and submit it as directed by the instructor.
Using the Outline Feature in Word 2007 for a Low-Complexity Work Breakdown Structure
Advanced word processing software includes an outlining feature that allows the user to work in an outline format with collapsible headings. This feature may be used to define a work breakdown structure in a low-complexity project.
Create a WBS using an outline in Microsoft Word 2007:
- Open MS Word 2007 and open a blank document. Save the file as Ch08WBSStudentName.docx using the Word 2007 document format that uses the .docx file extensions.
- On the Home tab, in the Styles group, scroll to display the Title option, and then click Title.
- Type John’s Move and then press Enter. The text is formatted using the title style as shown in Figure 8.31 “Title Style”.
- On the second line, type your name and then press Enter.
- On the third line, type the date and then press Enter. Notice that the title style does not apply to the following lines. The program’s default style is called the normal style.
- On the Home tab, in the Styles group, scroll and click Heading 1. Type Plan Move and then press Enter. The Heading 1 style is applied.
- On the Home tab, in the Styles group, click Heading 2. Type Contact Dion and Carlita and press Enter. Repeat this process to enter the following items formatted as Heading 2. Refer to Figure 8.32 “Title, Body Text, Heading 1, and Heading 2”.
- Host Planning Lunch
- Develop and Distribute Schedule
- Make Hotel Arrangement in Atlanta
- Prepacking
- Open a new blank word processing document. On the first line, type your name and the date. Save the new document as Ch08OutlineWord2007StudentName.doc using the Word 2003 file format.
- Switch to Ch08WBSStudentName.docx. Capture the screen that shows the outline at this point in the development of the exercise. Paste the screen into Ch08OutlineWord2007StudentName.doc. Save the file but leave it open.
- In Ch08WBSStudentName.docx, at the end of the line that begins with Contact Dion and Carlita, click to place the insertion point and then press Enter.
- Type Phone numbers are: Dion 555-0125, Carlita 555-0234. Observe that the additional text is formatted in normal style, similar to the name and date, as shown in Figure 8.33 “Screen Capture and Phone Numbers Added”.
- Select the line that begins with Pre-packing. On the Home tab, in the Styles group, click Heading 1. The Heading 1 style is applied.
- Use this process to fill in the remaining items in the WBS, as shown in Figure 8.34 “WBS with Three Levels”, using heading styles 1, 2, and 3.
- On the View tab, in the Document Views group, click the Outline button. Change the zoom, if necessary, to display all the document text, as shown in Figure 8.35 “WBS in Outline View”. Each heading is also formatted with a corresponding outline level of the same number.
- Capture this screen and paste it into Ch08OutlineWord2007StudentName.doc.
- In Ch08WBSStudentName.docx, on the Outlining tab, in the Outline Tools group, click the Show Level button, and then click Level 2. Text that is formatted with Headings 1 and 2 are displayed while the title, normal text, and lower-level headings are not. Plus signs indicate the presence of hidden text, as shown in Figure 8.36 “Display of Levels 1 and 2”.
- Capture this screen and paste it into Ch08OutlineWord2007StudentName.doc. Save Ch08OutlineWord2007StudentName.doc.
- In Ch08WBSStudentName.docx, on the Outlining tab, in the Close group, click the Close Outline View button. Save the document.
- Review your work and use the following rubric to determine its adequacy:
Element Best Adequate Poor File name Ch08OutlineWord2007StudentName.doc Same as Best but in .docx format Chapter number or student name missing Use the outline feature in a word processor to create a low-complexity WBS Name and date on first line; three screen captures that show the development and use of the WBS in Word 2007’s outline form using Heading styles 1, 2, and 3 Same as Best Missing information or screens File name Ch08WBSStudentName.docx Same as Best Chapter number or student name missing Use the outline feature in a word processor to create a low-complexity WBS Title style applied to the first line; normal style used for name, date, and phone numbers; heading styles 1, 2, and 3 used as directed; can be collapsed and expanded using the Outline view Same as Best Incorrect styles applied to some lines - Save the files and submit them as directed by the instructor.
