1.8 Software and Technology Exercises
Learning Objectives
- Download software from an Internet site and install it on a computer.
- Capture a computer screen and paste it into a word processing document.
- Create a folder of project management web addresses in a web browser.
Download and Install Adobe Reader
There are many programs that are useful for project managers that can be downloaded from a website. Some of them are free while others are trial versions or are available for a license fee. To download and install software on a computer, you must have administrative rights on that computer. If you are trying to use a computer at a company for your homework in this class, you probably do not have administrative rights to install software. You need to use a private computer on which you can log in as the administrator or as a user with rights to install software.
Alternatively, in some campus computer labs you are allowed to install software, but the computer is refreshed to its original configuration when the machine is restarted. If you use a computer in a common lab, be sure to complete the assignment before the machine is restarted.
In this exercise, you download and install Adobe Reader. This program allows you to read files that are saved in the PDF format. This format is very popular because it allows distribution of documents that may be easily viewed but not changed.
How to Download and Install Adobe Reader
- Using a web browser, go to https://get.adobe.com/reader/. The Adobe home page displays as shown in Figure 1.12 “Adobe Reader Download Page”.
Figure 1.12 Adobe Reader Download Page
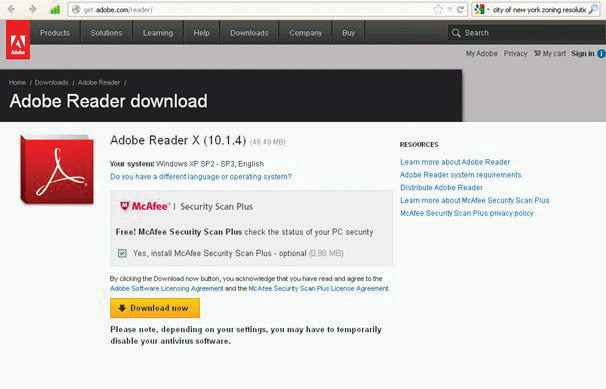
Source: Adobe product screenshot reprinted with permission from Adobe Systems Incorporated.
- Click the check boxes next to optional features, such as virus scans or toolbars, to deselect them and then click Download now.
- Follow the directions on the screen to install Adobe Reader.
- When the installation process is complete, the program is added to the list of available programs on your computer. It will start automatically whenever you try to open a file that is saved using the PDF file format.
- From the list of programs on your computer start Adobe Reader to confirm that it is successfully installed, as shown in Figure 1.13 “Adobe Reader Installed”.
Figure 1.13 Adobe Reader Installed

Source: Adobe product screenshot reprinted with permission from Adobe Systems Incorporated.
- Review your work and use the following rubric to determine its adequacy:
Element Best Adequate Poor File name N/A Downloaded software from an Internet site and installed it on a computer Program is installed and functioning Same as Best Did not allow time to find a computer on which software could be installed; process failed - Submit evidence of completion as directed by the instructor.


Download and Install Google Earth
There are many programs that are useful for project managers that can be downloaded from a website. Some of them are free while others are trial versions or are available for a license fee. To download and install software on a computer, you must have administrative rights on that computer. If you are trying to use a computer at a company for your homework in this class, you probably do not have administrative rights to install software. You need to use a private computer on which you can log in as the administrator or as a user with rights to install software.
Alternatively, in some campus computer labs you are allowed to install software, but the computer is refreshed to its original configuration when the machine is restarted. If you use a computer in a common lab, be sure to complete the assignment before the machine is restarted.
In this exercise, you download and install Google Earth. This program provides information that would be valuable to a project manager who needs to consider the implications of the location of a project.
How to Download and Install Google Earth
- Using a web browser, go to http://earth.google.com. The Google Earth home page displays as shown in Figure 1.14 “Google Earth Home Page”.
- Click the Download Google Earth button.
- Scroll through and review the Terms of Service. See Figure 1.15 “Terms of Service”.
- Click the Agree and Download button if you agree to abide by the terms. If not, contact your instructor for an alternative assignment.
- Choose a folder into which the file will be downloaded. The default choice in Windows is usually the Downloads folder in My Documents. Make note of where the file will be placed so you can find it in the next step.
The file that is downloaded is a program that can be executed by clicking the file name. It is an installation program that manages the rest of the download and installation process. In some browsers, the option to click the file name is available from the browser window, and in others, you must use a file management program like Windows Explorer to find the file and then double-click the file name. This process is typical of most programs that you download and install.
- Click or double-click the file name to start the installation. A security warning box may display seeking your permission to install a program, as shown in Figure 1.16 “Permission to Run the Installation Program”. Only programs from trusted sites should be installed.
- Click the Run button. The program will contact the Google Earth website and begin the process of downloading the main part of the program. A window with a progress bar displays to indicate how much of the file has been successfully transferred, as shown in Figure 1.17 “Progress Bar”.
- When the installation process is complete, the program starts. Any location on earth may be entered, and a satellite image with a variety of accompanying information is displayed, as shown in Figure 1.18 “Google Earth Installed”.
- Enter a location of your choice in the Fly to box and then press Enter.
- Capture the screen and then paste it into a word processing document.
- Review your work and use the following rubric to determine its adequacy:
Element Best Adequate Poor File name N/A Downloaded software from an Internet site and installed it on a computer Program is installed and functioning Same as Best Did not allow time to find a computer on which software could be installed; process failed - Submit evidence of completion as directed by the instructor.
Capture a Screen Using Windows XP and the Print Screen Button
The operating system of your computer manages the display on the monitor or screen. The operating system can make a copy of the screen and save it to disk or to the clipboard—a temporary storage area—and then the image of the screen can be pasted into a word processing document. The document can be saved and then attached to an e-mail or otherwise sent to team members. This skill might be used to illustrate a computer problem, illustrate a point, or prove that you have followed directions properly.
How to Capture a Screen Using Windows XP and the Print Screen Button
- Open a blank document in your word processing program.
- Save the file to a folder of your choice, such as Ch01StudentName, where you use your name without spaces in place of StudentName. Save the file as a Word 97–2003 file type. Your display may show the .doc file extension that is characteristic of the file type if it is set to display file extensions. See Figure 1.19 “File Name in Save As Dialog Box”.
- In the first line of the document, type Chapter 1 Exercises by StudentName where you replace StudentName with your name. Press the Enter key to move the insertion point to the next line, as shown in Figure 1.20 “Document with Insertion Point on Second Line”.
- Leave this document open. Start a web browser. Use the browser to go to http://maps.google.com. The Google Maps page displays.
- On the keyboard, find the PrntScrn button. This is the Print Screen button. (Some laptop computers do not have a PrntScrn button. If you have a laptop with Windows XP and no PrntScrn button, use a search engine like Google to find a free screen capture software like ScreenHunter, and then install it.)
- Press the PrntScrn button. An image of the screen is saved in a temporary memory area called the Windows clipboard.
- Switch to the word processing document. Click below the first line of text. Hold the Control (CTRL) key and then press the V key to paste the image from the clipboard.
- Press the Enter key twice to create a new empty line below the image. See Figure 1.21 “Capture of the Google Maps Screen with Insertion Point below the Image”.
- Review your work and use the following rubric to determine its adequacy:
Element Best Adequate Poor File name Ch01StudentName in the Word 2003 format where StudentName is replaced by your name Same as Best Different file name than specified without the student’s name Download software from an Internet site and install it on a computer Title; screen capture of the Google Maps site; insertion point below the image Title plus screen capture; insertion point on same line as image Missing title - Save the file and submit it as directed by the instructor.
Capture a Screen Using Windows Vista or Windows 7
The operating system of your computer manages the display on the monitor or screen. The operating system can make a copy of the screen and save it to disk or to the clipboard—a temporary storage area—and then the image of the screen can be pasted into a word processing document. The document can be saved and then attached to an e-mail or otherwise sent to team members. This skill might be used to illustrate a computer problem, illustrate a point, or prove that you have followed directions properly.
How to Capture a Screen Using Vista or Windows 7 and the Snipping Tool
- Open a blank document in your word processing program.
- Save the file to a folder of your choice, such as Ch01StudentName where you use your name in place of StudentName. Save the file as a Word 97–2003 file type. Your display may show the .doc file extension that is characteristic of the file type if it is set to display file extensions. See Figure 1.19 “File Name in Save As Dialog Box”.
- In the first line of the document, type Chapter 1 Exercises by StudentName where you replace StudentName with your name. Press the Enter key to move the insertion point to the next line, as shown in Figure 1.20 “Document with Insertion Point on Second Line”.
- Leave this document open. Start a web browser. Use the browser to go to http://maps.google.com. The Google Maps page displays.
- Click the Windows Start button to display a menu of options.
- On the menu of options, click All Programs.
- On the menu of programs, click the Accessories folder.
- On the menu of accessories, click Snipping Tool.
- In the Snipping Tool, click the New Snip button arrow and then click Window Snip.
- Click anywhere on the screen. In the Snipping Tool dialog box, on the toolbar, click the Copy button.
- Switch to the word processing document. Click below the first line of text. Hold the CTRL key, and then press the V key to paste the image from the clipboard.
- Press the Enter key twice to create a new empty line below the image. See Figure 1.21 “Capture of the Google Maps Screen with Insertion Point below the Image”.
- Review your work and use the following rubric to determine its adequacy:
Element Best Adequate Poor File name Ch01StudentName in the Word 2003 format where StudentName is replaced by your name Same as Best Different file name than specified without the student’s name Capture a computer screen and paste it into a word processing document Title; screen capture of the Google Maps site; insertion point below the image Title plus screen capture; insertion point on same line as image Missing title - Save the file and submit it as directed by the instructor.
Capture a Screen Using OSX on a Mac
The operating system of your computer manages the display on the monitor or screen. The operating system can make a copy of the screen and save it to disk or to the clipboard—a temporary storage area—and then the image of the screen can be pasted into a word processing document. The document can be saved and then attached to an e-mail or otherwise sent to team members. This skill might be used to illustrate a computer problem, illustrate a point, or prove that you have followed directions properly.
How to Capture a Screen Using OSX on a Mac
- Open a blank document in your word processing program.
- Save the file to a folder of your choice, such as Ch01StudentName where you use your name in place of StudentName. Save the file as a Word 97–2003 file type. Your display may show the .doc file extension that is characteristic of the file type if it is set to display file extensions. See Figure 1.19 “File Name in Save As Dialog Box”.
- In the first line of the document, type Chapter 1 Exercises by StudentName where you replace StudentName with your name. Press the Enter key to move the insertion point to the next line, as shown in Figure 1.20 “Document with Insertion Point on Second Line”.
- On the keyboard, press Command + Control + Shift + 3. An image of the screen is saved in the clipboard.
- Switch to the word processing document. Click below the first line of text. Hold the CTRL key, and then press the V key to paste the image from the clipboard.
- Press the Enter key twice to create a new empty line below the image. See Figure 1.21 “Capture of the Google Maps Screen with Insertion Point below the Image”.
- Review your work and use the following rubric to determine its adequacy:
Element Best Adequate Poor File name Ch01StudentName in the Word 2003 format where StudentName is replaced by your name Same as Best Different file name than specified without the student’s name Capture a computer screen and paste it into a word processing document Title; screen capture of the Google Maps site; insertion point below the image Title plus screen capture; insertion point on same line as image Missing title - Save the file and submit it as directed by the instructor.
Create a Folder of Bookmarks in a Web Browser in Chrome
You will visit sites that contain supporting information and useful templates. To save the addresses of these sites, you can create in a folder named Project Management in your web browser.
How to Create a Folder of Bookmarks in Google Chrome
- Open your web browser program. In the address box, type http://maps.google.com and then press Enter. The Google Maps home page displays as shown in Figure 1.22 “Google Maps Home Page”.
- On the toolbar, click the Bookmarks button. The Bookmark Added dialog box displays.[1]The default location for the bookmark is the Bookmarks bar, which is a toolbar that contains links to the websites. It is also a folder.
- In the Bookmark dialog box, click the Close button. The web address for http://maps.google.com is placed in the Bookmarks bar folder and is available for display on the toolbar.
- On your keyboard, at the lower left, locate the Control (CTRL) key. Press and hold the CTRL key, and then on the keyboard press B.[2] The Bookmark toolbar displays, as shown in Figure 1.23 “Chrome Bookmarks Bar”.
- On the toolbar above the Bookmarks bar, click the Tools button. On the menu, click Bookmark Manager. The Bookmark Manager dialog box displays, as shown in Figure 1.24 “Chrome Bookmark Manager Dialog Box”.
- In the Bookmark Manager dialog box, on the toolbar, on the Organize button, click the small arrow.[3]
In the menu, click New Folder. The New Folder dialog box displays. - In the New Folder dialog box, in the Name box, type Project Management and then click OK. The Project Management folder is added to the Bookmarks bar as shown in Figure 1.25 “Folder Added to the Bookmarks Bar”.
- On the toolbar, click the Tools button. On the menu, click Bookmark manager. The Bookmark manager dialog box displays, as shown in Figure 1.26 “Managing Bookmarks”.
- Move the mouse pointer onto Google Maps. Press and hold the left mouse button and move the mouse to move the pointer on the screen to the Project Management folder in either pane of the dialog box.[4]
The link is moved into the Project Management folder. - In the Bookmark Manager dialog box, in the left pane, click the Project Management folder. The link to Google Maps is displayed in the right pane to indicate that it is now in the Project Management folder. The link to Google Maps displays in the pane to the right, as shown in Figure 1.27 “Link Placed in the Project Management Folder”.
- Use the skills you practiced previously to capture an image of this dialog box and then paste it into Ch01StudentName.doc.
- In the Bookmark Manager dialog box, in the upper right corner, click the close button.[5]
Close the Chrome web browser. - Start the Chrome browser again. On the Bookmarks bar, click the Project Management folder. The link to Google Maps is displays under the Project Management folder on the Bookmarks bar, as shown in Figure 1.28 “Project Management Folder on the Chrome Bookmarks Bar”.
- Click the link to Google Maps. The Google Maps home page displays. Close the browser.
- Review your work and use the following rubric to determine its adequacy:
Element Best Adequate Poor File name Ch01StudentName.doc Same name using .docx format Does not include student name in file name Create a folder of project management web addresses in a web browser Folder named Project Management on the Bookmarks toolbar with a working link to Google Maps Same as Best Project Management folder without a working link to Google Maps or just a link to Google Maps as one of the Favorites but not in a folder - Submit evidence of completion as directed by the instructor.
Create a Folder of Bookmarks in a Web Browser in Firefox 3
You will visit sites that contain supporting information and useful templates. To save the addresses of these sites, you can create a folder named Project Management in your web browser.
How to Create a Folder of Bookmarks in Mozilla Firefox 3
- Open your web browser program. In the address box, type http://maps.google.com and then press Enter. The Google Maps home page displays as shown in Figure 1.29 “Firefox 3 Browser”.
- On the toolbar, click the Bookmarks button. The Edit This Bookmark dialog box displays[6]
as shown in Figure 1.30 “Bookmark Dialog Box in Firefox”. The default location for the bookmark is the Unsorted Bookmarks. - In the Edit This Bookmark dialog box, click the Done button. The web address for http://maps.google.com is placed in the list of unsorted bookmarks, and the Bookmarks toolbar displays, as shown in Figure 1.31 “Firefox Bookmarks Bar”.
- On the Menu bar, click Bookmarks. On the menu, click Organize Bookmarks. The Library dialog box displays, as shown in Figure 1.32 “Library of Bookmarks in Firefox”.
- In the Library dialog box, in the left pane, click Bookmarks Toolbar. On the Library dialog box, on the toolbar, click Organize. On the menu, click New Folder. The Add Folder dialog box displays.
- In the Add Folder dialog box, in the Name box, type Project Management as shown in Figure 1.33 “Folder Added to the Bookmarks Bar”.
- In the Add Folder dialog box, click the Add button. The new folder is added to the Bookmarks toolbar.
- In the Library dialog box, in the left pane, click the arrow to the left of Bookmarks Toolbar to show its subfolders. The Project Management folder displays as a subfolder.
- In the Library dialog box, in the left pane, click Unsorted Bookmarks to show its bookmarks. Locate the link to Google Maps, as shown in Figure 1.34 “Managing Bookmarks”.
- Move the mouse pointer onto Google Maps. Press and hold the left mouse button and move the mouse to move the pointer on the screen to the Project Management folder in the left pane of the dialog box.[7]
The link is moved into the Project Management folder. - In the Library dialog box, in the left pane, click the Project Management folder. The link to Google Maps is displayed in the right pane to indicate that it is now in the Project Management folder, as shown in Figure 1.35 “Link Placed in the Project Management Folder”.
- In the Library dialog box, in the upper right corner, click the Close button.[8]
Close the Firefox web browser. - Start the Firefox browser again. On the Bookmarks bar, click the Project Management folder. The link to Google Maps displays under the Project Management folder on the Bookmarks bar, as shown in Figure 1.36 “Project Management Folder on the Bookmarks Bar”.
- Capture this screen and paste it into a blank word processing document. Save the document as Ch01StudentName.doc
- In the browser, click the link in the Project Management folder to Google Maps. The Google Maps home page displays. Close the browser.
- Review your work and use the following rubric to determine its adequacy:
Element Best Adequate Poor File name N/A Create a folder of project management web addresses in a web browser Folder named Project Management on the Bookmarks toolbar with a working link to Google Maps Same as Best Project Management folder without a working link to Google Maps or just a link to Google Maps as one of the Favorites but not in a folder - Submit evidence of completion as directed by the instructor.
Create a Folder of Bookmarks in a Web Browser in Internet Explorer 8
You will visit sites that contain supporting information and useful templates. To save the addresses of these sites, you can create a folder named Project Management in your web browser.
How to Create a Folder of Favorites in Internet Explorer 8
- Open your web browser program. In the address box, type http://maps.google.com and then press Enter. The Google Maps home page displays as shown in Figure 1.37 “Google Maps Home Page”.
- On the toolbar, click the Favorites button. The Add to Favorites menu displays as shown in Figure 1.38 “Add to Favorites Menu”.
- To the right of Add to Favorites, click the arrow.[9]
On the menu, click Add to Favorites bar. Click outside the menu to close it. The web address for maps.google.com is placed in the Favorites toolbar and the toolbar is displayed, as shown in Figure 1.39 “Internet Explorer Favorites Toolbar”. - On the Favorites toolbar, click the Favorites button. On the menu, click the Add to Favorites arrow. On the menu, click Organize Favorites. The Organize Favorites dialog box displays, as shown in Figure 1.40 “Internet Explorer Favorites Dialog Box”. Your favorites and folders will be different from those shown.
- In the Organize Favorites dialog box, click the New Folder button. A new folder is added with the default name—New Folder—selected and ready to be replaced.
- Type Project Management and then press Enter. The Project Management folder is added at the bottom of the list of favorite links and folders, as shown in Figure 1.41 “Folder Added to the List of Favorites”.
- Locate the Favorites Bar folder on the list of favorites. Drag the Project Management folder onto the Favorites Bar folder and release the mouse button. The Project Management folder is a subfolder of the Favorites Bar, as shown in Figure 1.42 “Project Management Folder Moved into the Favorites Bar Folder”.
- In the Organize Favorites dialog box, drag the Google Maps link onto the Project Management folder. The link to Google Maps is placed in the Project Management folder.
- Click the Project Management folder. The Google Maps link displays in the Project Management folder, as shown in Figure 1.43 “Google Maps Link in the Project Management Subfolder”.
- In the Bookmark Manager dialog box, click the Close button. Close the web browser.
- Start the Internet Explorer browser again. On the Favorites toolbar, click the Project Management folder. The link to Google Maps displays under the Project Management folder on the Bookmarks bar, as shown in Figure 1.44 “Project Management Folder on the Internet Explorer Bookmarks Bar”.
- Capture this screen and paste it into Ch01StudentName.doc.
- In the browser, click the link to Google Maps. The Google Maps home page displays. Close the browser.
- Review your work and use the following rubric to determine its adequacy:
Element Best Adequate Poor File name Ch01StudentName.doc .docx format Student name not in file name Create a folder of project management web addresses in a web browser Folder named Project Management on the Favorites toolbar with a working link to Google Maps Same as Best Project Management folder without a working link to Google Maps or just a link to Google Maps as one of the Favorites but not in a folder - Submit evidence of completion as directed by the instructor.
Create a Folder of Bookmarks in a Web Browser in Internet Explorer 9
You will visit sites that contain supporting information and useful templates. To save the addresses of these sites, you can create a folder named Project Management in your web browser.
How to Create a Folder of Favorites in Internet Explorer 9
- Open your web browser program. In the address box, type http://maps.google.com and then press Enter. The Google Maps home page displays as shown in Figure 1.45 “Google Maps Home Page”.
- On the toolbar, click the View Favorites button, and then click the Add to Favorites button. The Add a Favorite dialog box displays as shown in Figure 1.46 “Add a Favorite Dialog Box”.
- Click the New Folder button. In the Create a Folder dialog box, in the Folder Name box, type Project Management. Confirm that Favorites is chosen in the Create in box, as shown in Figure 1.47 “Create a New Folder”.
- Click the Create button.
- In the Add a Favorite dialog box, observe that the new folder displays in the Create in box, as shown in Figure 1.48 “Internet Explorer Add a Favorite Dialog Box”.
- Click the Add button.
- Click the View Favorites button. Click the Favorites tab, if necessary. Scroll to the new Project Management folder and then click it. The link to Google Maps is stored within the Project Management folder, as shown in Figure 1.49 “Google Maps Link in the Project Management Folder”.
- In the Bookmark Manager dialog box, click the Close button. Close the web browser.
- Capture this screen and paste it into Ch01StudentName.doc.
- In the browser, click the link to Google Maps. The Google Maps home page displays. Close the browser.
- Review your work and use the following rubric to determine its adequacy:
Element Best Adequate Poor File name Ch01StudentName.doc .docx format StudentName not in file name Create a folder of project management web addresses in a web browser Folder named Project Management on the Favorites toolbar with a working link to Google Maps Same as Best Project Management folder without a working link to Google Maps or just a link to Google Maps as one of the Favorites but not in a folder - Submit evidence of completion as directed by the instructor.
Create a Folder of Bookmarks in a Web Browser in Safari
You will visit sites that contain supporting information and useful templates. To save the addresses of these sites, you can create a folder named Project Management in your web browser.
How to Create a Folder of Bookmarks in Apple Safari
- Open your web browser program. In the address box, type http://maps.google.com and then press Enter. The Google Maps home page displays as shown in Figure 1.50 “Safari Browser”.
- On the toolbar, click the Bookmarks button. A dialog box displays[10]as shown in Figure 1.51 “Dialog Box in Safari”. The default location for the bookmark is the Bookmarks bar.
- In the dialog box, click the Add button. The web address for http://maps.google.com is placed on the Bookmarks toolbar, as shown in Figure 1.52 “Safari Bookmarks Bar”.
- On the Menu bar, click Bookmarks. On the menu, click Add Bookmarks Folder. The Bookmarks dialog box displays, as shown in Figure 1.53 “New Folder”.
- In the Bookmarks dialog box, with untitled folder selected, type Project Management as shown in Figure 1.54 “Folder Added to the Bookmarks Bar”.
- In the Bookmarks dialog box, in the Collections pane, click Bookmarks Bar to display its contents. The Google Maps link displays in the right pane.
- Move the mouse pointer onto Google Maps. Drag the Google Maps link onto the Project Management folder. The link is moved into the Project Management folder.
- In the Bookmarks dialog box, in the left pane, click the Project Management folder. The link to Google Maps is displayed in the right pane to indicate that it is now in the Project Management folder, as shown in Figure 1.55 “Link Placed in Project Management Folder”.
- Use the skills you practiced previously to capture an image of this dialog box. If necessary, open Ch01StudentName.doc. Paste the screen capture below the previous screen. Save the file and leave it open.
- From the Collections pane, drag the Project Management folder onto the Bookmarks toolbar. The Project Management folder is added to the Bookmarks toolbar, as shown in Figure 1.56 “Project Management Folder on Bookmarks Toolbar”.
- In the Bookmarks dialog box, in the upper left corner, click the close button.[11]
Close the Safari web browser. - Start the Safari browser again. On the Bookmarks bar, click the Project Management folder. The link to Google Maps displays under the Project Management folder on the Bookmarks bar, as shown in Figure 1.57 “Project Management Folder on Bookmarks Toolbar”.
- Capture this screen and paste it into a blank word processing document. Save the document as Ch01StudentName.doc.
- In the browser, click the link to Google Maps. The Google Maps home page displays. Close the browser.
- Review your work and use the following rubric to determine its adequacy:
Element Best Adequate Poor File name Ch01StudentName.doc Same as Best Other word processing program format Create a folder of project management web addresses in a web browser Folder named Project Management on the Bookmarks toolbar with a working link to Google Maps Same as Best Project Management folder without a working link to Google Maps or just a link to Google Maps as one of the Favorites but not in a folder - Submit evidence of completion as directed by the instructor.
- This assumes that you have not previously added this site as a bookmark. ↵
- In the future, this sequence of holding the Control key and pressing another key will be written with a plus sign (e.g., Ctrl + B). ↵
- This is an example of Microsoft syntax. In the future, the process of clicking the arrow on a button will be shortened (e.g., click the Organize arrow). ↵
- In the future, description of this type of process will be shortened (e.g., drag Google Maps to the Project Management folder). ↵
- In the future, description of this process will be shortened (e.g., close the dialog box). ↵
- This assumes that you have not previously added this site as a bookmark. ↵
- In the future, description of this type of process will be shortened (e.g., drag Google Maps to the Project Management folder). ↵
- In the future, description of this process will be shortened (e.g., close the dialog box). ↵
- In the future, arrows associated with buttons will be referred to with the button name (e.g., click the Add to Favorites button). ↵
- This assumes that you have not previously added this site as a bookmark. ↵
- In the future, description of this process will be shortened (e.g., close the dialog box). ↵
