27 Feline OvarioHysterEctomy Student Study Guide, OHE Quiz, Assessment Rubric, OHE 9 steps (one page) and DETAILED OHE STEPS
INDEX
Introduction p1
Helpful Background Information on OHE p1
Where to Gain More Surgical Experience p2
1) Feline OHE Student Study Guide (3 pages) p4 guide w/links to pictures/videos p3
2) Quiz Based on Study Guide p3
3) Quiz Answers p3
4) Feline OHE Rubric p3
5) Feline OHE steps only (1 page) p4
6) Feline OHE DETAILED STUDY GUIDE More detail and TidBits, links to pictures, videos p4-12
Introduction
I spent the first 10 years of my career in private practice and enjoyed all aspects of veterinary medicine! Then a friend and classmate asked me to join her at a busy humane society and I was introduced into the world of HQHVSN (high quality, high volume, spay, neuter), shelter medicine, animal neglect, abuse and cruelty cases, and the shocking revelation to me, that veterinarians only see about 50% of pets in the USA. After 7 years at the shelter, I joined MNSNAP, a mobile spay/neuter service for several years, that I loving call “the marine corps of spay/neuter.” I also worked at Mission Animal Hospital, a sliding fee scale clinic for several years and MNPETS an at home euthanasia service, which was a very profound experience helping owners say goodbye to their beloved pets.
My dream job teaching veterinary students opened up in 2018 as Clinical Skills coordinator and instructor in surgery courses at U of MN, CVM. Having worked with veterinary students since my internship year, I have observed several challenges common among some veterinary students during live animal OHE procedures. This eBook is an attempt to document for student review the important surgical concepts and TidBits, to help students perform feline OHE competently, and with confidence that comes with knowledge and of course practice of the surgical skills.
This eBook will be augmented and improved as I receive feedback from students and instructors, so it will be an evolving project! This e-book is for instructional purposes for veterinary students currently enrolled in a veterinary school program. This eBook is designed to augment the learning experience with direct supervision by DVM’s not a stand alone how to spay manual. Make sure you prepare well and ask questions to augment your understanding of this procedure.
The Veterinary Oath which all DVMs graduating in the US say aloud at graduation, asks us to be the best we can be as we learn and grow in our life long journey as veterinarians.
**Please note this is one of many ways to perform a feline OHE, it’s a good place to start + think your way through each step 🙂 **
Surgeons use Halsted’s tried and true principles, and develop their own way to perform surgery using these basic rules. This is why you’ll find multiple opinions and methods-a lot of creativity exists in surgery! Please consult multiple surgery texts and DACVS to assure your techniques are sound!
Helpful Background Information Regarding OHE
A thorough physical exam is always warranted, and ideally screening bloodwork, and internal and external parasite screening to assure best health possible for an elective procedure such as a spay surgery. Performing Physical Exam of Dogs and Cats A terrific text book on performing a physical exam in dogs and cats
ASA Physical Status Classification adaptation of Anesthesia risk guide used in human medicine. This handy chart was made by Jurox a company that makes anesthetic drugs. They sponsor Think Anesthesia Veterinary Education
For more information on when to spay and other questions please see this link SPAY (link to AVMA Spay/neuter info for clients and additional link for AVMA member veterinarians). Veterinarians in the United States generally perform and use the anacronym OHE OvarioHysterEctomy (link to ACVS Ovariohysterectomy/Ovariectomy Surgery), while in Europe most veterinarians perform an OE Ovariectomy. Also consult your notes from Dr. Root-Kustriz’s courses!
“When Should we neuter Dogs? It Depends” HAVMA News article by R Scott Nelson
Preventing and managing spay/neuter complications article by Dr. Philip A. Bushby DVM DACVS (excellent article as prevention=pound of cure).
ASPCA Spay/Neuter Alliance has a training facility in North Carolina to teach senior vet students and veterinarians hands on OHE techniques and have options for financial assistance to attend!
Where to Get Surgical Experience
- Clinical Skills labs Y1, Y2, self assess, get feedback, incorporate into your next effort
- Surgery labs Y2, Y3, self assess, get feedback, incorporate into your next effort
- Contact SkillsPAC students to practice in small group or one-on-one
- Scheduled Practice ZONE sessions-sign up link in Canvas Home Page
- Student club activities with SIRVS (Student Initiative for Reservation Veterinary Services) provide spay and neuter services as well as well health services for pets at several Native American reservations. Students of all experience levels can participate in accordance with their skill level. Fantastic experience! VeTOUCH– Veterinary Outreach for Urban Community Health-offer free well health care for pets of low income clients. Student lead with faculty and CVT support. Fantastic experience! Surgery Club, Shelter Medicine Club and many others to gain valuable experience and practice sessions!
- Mini Rotation experiences with the Spay/Neuter rotation. Expected re-start with new CVM campus location in Summer of 2023. Community Based Medicine spay/neuter portion of CBM at University Ave clinic.
- Mission Animal Hospital student externship for Y1, Y2 and Y3 students, as well as the current Y4 senior rotation
- Arrange observation, volunteer, or better yet get paid at your local vet or shelter to assist with spay neuter procedures-you can learn a lot by observing, and helping out as your skill set allows.
- Plan summers to observe and gain some experience in surgery as well as prep of patient, client communication and caring for patients!
1) Feline OHE Study Guide
Feline OHE Student Study Guide– 3 pages can also be used as a Checklist and includes links to pictures/illustrations: 4 basic rule sets to guide surgery: 1) Halsted’s Principles, 2) Instrument/Suture Handling, 3) Maintaining Sterility 4) Knowledge of the steps of procedure, followed by 3 parts of OHE, each with 3 general steps:
I) Initial Approach 1) Clip, Surgical Prep, and Drape Patient 2) Initial Skin Incision/SQ Fat Management 3) Locate and Incise Linea
II) Remove Ovaries/Uterus 4) Locate Uterus 5) ID + Ligate Ovarian Pedicles, Breakdown of Broad Ligament 6) Ligate UB
III) Closure 7) Close Linea 8) Close SQ Fat 9) Subcuticular/ID Skin Closure, tattoo if shelter/rescue
2) Feline OHE Quiz Based on the Study Guide
3) Answers to Quiz Based on Student Study Guide
4) Feline OHE Assessment Rubric
5) Feline OHE 9 steps (one page)
6) Feline OHE DETAILED found below! Contains links to pictures, illustrations, videos, explanations, and TidBits
| STUDENT OVERALL GOAL: COMPETENCY
For participation in live animal surgery attaining at least Advanced Beginner is required for most skills Competence is required for ligation and suturing.
The only thing that separates the assessment categories is knowledge and performance of skills
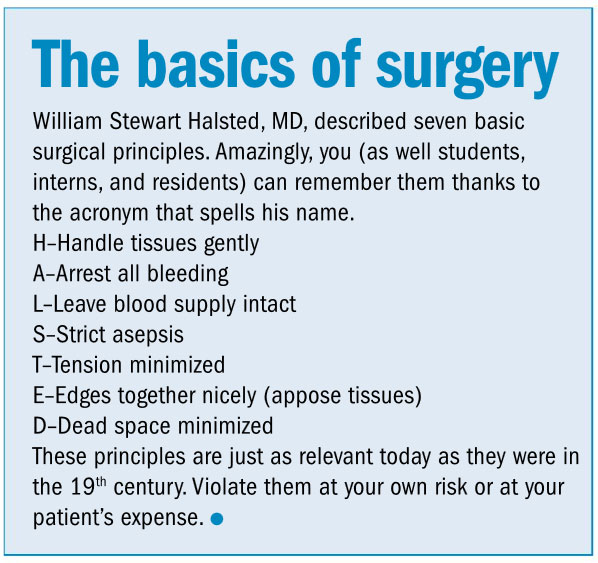
FAIL- dangerous maneuver or no knowledge/skill NOVICE-observer, understands some principles, not ready to “do” WHERE EVERYONE STARTS! ADVANCED BEGINNER- understands principles, has practiced and is developing forward, building skills and confidence, needs more practice COMPETENT- understands principles, able to perform skills competently, handle complications and able to teach classmates STUDENT AND EARLY GRAD GOAL! PROFICIENT- understands principles and able to perform skills with excellent technique, confidence, appropriate speed, and can handle complications that occur intra-op quickly with confidence POST GRADUATE GOAL! GOLDILOCKS- Good OLD Intuition/Intelligence Linked Of Course with Kinetic Skill (Description of how to get things “just right” in surgery) |
2. MSF MAINTAINING STERILE FIELD:
|
2. I/SH INSTRUMENT/SUTURE HANDLING
|
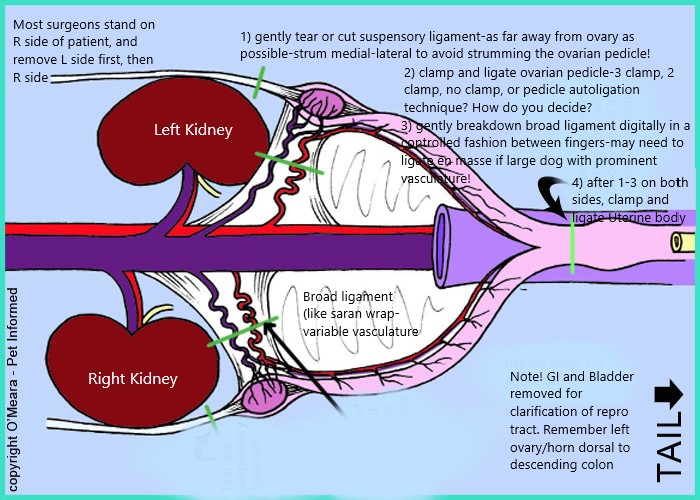
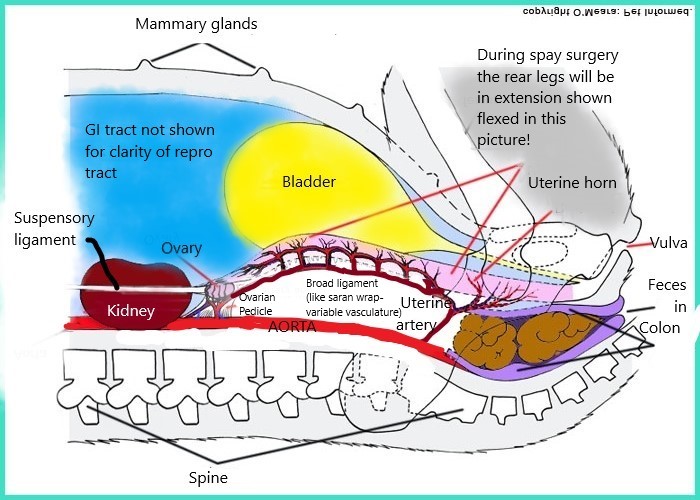
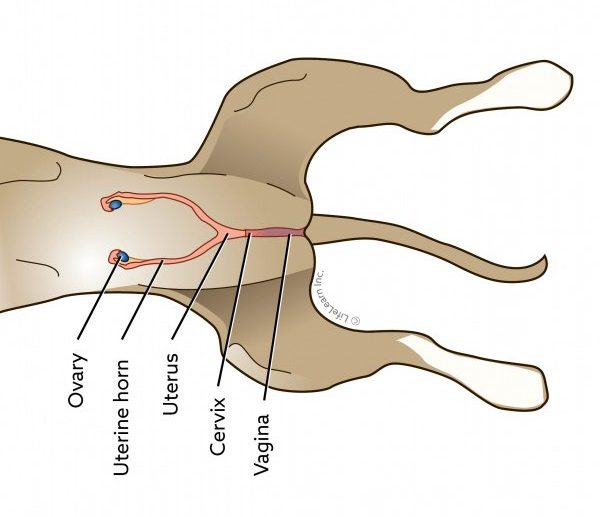
Take a few moments to look at these modified anatomical pictures directly below to get your bearings-really helps to engage your 3-D visualization skills! I have modified two Illustrations from Petinformed.com flipping and mirroring an image and added some notes to give perspective of a surgeon on the right hand side of a dorsally recumbent patient to improve student understanding of anatomy, as understanding anatomy is key to any surgical procedure.
V/D view female repro tract and Right sided dorsally recumbent view female repro tract
Feline Ovariohysterectomy DETAILED VERSION- this detailed version below, is designed for students to look up specific questions they may have and includes diagrams/pictures/videos and Tidbits. Pictures were taken at MNSNAP (MN Spay Neuter Assistance Program) a brick and mortar and mobile non-profit HQHVSN facility (High Quality, High Volume, Spay Neuter).
INITIAL APPROACH
1) Clip and surgical prep of patient, 4 quarter drape, and paper drape
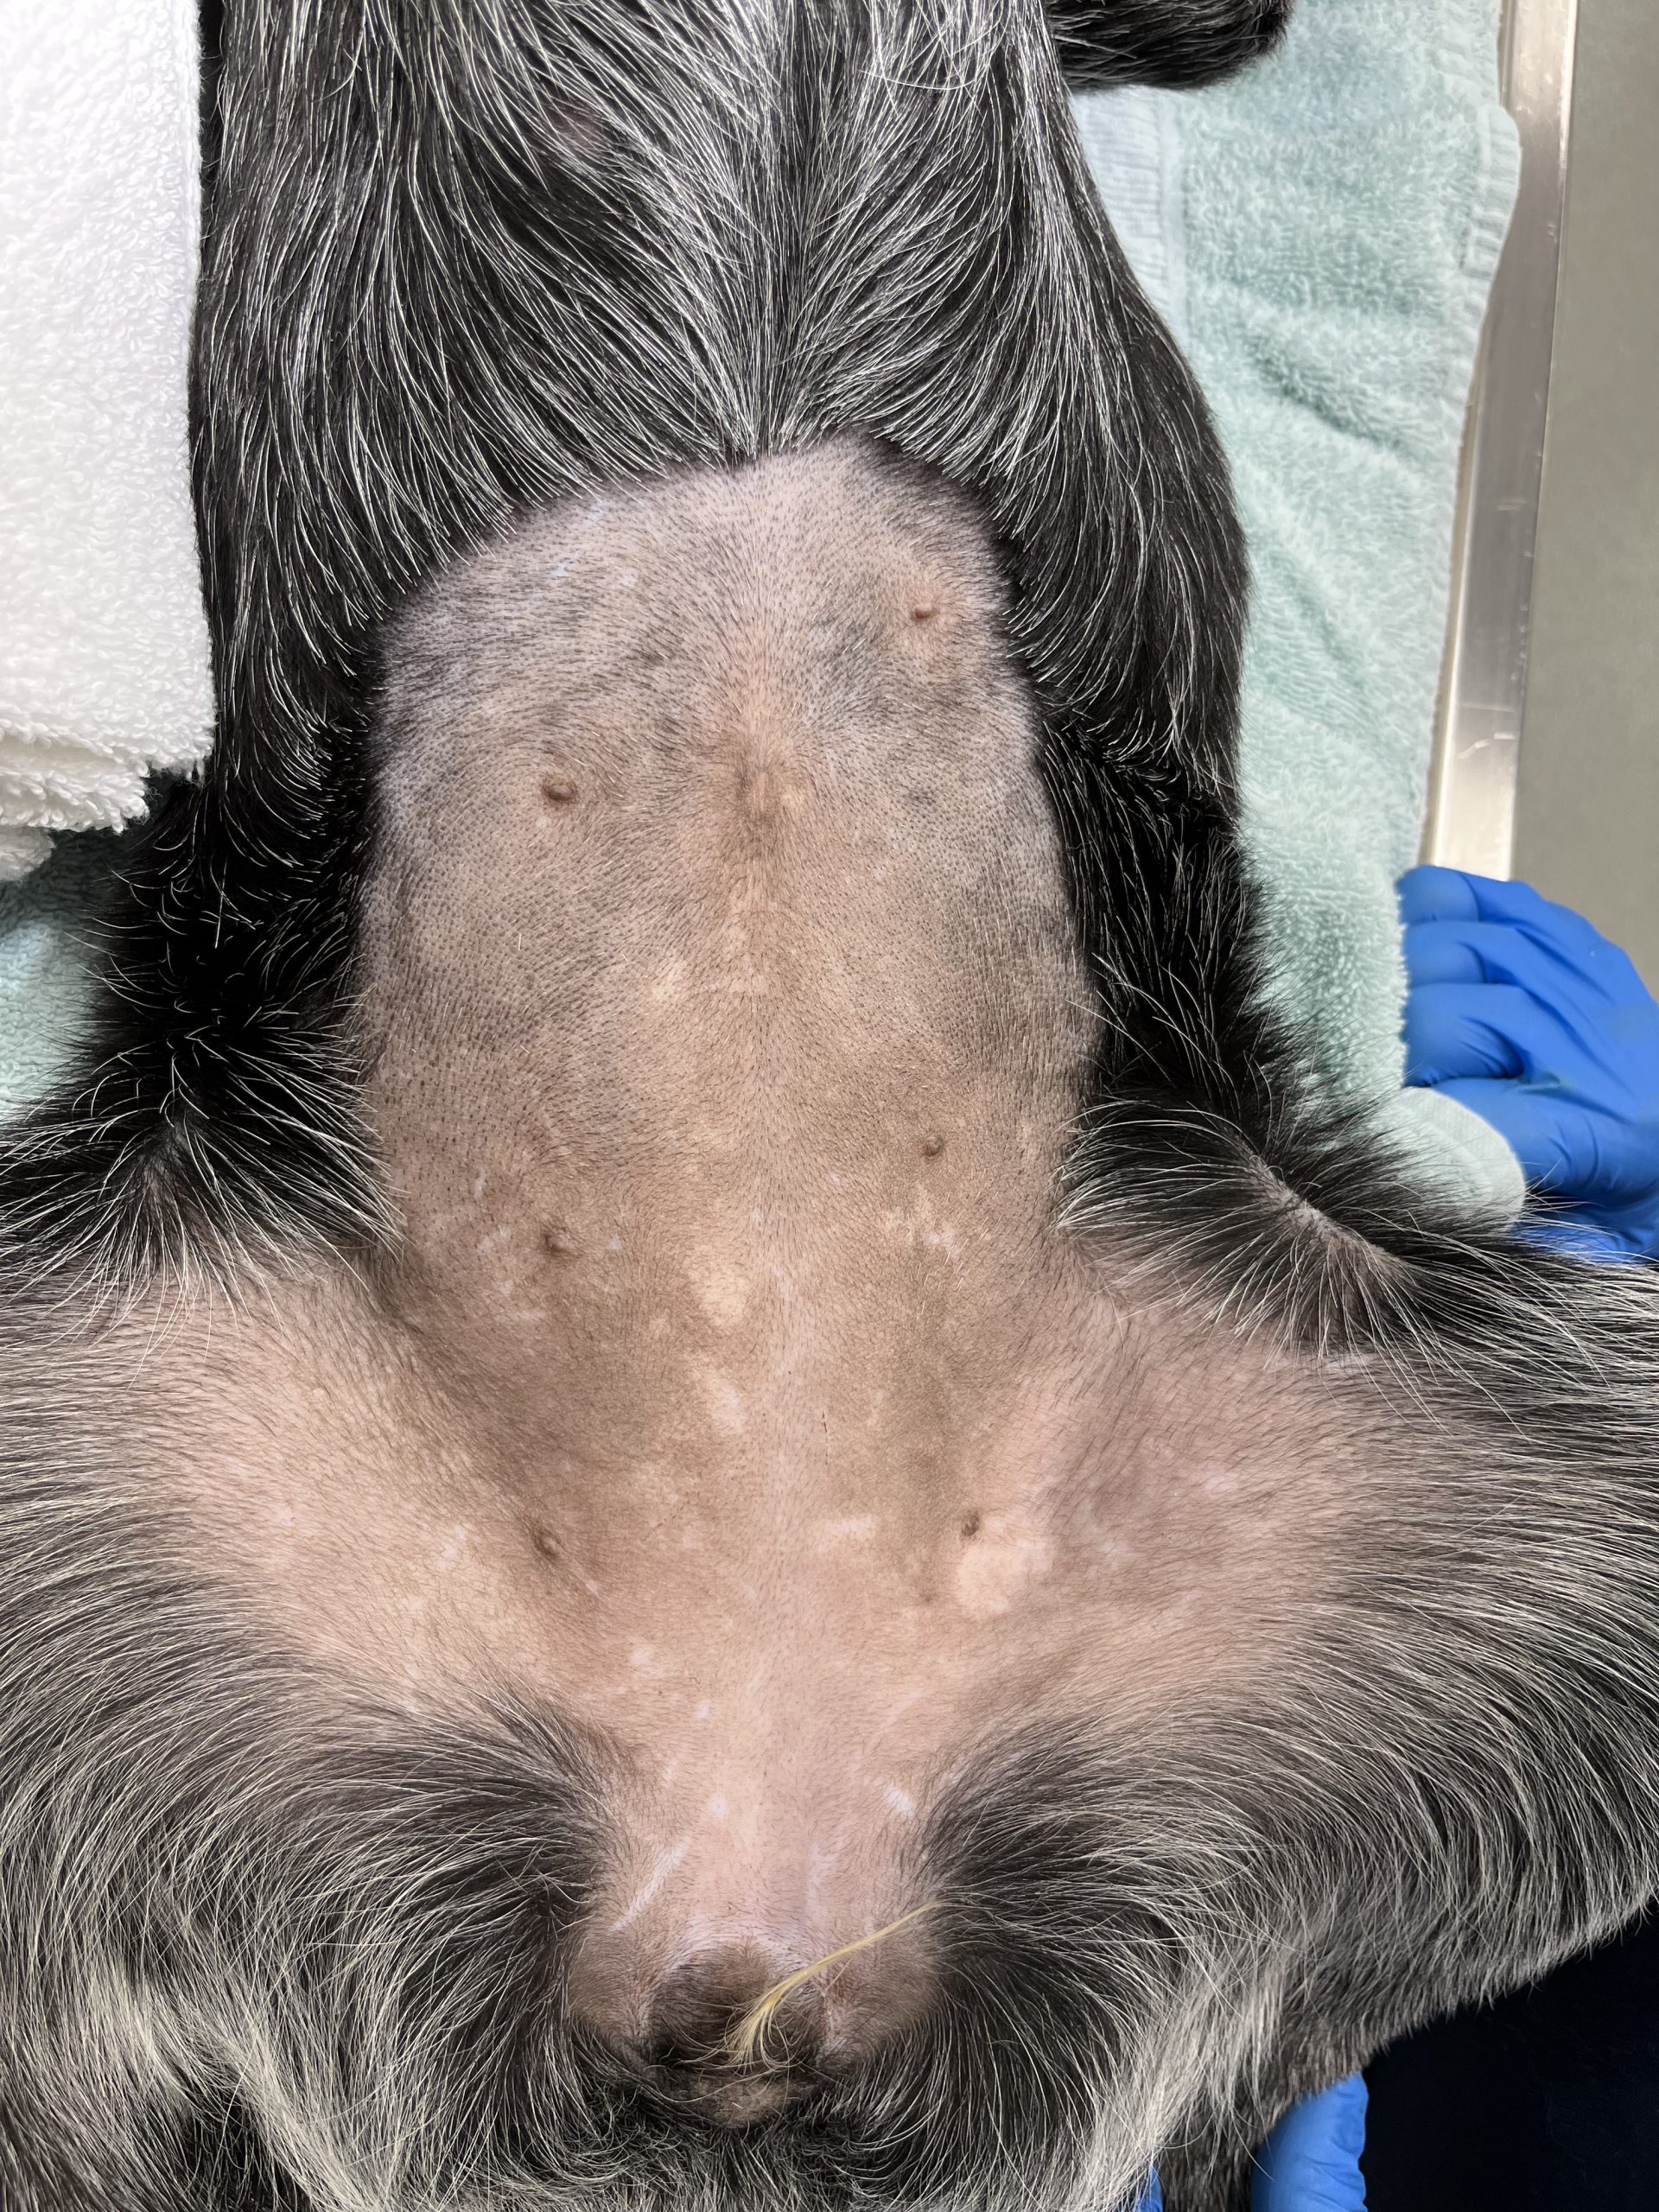
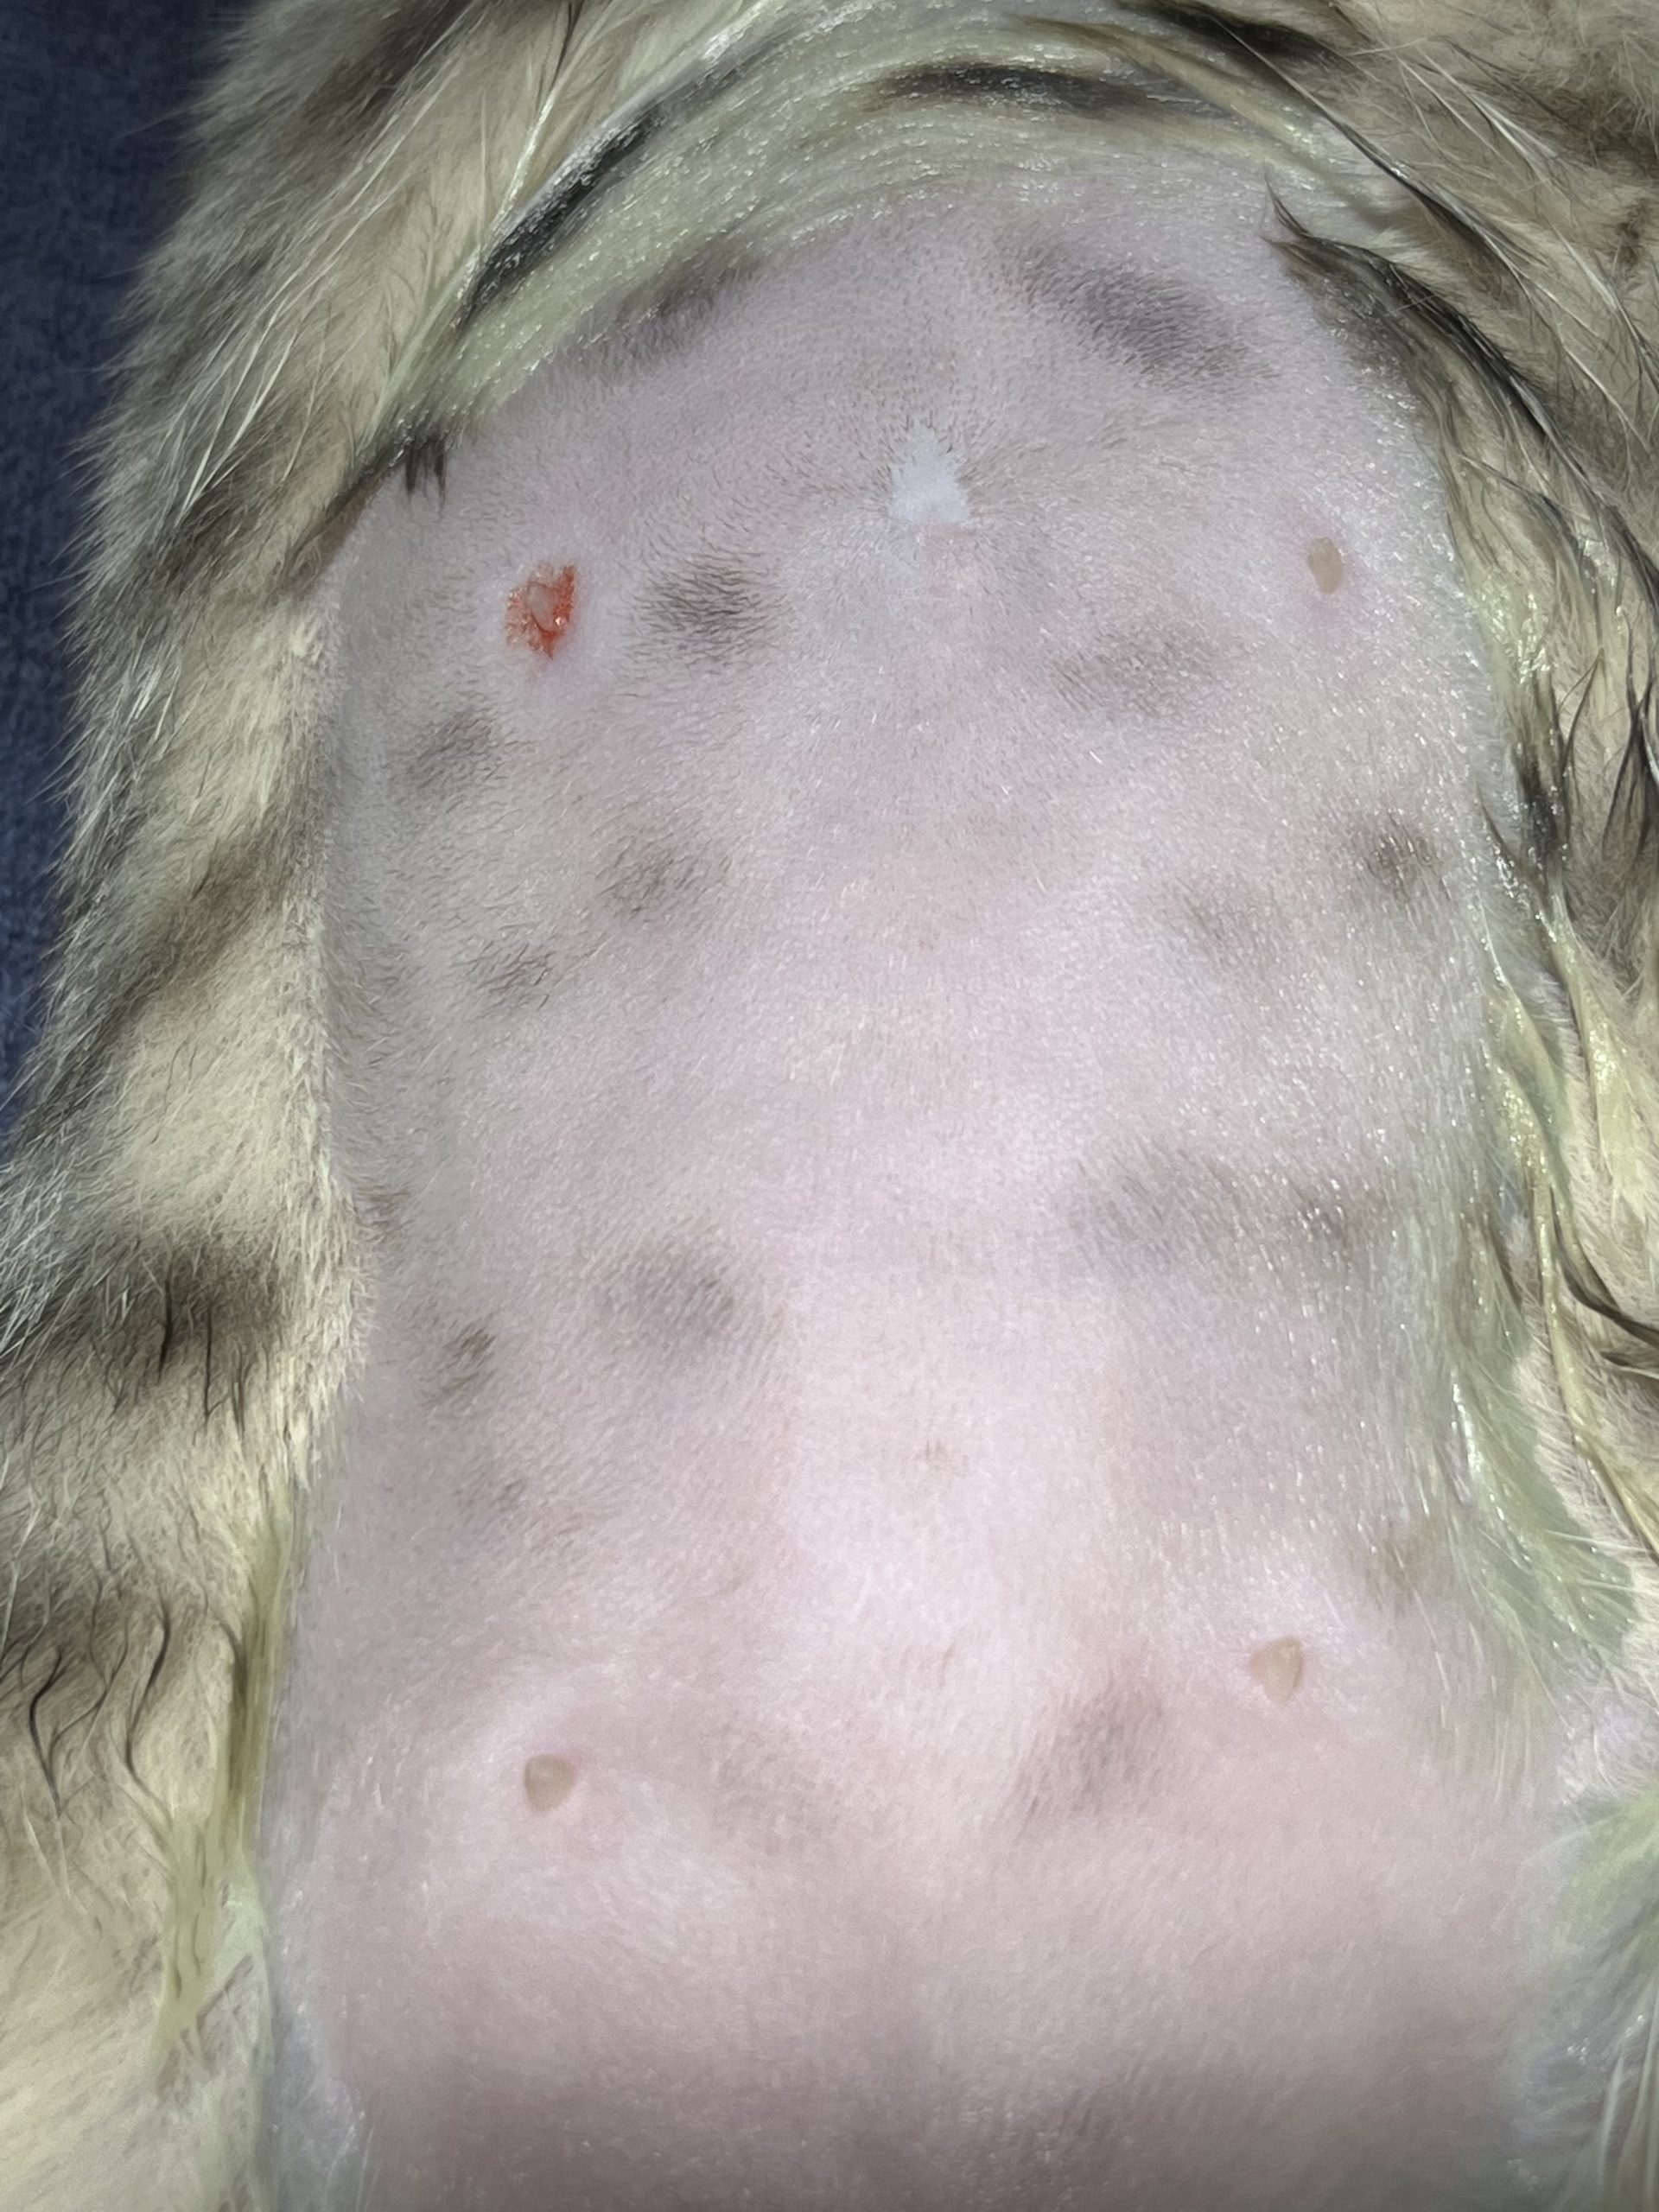
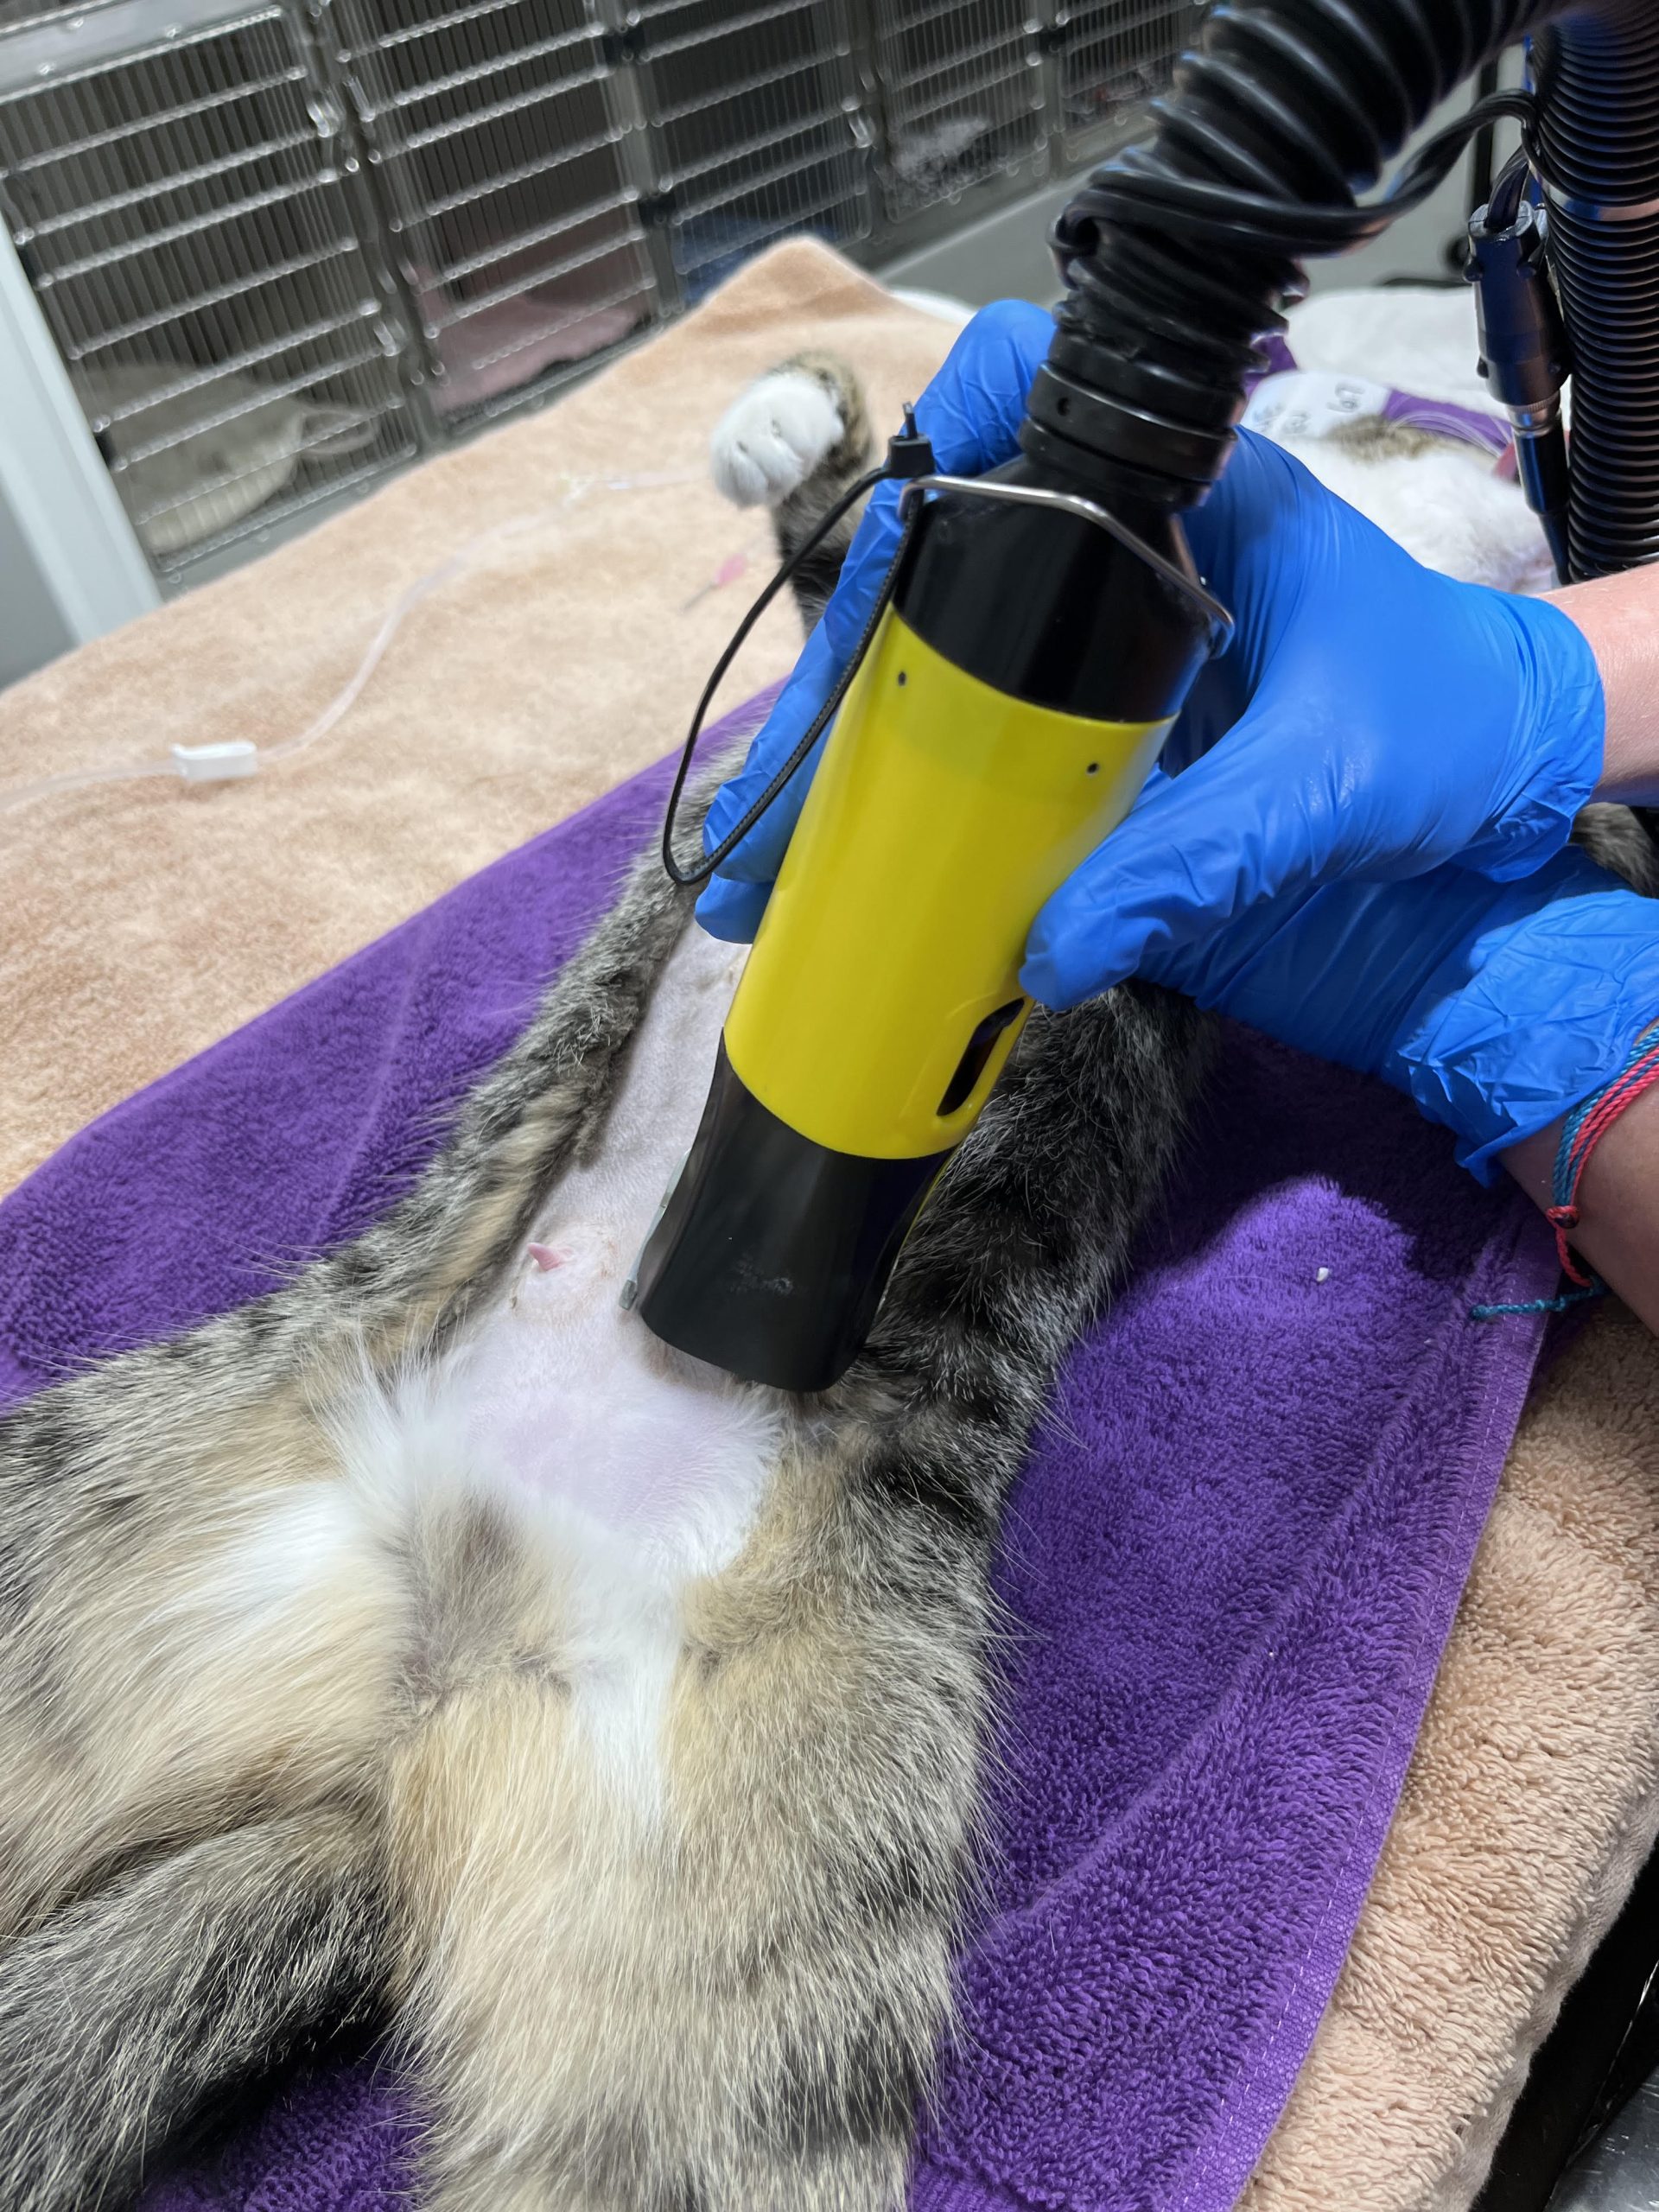
( ) in anesthesia prep area NOT in surgery-we don’t want hair flying around in surgery! dog cat– Hair is clipped from xiphoid (at least more cranial to umbilicus for HQHVSN) to pubis and clipper’s width lateral to teats, even edges, symmetrical- should be quick and include removal of hair with sticky roller or vacuum. Why so prepare such a large area? Often we don’t know before surgery which patient may need their incision elongated, so standard is to have an ample prep. Palpate the bladder and only express when the patient is sufficiently anesthetized to avoid bladder rupture-a small bladder during surgery is helpful as can obstruct easy access to the uterine horns. Tidbit The clip and incision line are all your clients will see, so make it look nice! Also make sure to use clean clippers, that are well lubed with sharp blades to prevent razor burn! Tidbit Double check for spay scar!!
Lauber clipper clipping cat with vacuum attachment best clipper ever IMO for prepping for surgery! Vacuum over clipper blades pulls hair up for clean precise cut, and hair is vacuumed away so no further cleanup of hair is needed. Prep time is extremely fast with this clipper system! Lauber Vacuum clippers website
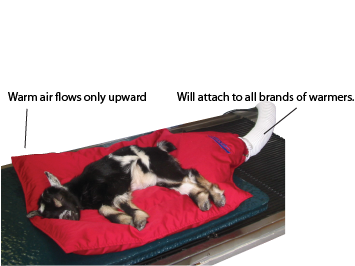
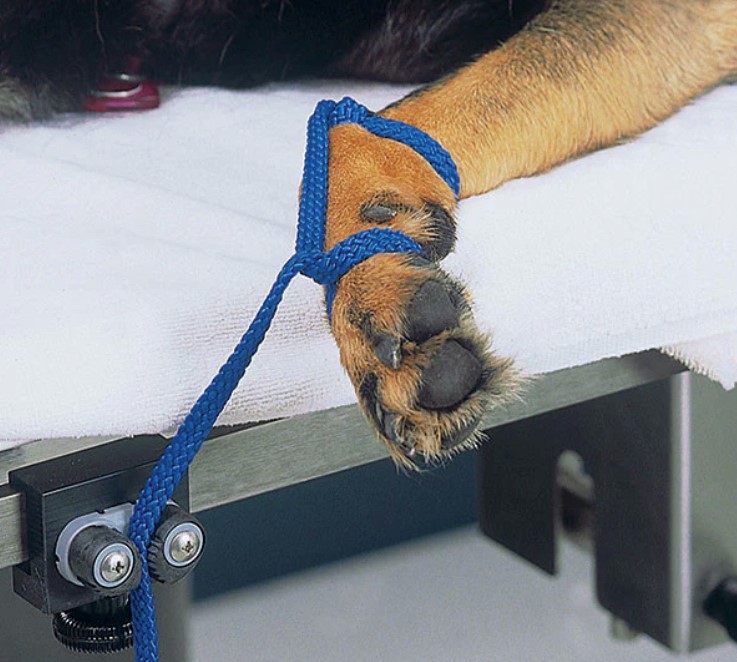
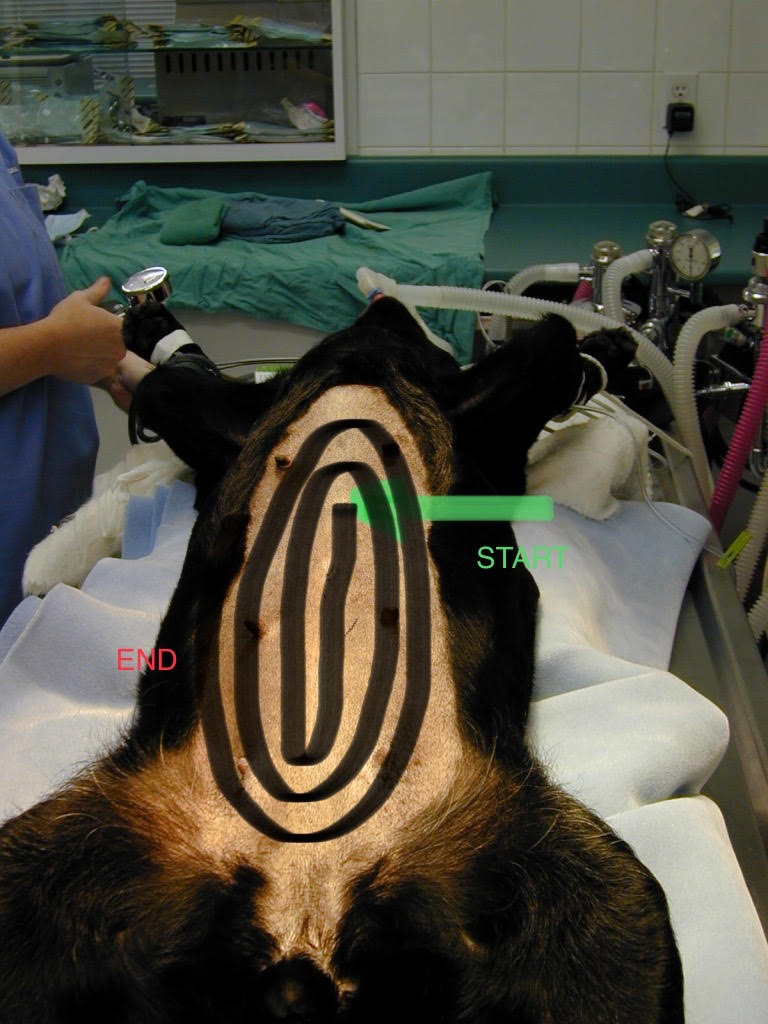
( ) Move patient to Surgery Suite preoxygenate, intubate, attach monitoring equipment then center patient on center line of table, double check patient is truly straight to line up linea with midline. Place patient on peepad to protect the underlying warming pad underneath the patient (should be turned on approx. 15 min before patient comes into surgery). Secure patient without undo force on limbs using double loop tie downs and scrub sx site in sx suite (most clinics clip and scrub in surgery prep, with a final scrub in surgery suite). Scrub starting on midline then move outward in increasing divergent circles around the planned midline incision. Remember to scrub patient using 2 handed technique and squeeze excess fluid from scrub and rinse with pick hand, form into Hershey’s kiss shape with scrub hand IMPORTANT: After scrubbing gently pull the pee pad caudally to catch urine during surgery, this allows pee pad to absorb any urine, and assures the patient has good contact with the warm air pad
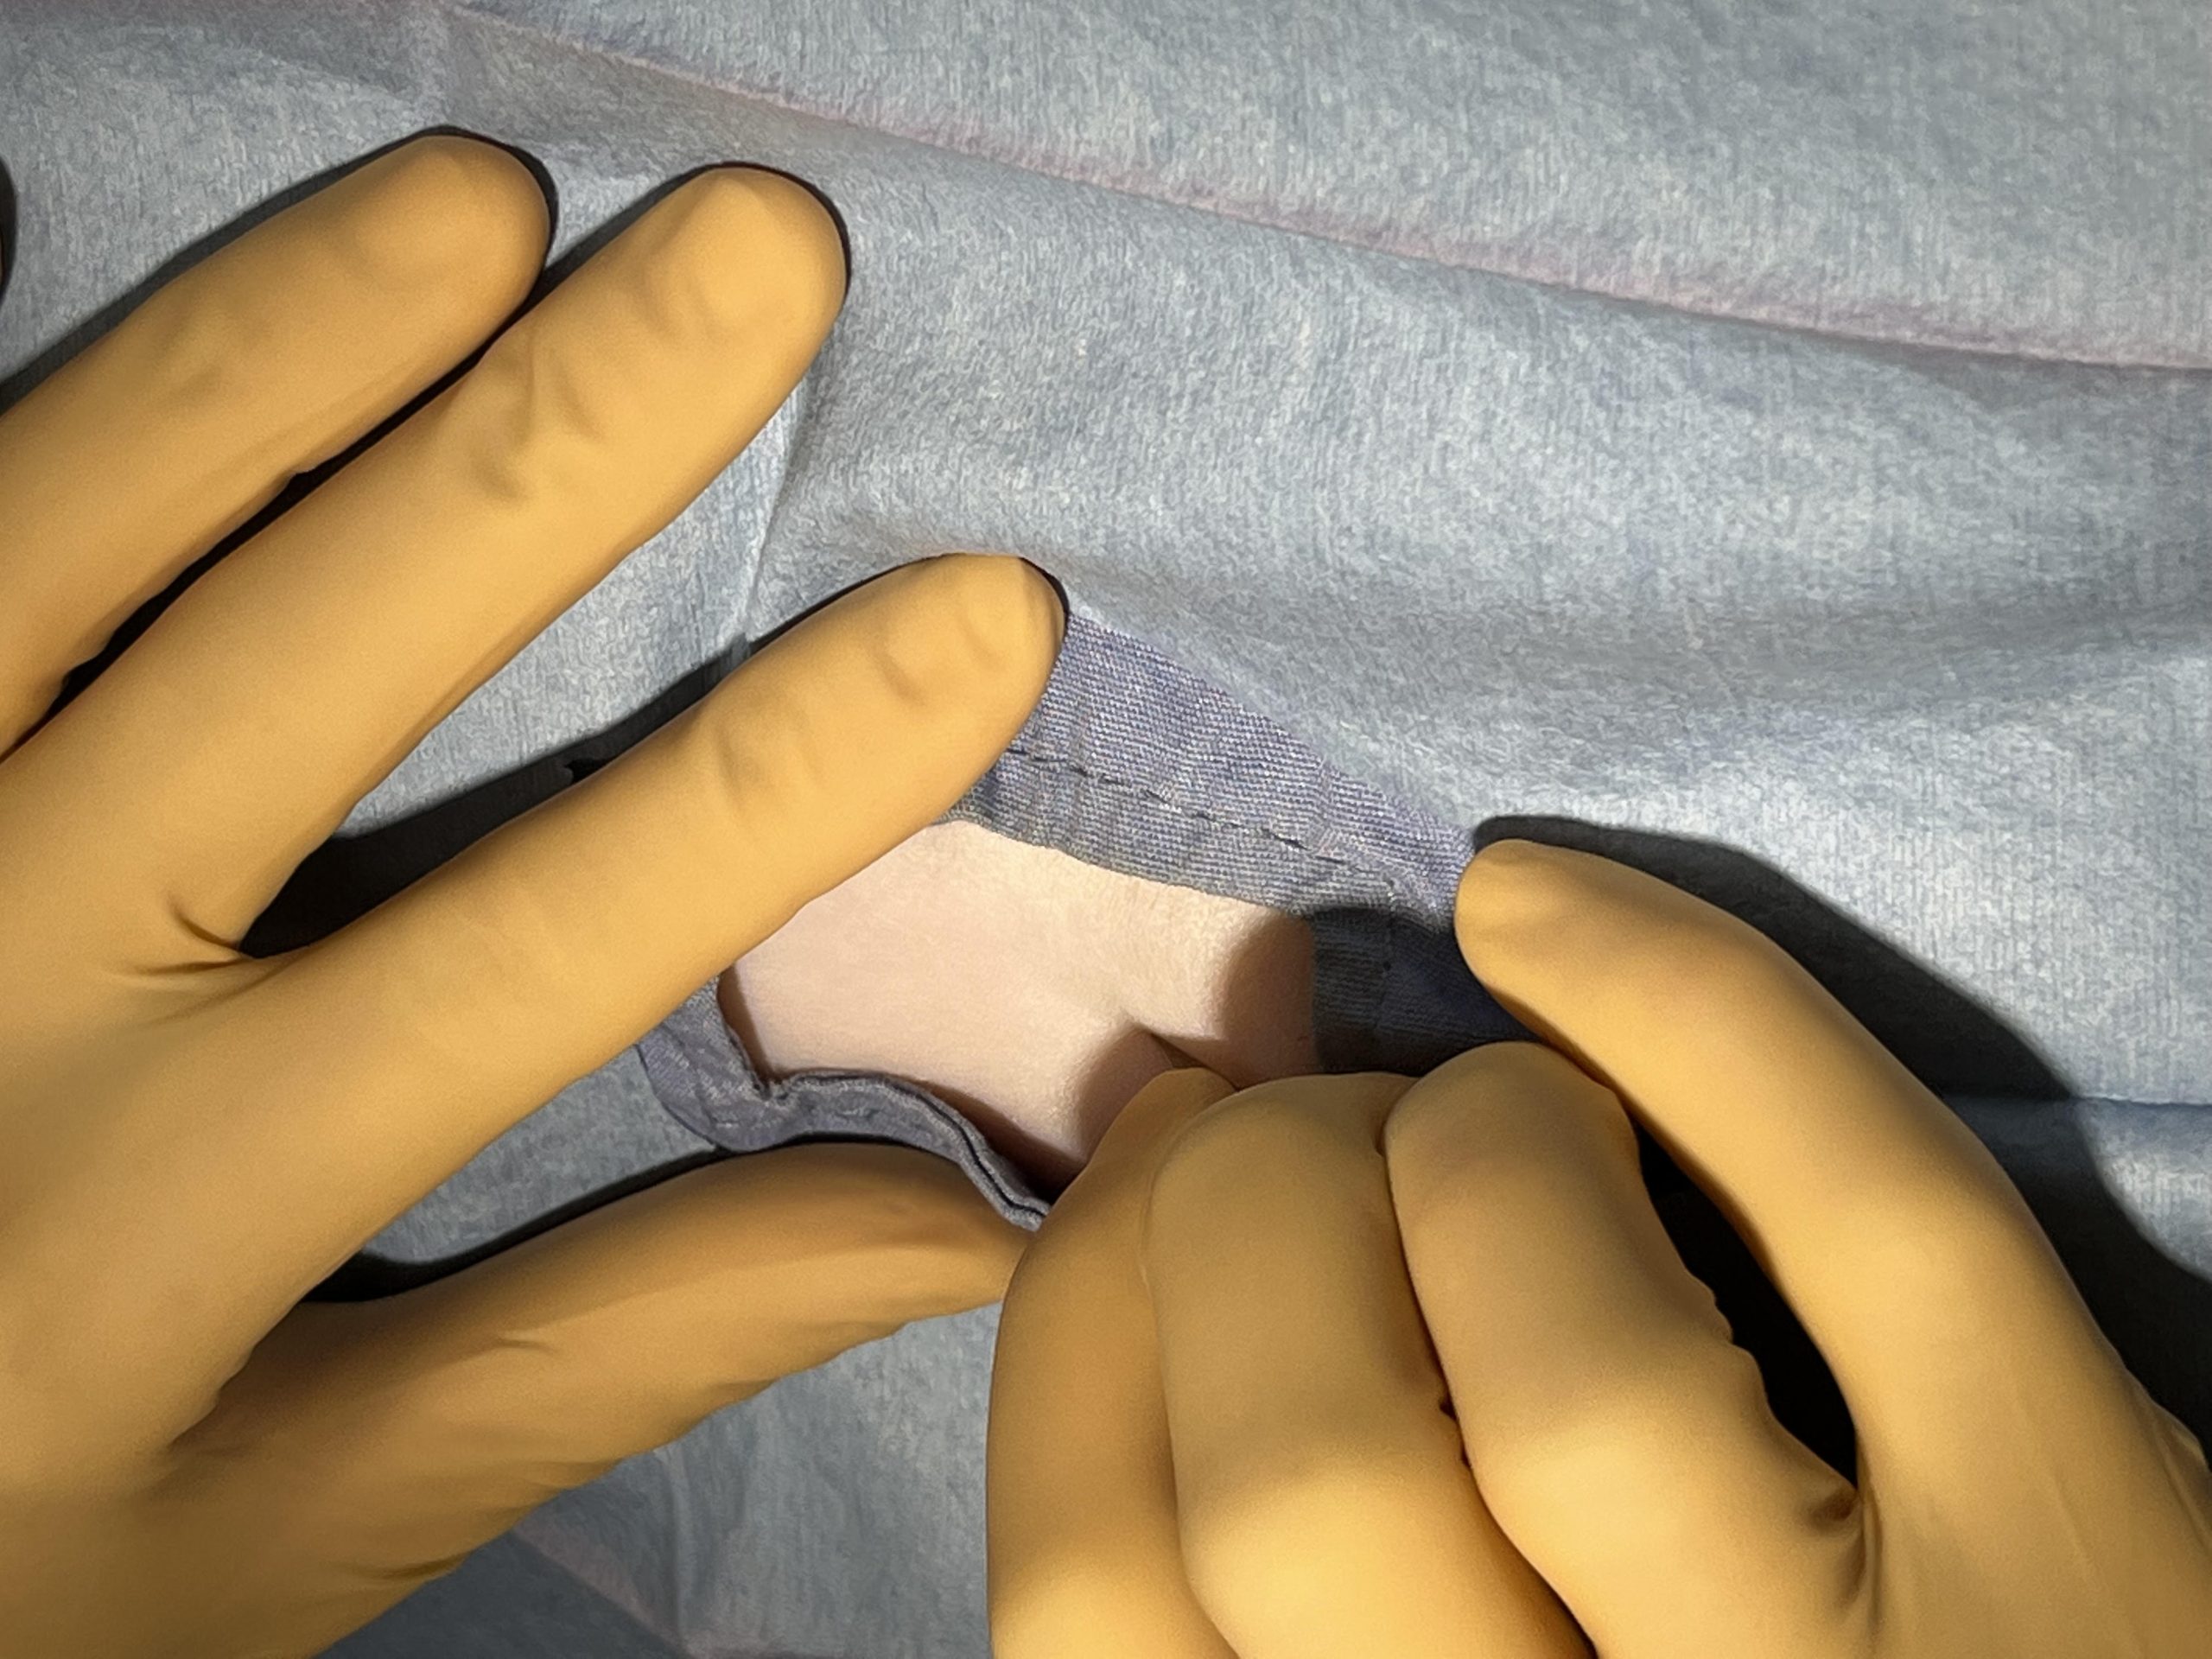
( ) After surgeon performs hand scrub, gowning, and closed gloving, the surgeon opens instrument pack and places 4 quarter drape surrounding the border of the planned incision using 4 huck towels with the top ⅓ folded toward the patient, fingers protected.
( ) Huck towel and penetrating clamp rules are important are applied across the xiphoid to and pubis and lateral to the planned incision, Remember you can move from midline outward, NOT outward toward midline. Also you can reposition the penetrating clamp if the clamp is not brought out from under the huck towel, however must be discarded if tips come out of the huck towel. Huck towels are placed approximately 1-1.5 cm from where the incision will be. TidBit often a good idea in deep chested patients to apply drape over xyphoid and pubis first as can act as Velcro to hold the longitudinal drapes parallel to where the midline incision will be Tidbit If the incision is long ex) exploratory laparotomy or C-section, be sure to add additional clamps on each side to prevent abdominal contents from sliding between the corner clamps and beneath the huck towels.
( ) Surgeons plan and discuss unfolding and centering the paper drape so it is aligned with the midline of the patient, and determine orientation so long axis of drape is along the length of the table with enough of drape to be under the instrument tray. Convert fingers to pinch on top of drape to avoid contamination, and carefully unfold. Remember your sterile field is a box in front from waist to chest-don’t lift the drape above chest height! A common error with new learners is to touch something nonsterile during placement of large drape requiring re-gloving
( ) In unison, drop the most cranial portion of drape, switch hands holding drape, then both surgeons side step toward the instrument tray, lift up tray in unison using free hand, keeping it level w/hand not holding drape, then place the end of the paper drape under the tray , and replace tray on top of the drape. Tidbit Allis tissue forceps can be used to clamp the paper drape to the inner paper drape of instrument pack. This method creates a continuous sterile field from patient to instrument tray and can capture instruments if accidentally dropped. Tidbit organize your instruments so they are easily found and tidy. Good idea to keep a working area-instruments you are using, and instruments you have not touched, in case others may need to borrow an instrument in a busy practice.
( ) Feel the underlying 4 quarter clamps securing the huck towels, then apply ideally non-penetrating (flat end that does not pierce the drape or penetrating clamps to the shafts of the penetrating clamps holding the huck towels secure to hold the paper drape in place-do place these additional clamps into skin! Make a fenestration in the paper drape with sharp-sharp scissors, thin box method or Capital I shape and fold flap inwards, so minimal huck towel is showing. Tidbit minimize jagged paper edges, they can get caught later in your ovarian pedicle ligature or uterine stump ligature as the tissue leans against the paper drape! Also for mass excisions and other small draped areas we often make a fenestration prior to paper drape placement as is much easier to manage, or use a pre-fenestrated cloth drape-quick and handy! However, making a fenestration in a very large drape prior to placement is problematic-a lot of drape to manage and keep sterile, so this is why we fenestrate the large drape after placing.
2) Initial Skin Incision, management of SQ fat
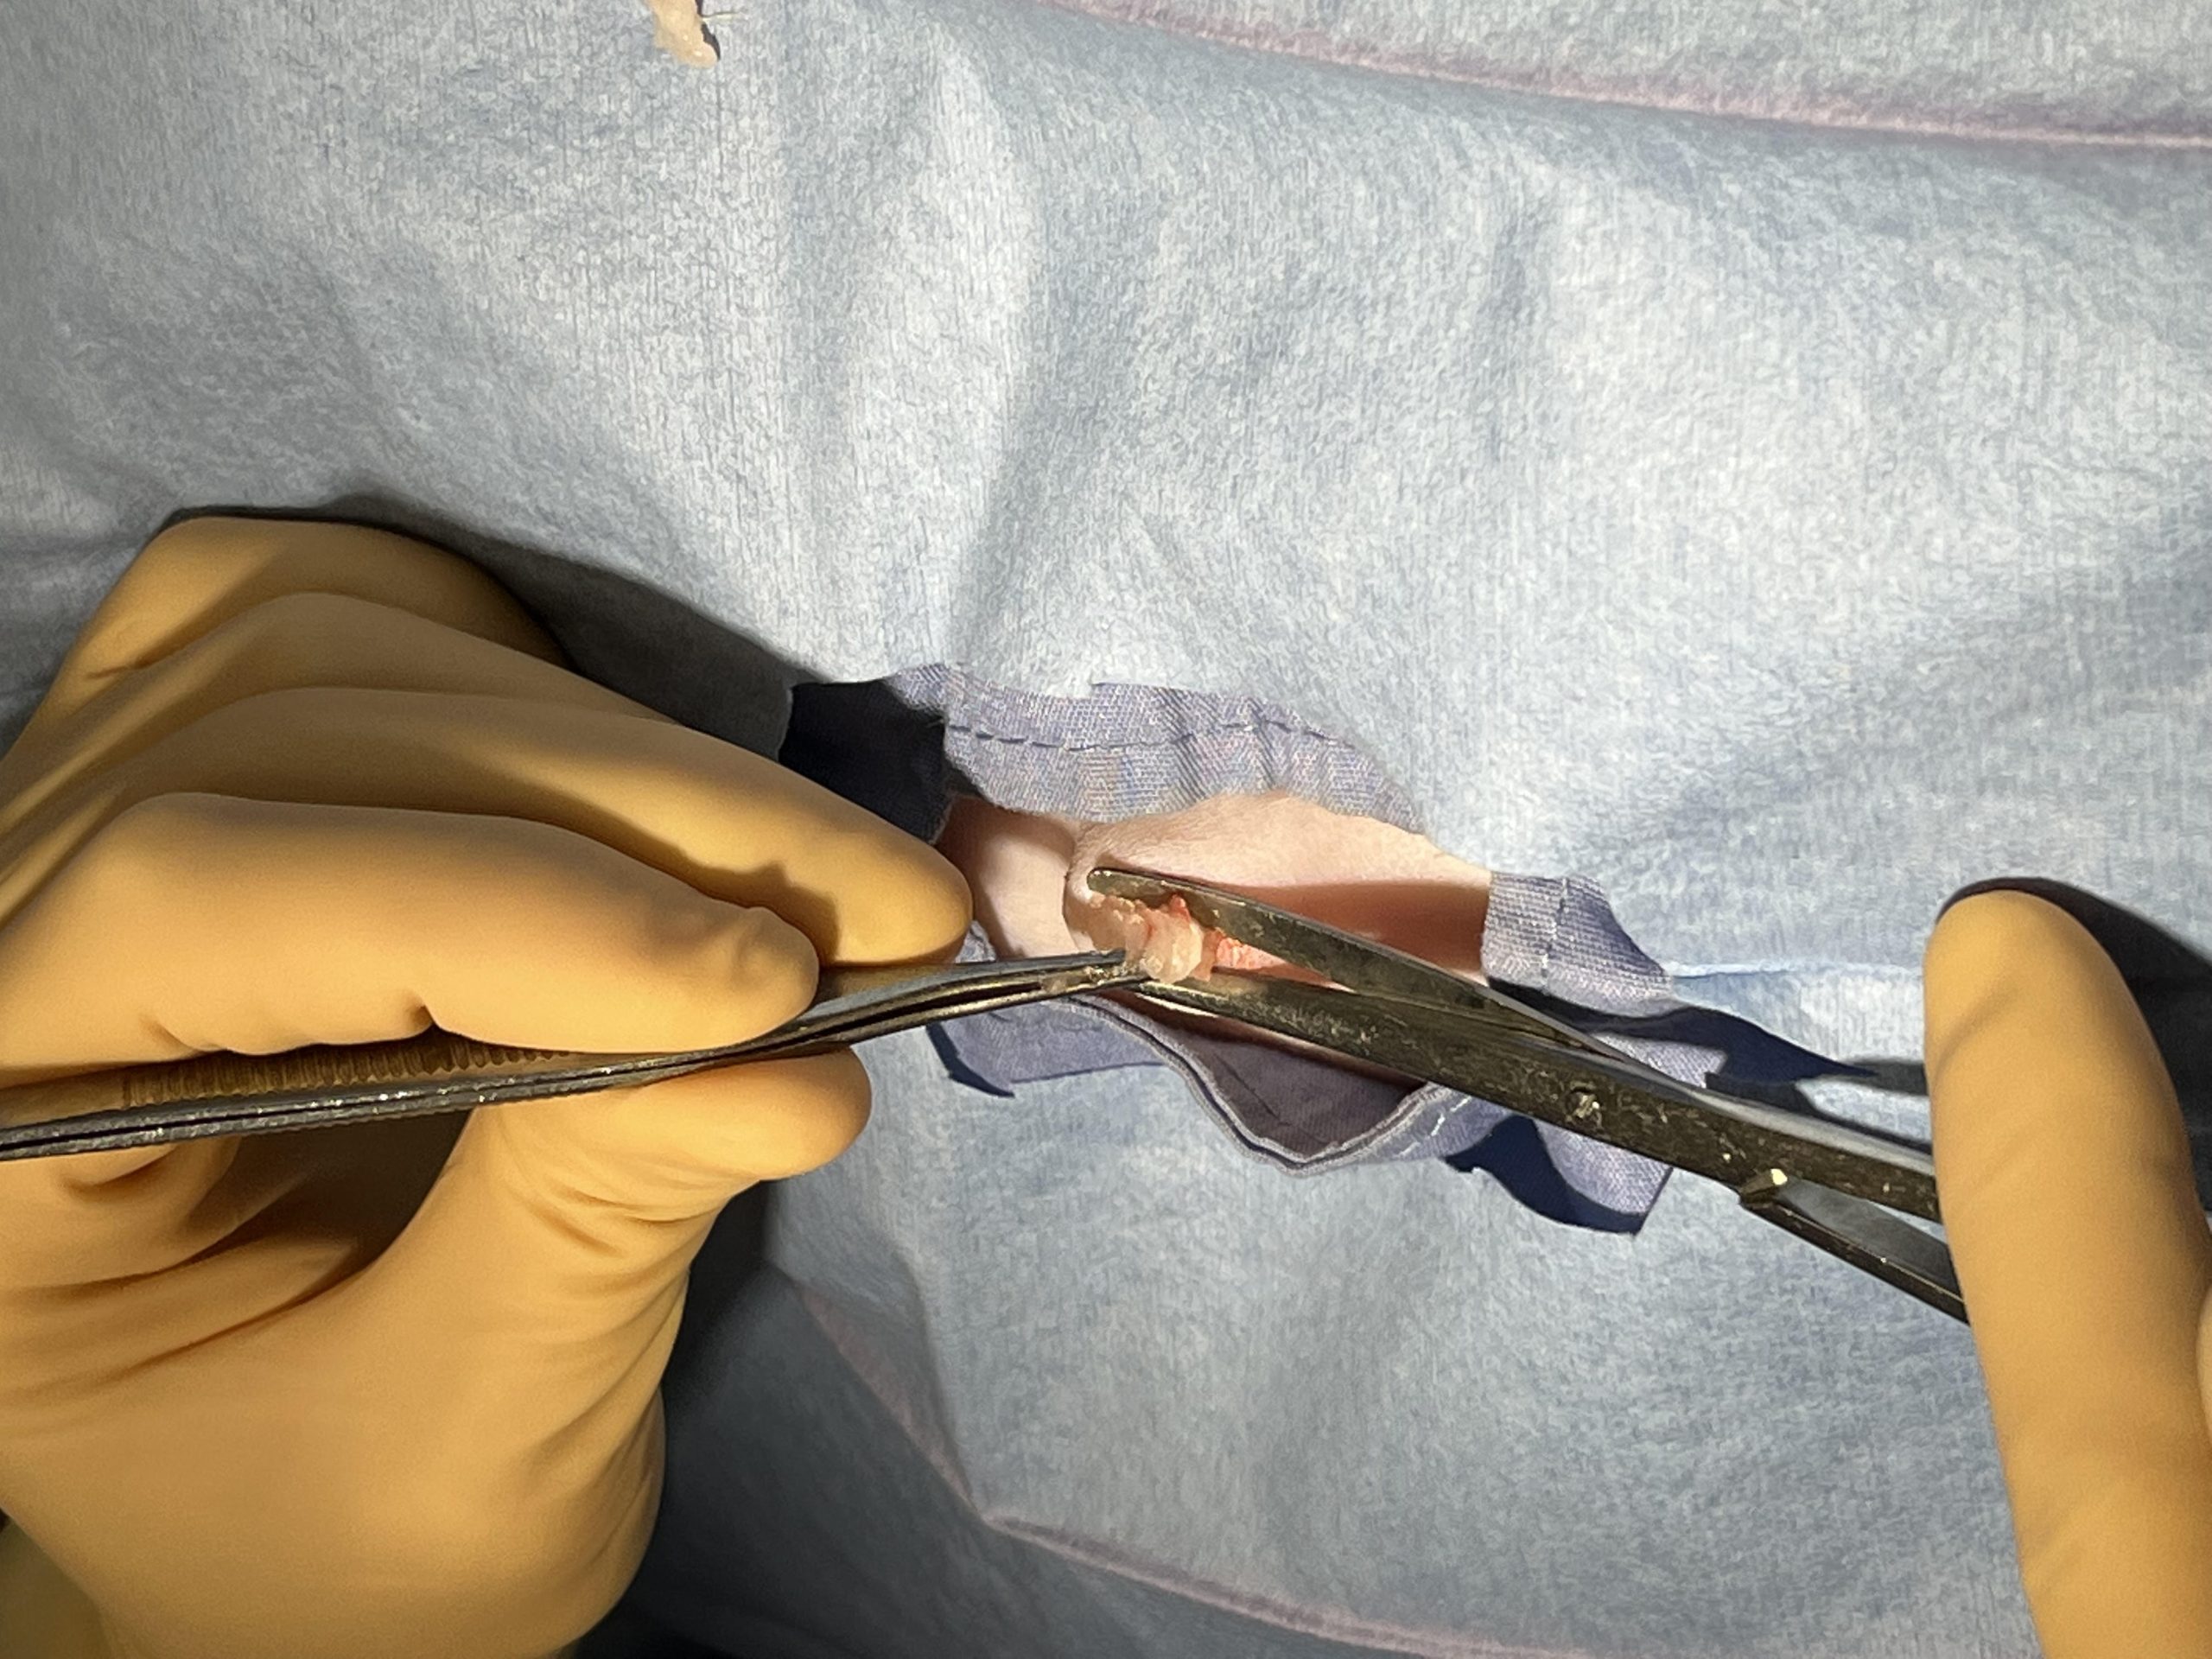
( ) Location of incision cats, kittens, puppies; cranial third of abdomen, between umbilicus and pelvic brim…older dogs closer to the umbilicus. Initially, make a 1-2inch ventral midline incision in cranial 1/3 of abdomen (depending on age of patient). Tidbit shelter vets routinely spay cats/kittens/puppies with a 1/4-1/2 inch incision, of course this comes after MUCH practice! Tidbit important to have a thorough history and examine your patient prior to surgery to determine if a pyometra, or pregnancy is present, which usually necessitates a longer incision…This is why we prep a large area in case we need to extend the incision.
( ) Use two-handed technique to incise skin-dominant hand grips scalpel handle, other hand applies slight outward tension on skin to create uniform surface under slight tension. Hand spreading skin moves to reposition after a couple centimeters of incision, belly of blade stays on skin-goal is one smooth stroke for entire length of incision. NOT several small strokes-this creates an uneven border and may be more painful, more difficult to close, have increased healing time, and create a larger scar. Skin Incision Video Right Handed, Skin Incision Video Left Handed
( ) The direction of the ventral midline incision is generally cranial to caudal, using dominant hand, therefore right handed surgeons generally stand on right side of table (patient’s head to left, right side of patient), left handed surgeons on the left side, (patient’s head to the right, left side of patient). Tidbit remember most surgeons suture from dominant side to non-dominant side this keeps suture in front of us, most surgeons learn how to suture in the other direction-takes practice but is possible!
( ) Great Clinician’s Brief article on Identifying linea and incising SQ fat. SQ fat generally comes from each side and meets on the midline-be aware of blood vessels within each side of the SQ fat as described in this linked article. Using metzenbaum scissors, or blade as described in article incise SQ fat on midline, avoiding vasculature along long axis of skin incision, or blunt dissection spreading SQ fat gently off midline mosquitos closed and opening along length of midline. Tidbit for larger patient as described in article; make a little nick in SQ fat where it attaches to the linea with the tip of metzenbaum and with scissors slightly open, gently push along this attachment-do NOT extend to sides, keep along attachment only to minimize dead space! Tidbit often in small kittens, young cats, puppies with low vascularity fat, a tiny amount of fat is removed with metzenbaum scissors as is noted in this picture-care must be taken not to remove a large amount of fat and disrupt the vasculature of fat as can cause needless dead space, bleeding which takes time to ligate, associated inflammation, potential seroma and increased healing time. Also be careful, especially if the patient does not have much SQ fat, as you need to be careful about going too deep and injuring the underlying musculature. Video blunt dissection of SQ fat RH, Video blunt dissection SQ fat LH
( ) Ligate or cauterize small bleeders-nice article summarizing options meticulous hemostasis performed right away also avoids confusion of where is blood coming from later in procedure and can be performed quickly. Of course best course is to avoid cutting vasculature if possible or clamp and ligate prior to incising blood vessel to prevent bleeding. Always be mindful of where blood vessels are before incising skin-may need to change location of incision? Tidbit tiny vessels can be clamped at their tip allowed to remain for a few minutes then removed, check to be sure have formed clot and not bleeding. Larger vessels should be ligated by clamping tip of bleeder with tip of mosquito hemostat, place a ligature around vessel and tying with simple throw and 3 additional throws. Electrocautery is a great tool to use for small arteries/veins. Arteries < 1mm diameter or veins < 2mm in diameter-remember the smoke should be evacuated via sterile tipped vacuum. Always be alert for breeds who may be prone to bleeding disorders prior to surgery, and be alert for possible acquired bleeding disorders if bleeding is noted outside realm of normalcy-bleeding gums or petechia on pre-sx exam, or prolonged bleeding from toe nail trim during prep, should be investigated and perhaps to postpone surgery and investigate diagnosis than to proceed and wish you had investigated… Bleeding disorders in dogs, Bleeding disorders in Cats
3) Locate Linea, and make safe incision through linea
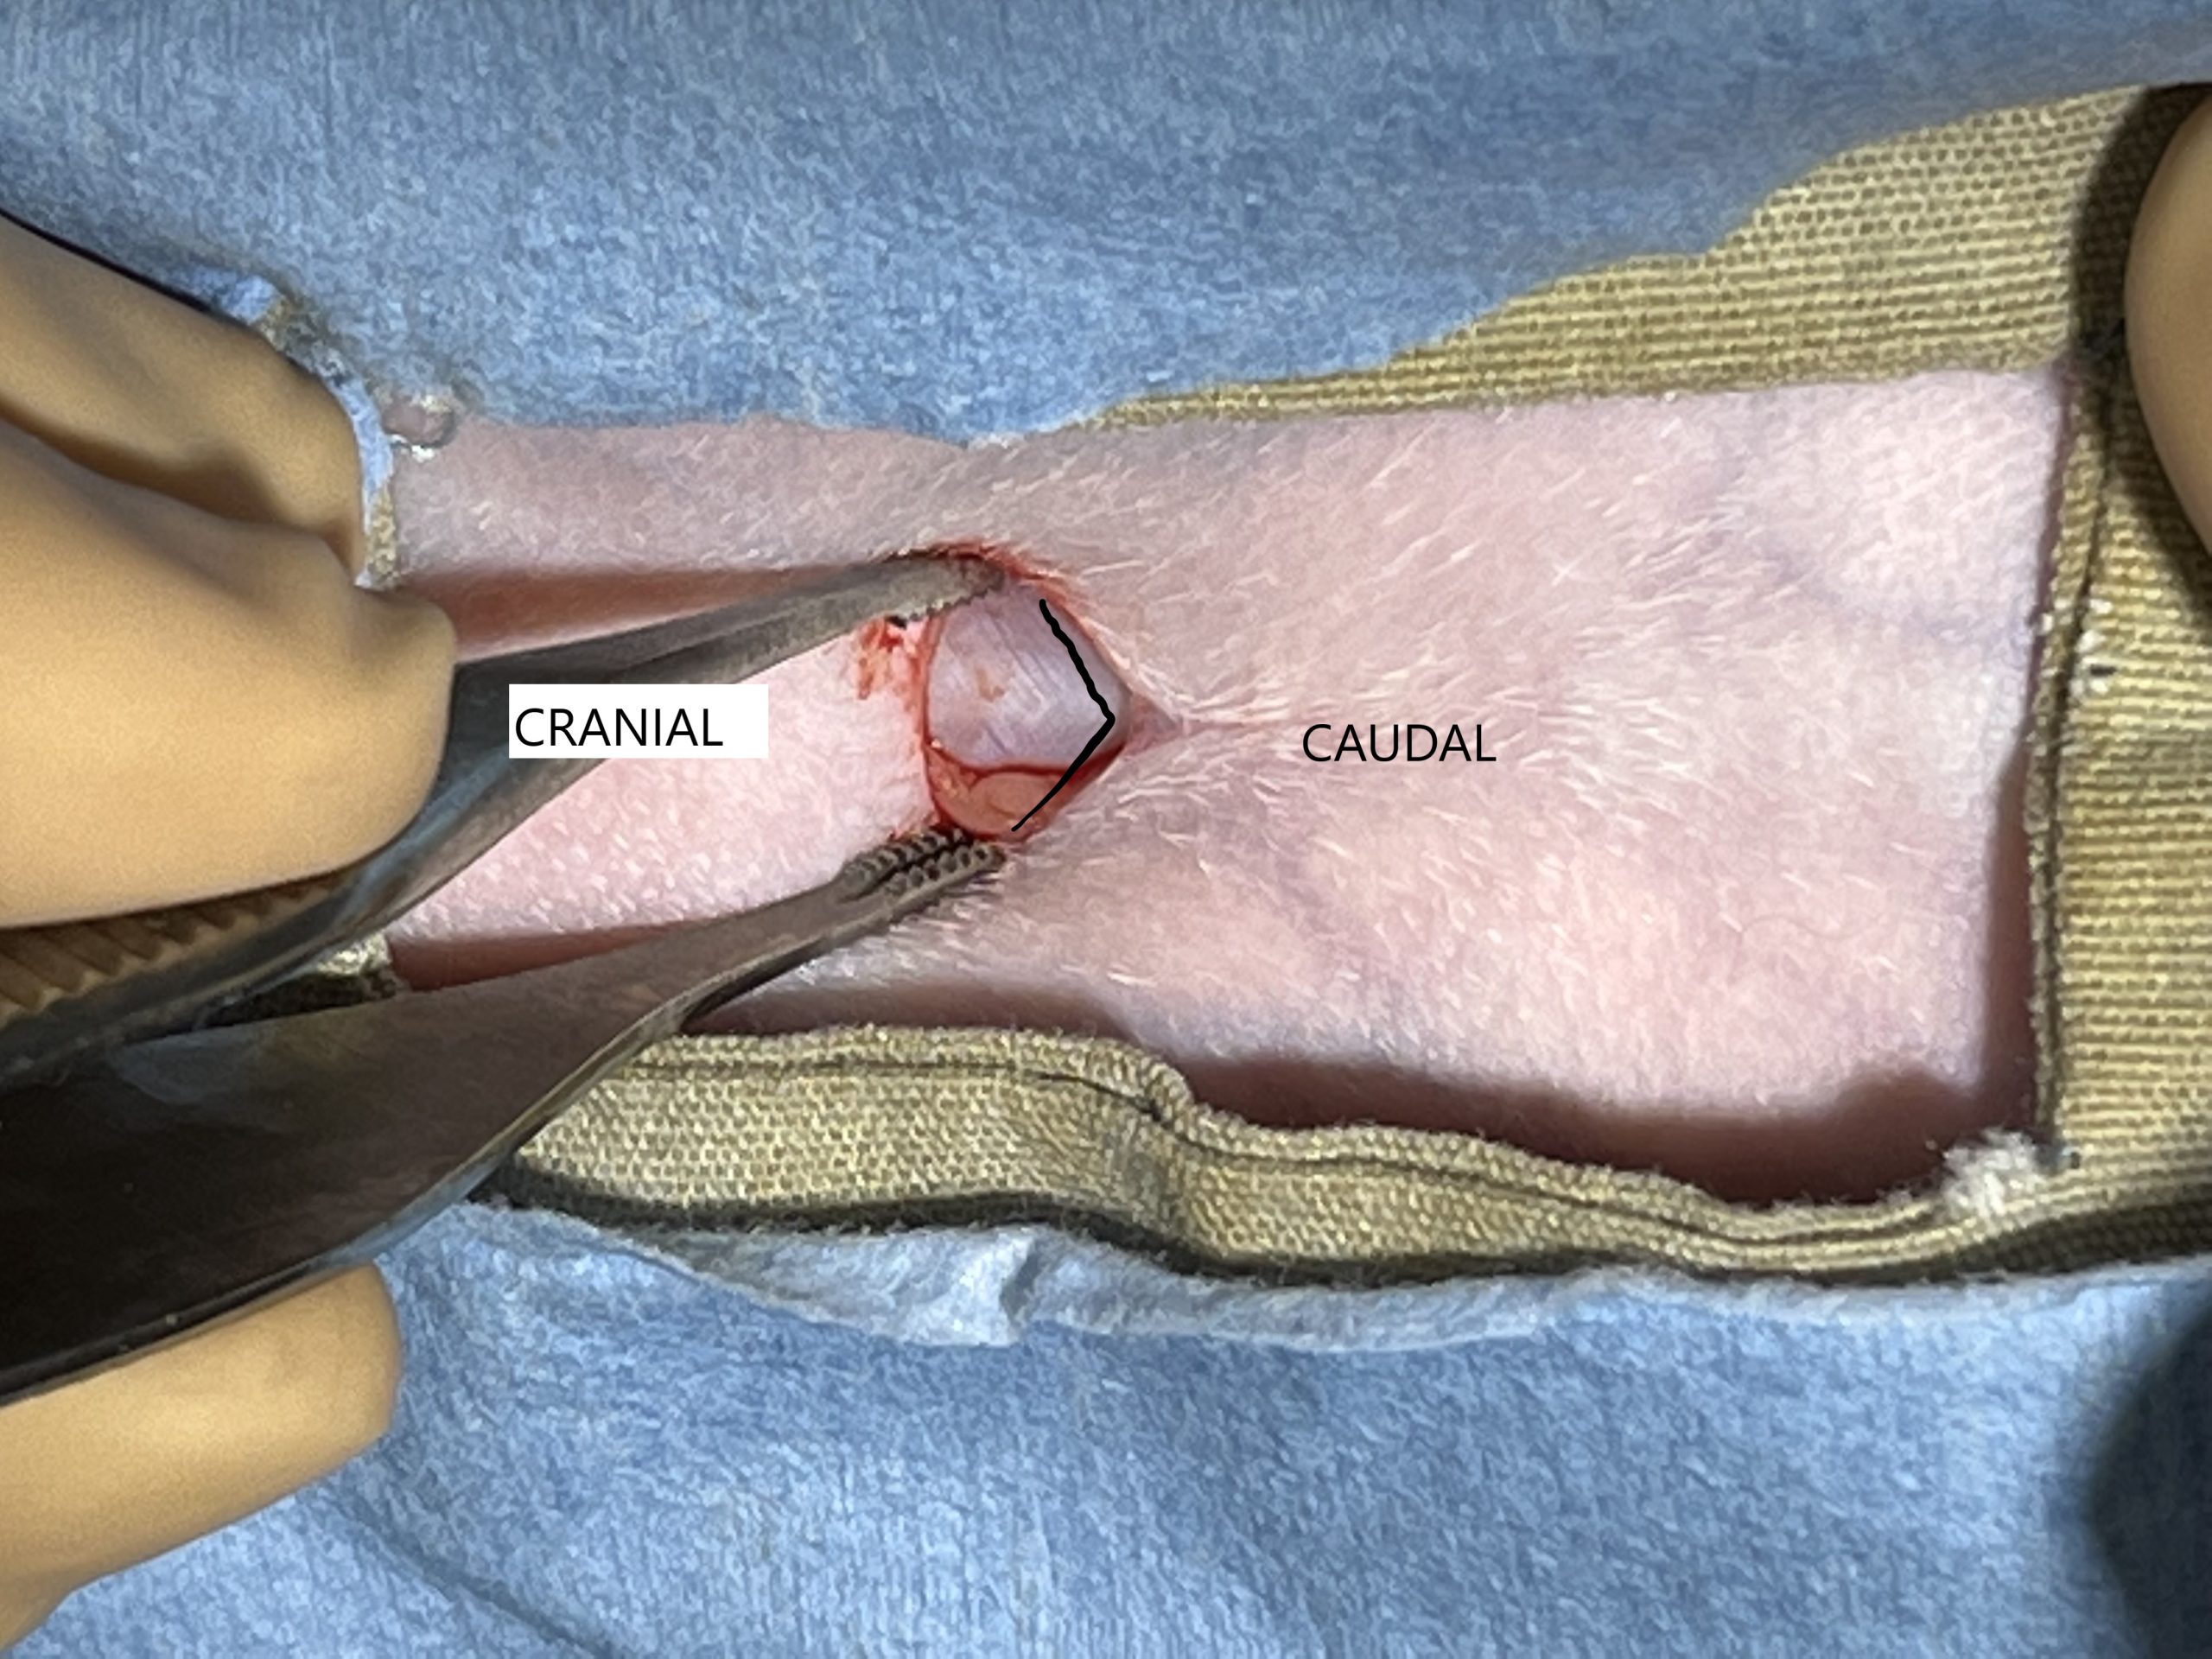
( ) Linea is directly dorsal or below the parted fat-refer to article above. Look for the Linea alba or white line where the connective tissue from both sides of abdominal wall meet. Tidbit fibers of the external sheath meet at the linea forming a chevron pointing caudally in ventral abdominal approach (fibers from external abdominal oblique course from superior to inferior (caudally as viewed ventrally) .
( ) Gently grasp linea with thumb forceps-adson brown or rat tooth and lift up to form a tent, this helps protect abdominal contents from being poked, make a small “stab incision” along the long axis of the linea scalpel blade pointing upward, parallel with linea, NOT downward! This is an important concept to implement to prevent injury to spleen/intestines! Many pictures illustrate sharp tip of scalpel pointed down-this is NOT recommended as can cause injury to abdominal organs! Tidbit can use tip of needle to catch linea and gently pull linea directly upward Tidbit often helpful not to stretch out patients legs too much towards the head as can make the linea quiet taught and difficult to tent up to make the initial incision (although please realize some DVMs prefer legs stretched out toward the head to increase tension on the suspensory ligament). Some spay neuter vets like front legs along the sides of the patient, others front legs stretched out next to head, some use V trays, others not-lots of variation! Find out what you prefer and why-this becomes clear as you add experience 🙂 ID and incising linea video right handed, ID and incising linea video left handed
( ) Carefully extend incision by again lifting the linea at the site of incision, carefully insert closed forceps, or groove director into incision along the inner aspect of the linea, and lift up, keeping linea elevated and guarded by width of forceps or groove director and elevation of linea to protect the underlying abdominal organs and intra abdominal fat when extending incision with scalpel blade, or sharp Mayo scissors (metzenbaum scissors are too delicate for incising connective tissue. Using the body of the blade parallel to the linea, carefully incise mid linea using one continuous incision while keeping constant upward pressure while incising. Tidbit be aware of deep breaths of the patient potentially impacting when you make your incision-pay attention and be careful! Also be cognizant of potential adhesions to body wall if patient has had previous surgery
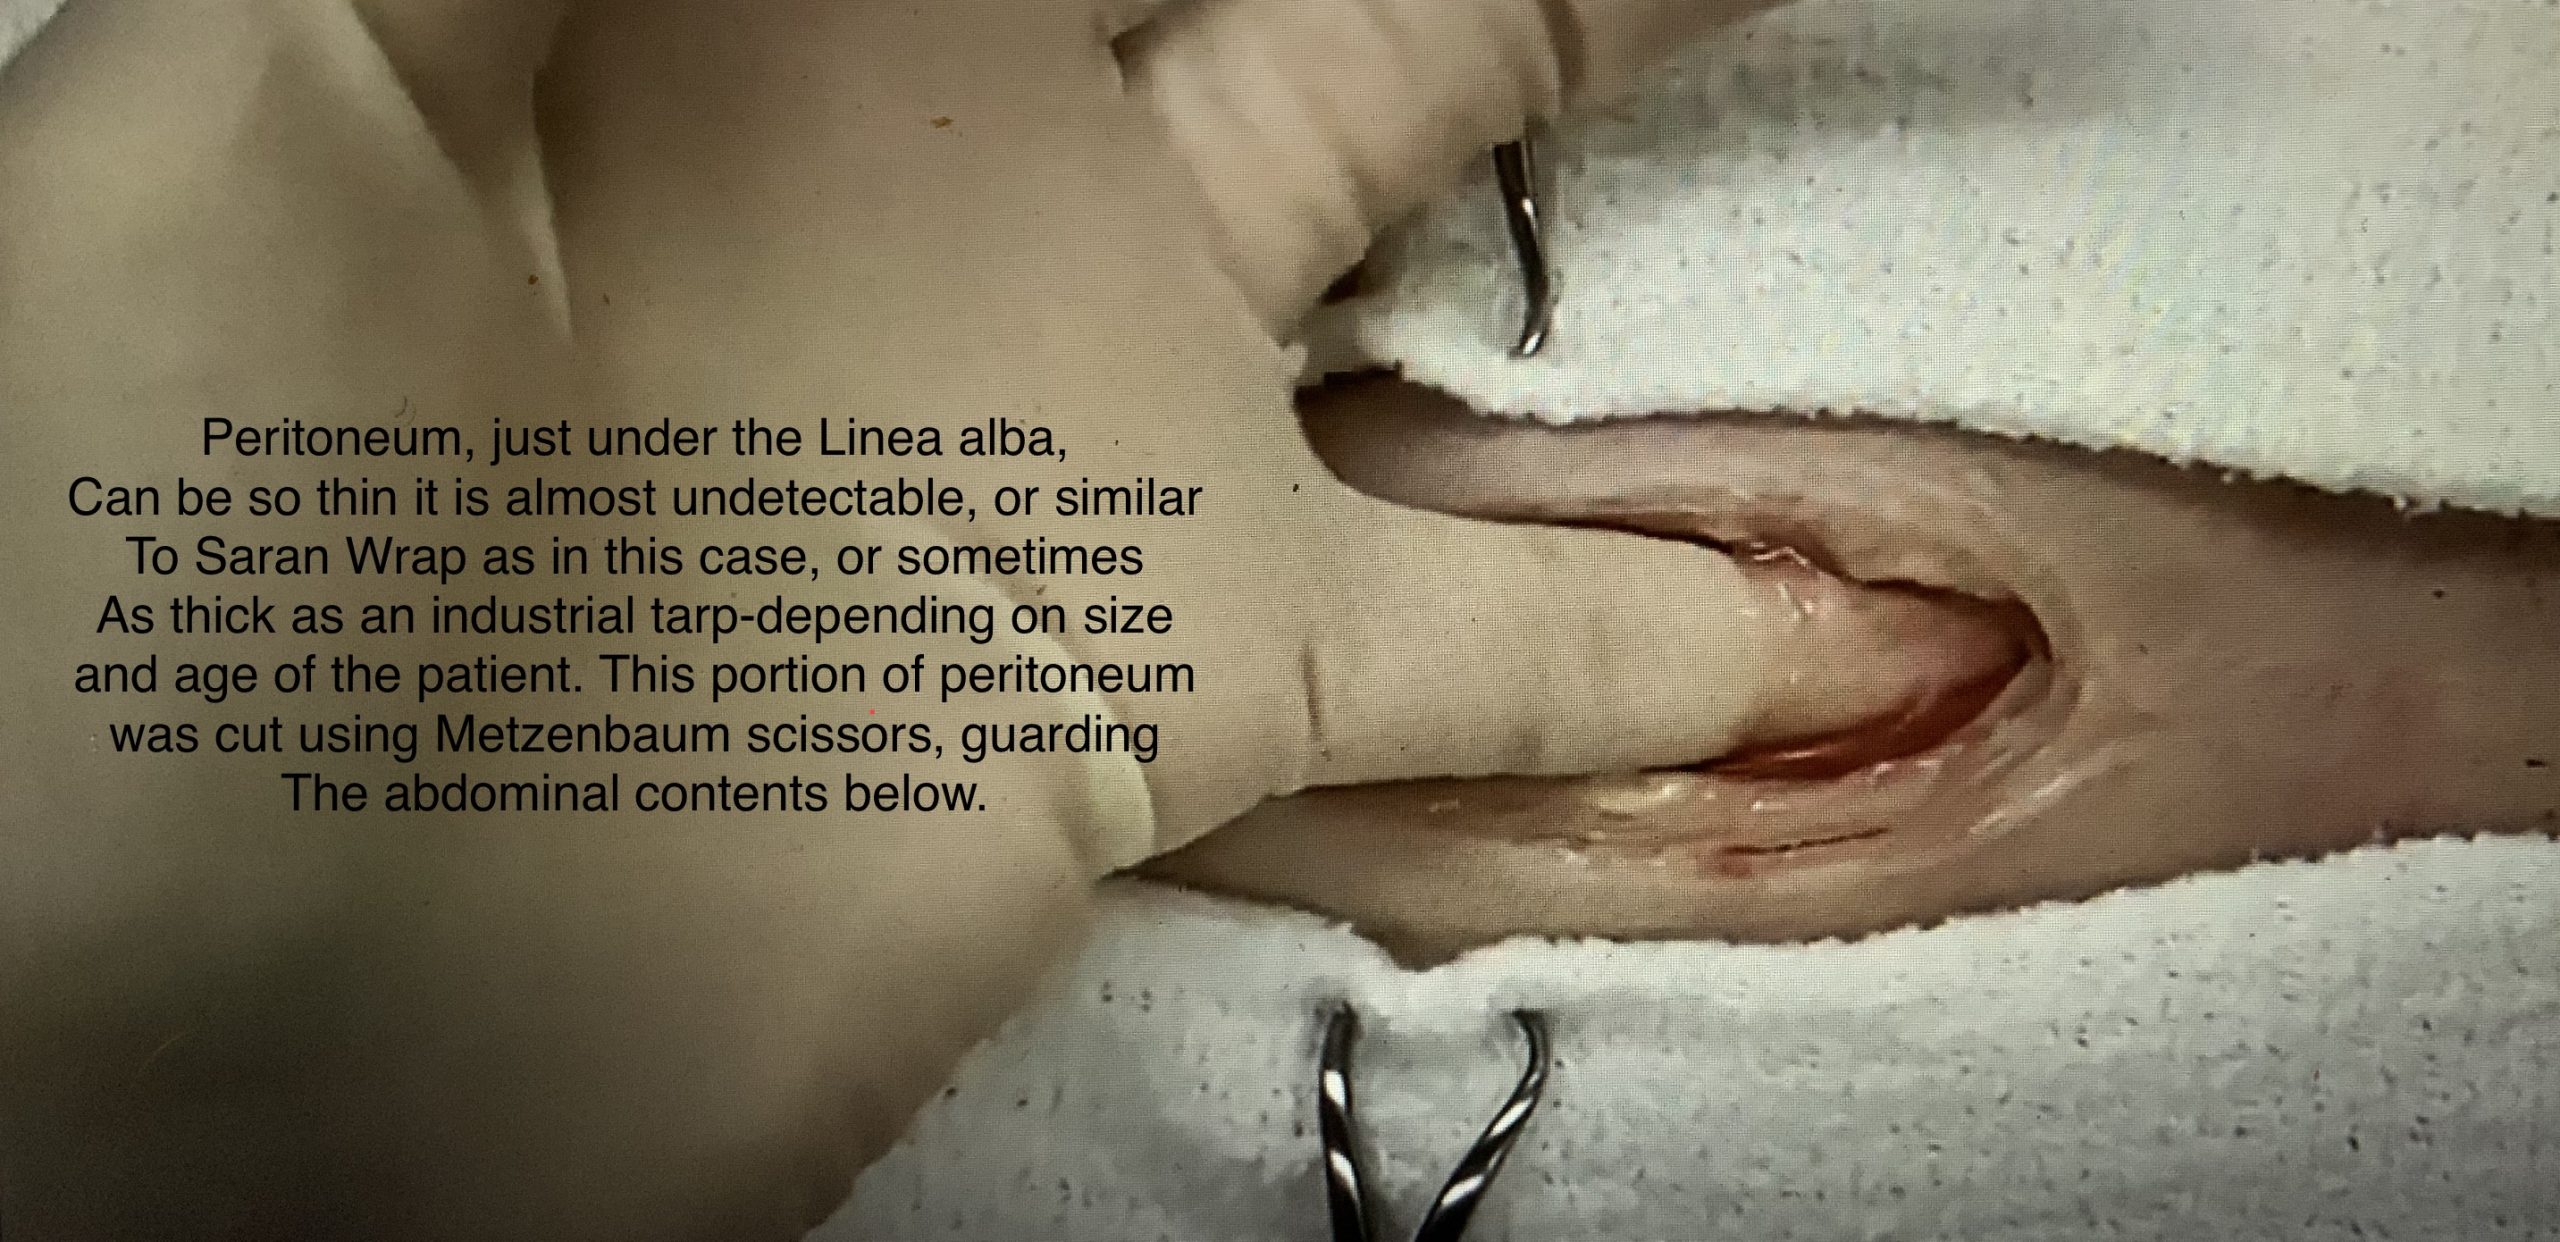
( ) Peritoneum-can be very thin (barely detectable) or thick/tough (like saran wrap or an industrial tarp), depending on patient size, age, breed, species. TidBit Sometimes when the linea is incised in manner described above the peritoneum separates from the inner aspect of the body wall and is not incised-if this happens, your spay hook will not be able to be advanced! so its worth double checking this and carefully incising the peritoneum while protecting the abdominal contents below it. This is described in the video above and picture link below.
( ) Use close observation and/or little finger to check if you are through the peritoneum, If not yet through the peritoneum, gently lift the body wall up by incision, grasp tiny bit of peritoneum and make tiny nick with Metzenbaums in the peritoneum, (careful to stay above abdominal contents) and carefully extend the incision in the peritoneum in the same manner as above (lifting peritoneum and protecting abdominal contents by inserting forceps or groove director to keep peritoneum elevated as you incise along the peritoneum.
II) REMOVE OVARIES AND UTERUS
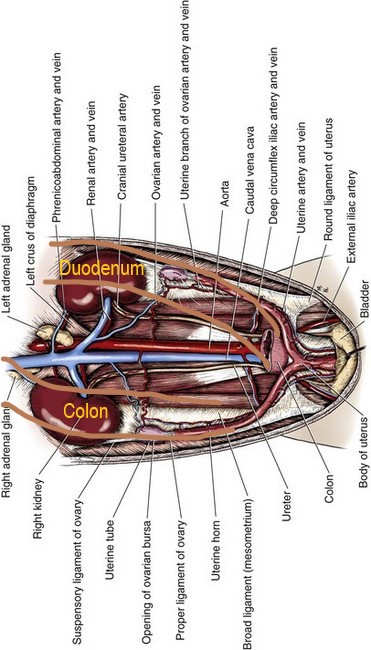
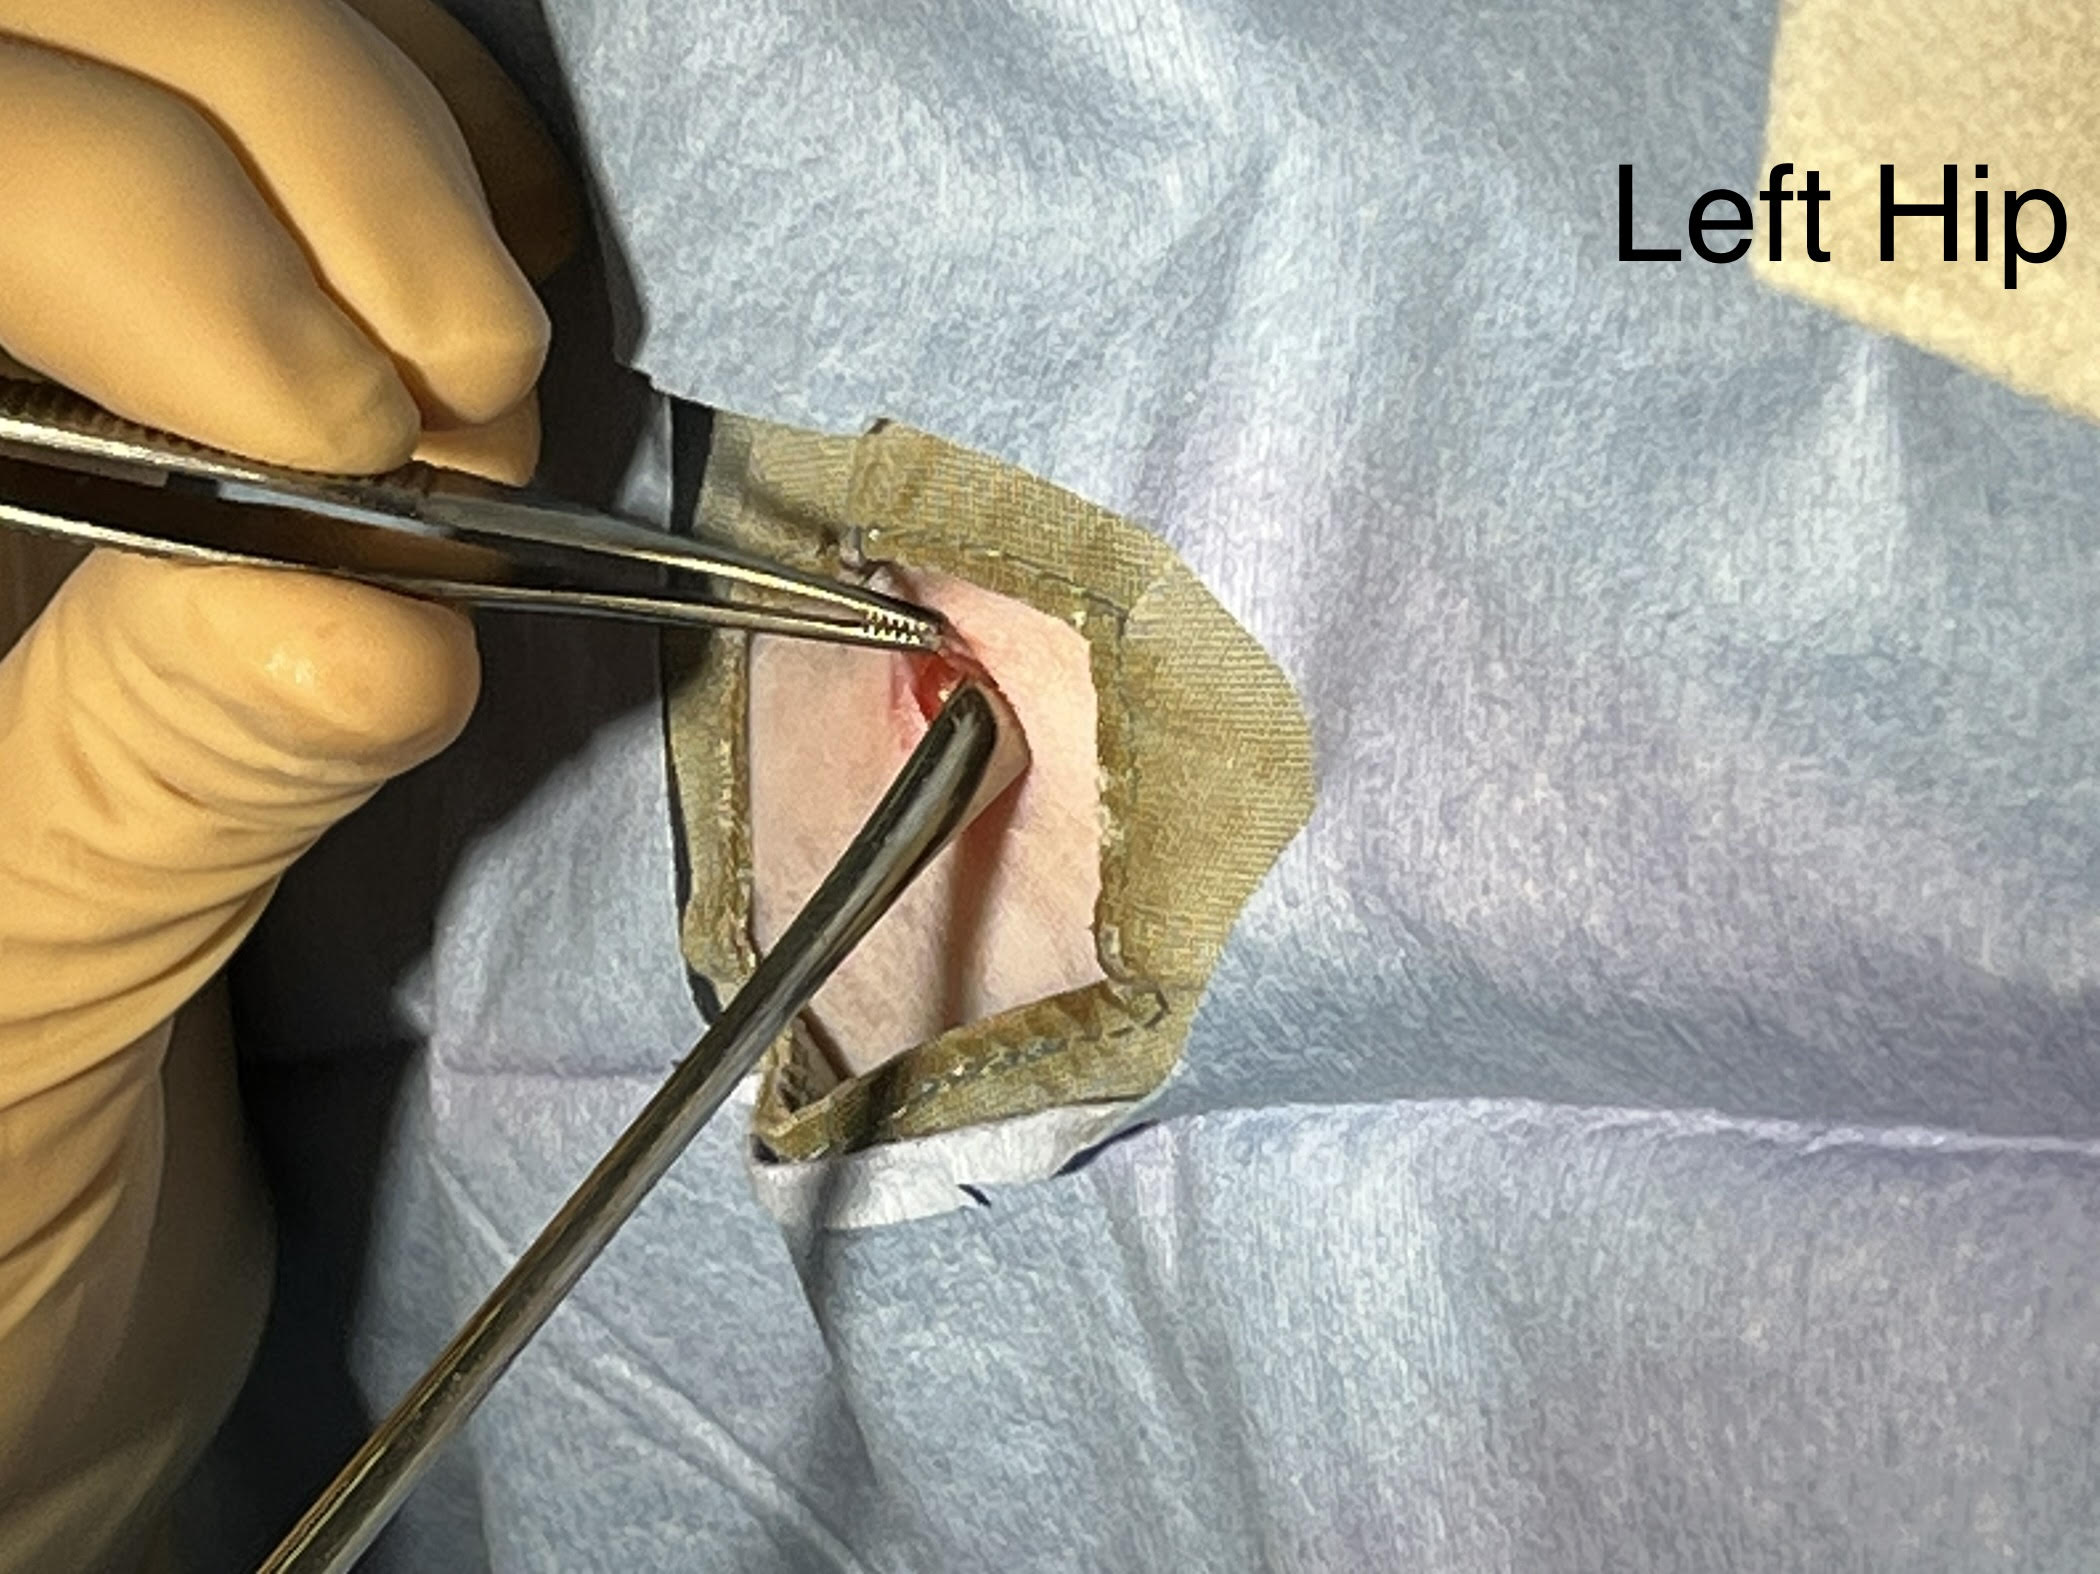
4) Locate and bring the Left uterine horn to incision-prior to starting, visualize where the uterine horns are! (most surgeons stand on right side of patient and start with left ovary as usually easier to gently lift up TidBit righty tighty, lefty loosey-right kidney and ovary are more cranial and tighter dorsally, left kidney and ovary more caudal and hang more ventrally, so generally easier to find left side than right side). Remember left horn is beneath the colon- descending colon is on left side of V/D radiograph, right horn beneath duodenum- duodenum is first part of small bowel which is on the cranial right abdomen (during national anthem hand over your heart or cardia of stomach which is to the left, duodenum on the outflow side or the right by pylorus ). Here’s another reminder V/D view of female dog reproductive tract-similar to cat:)
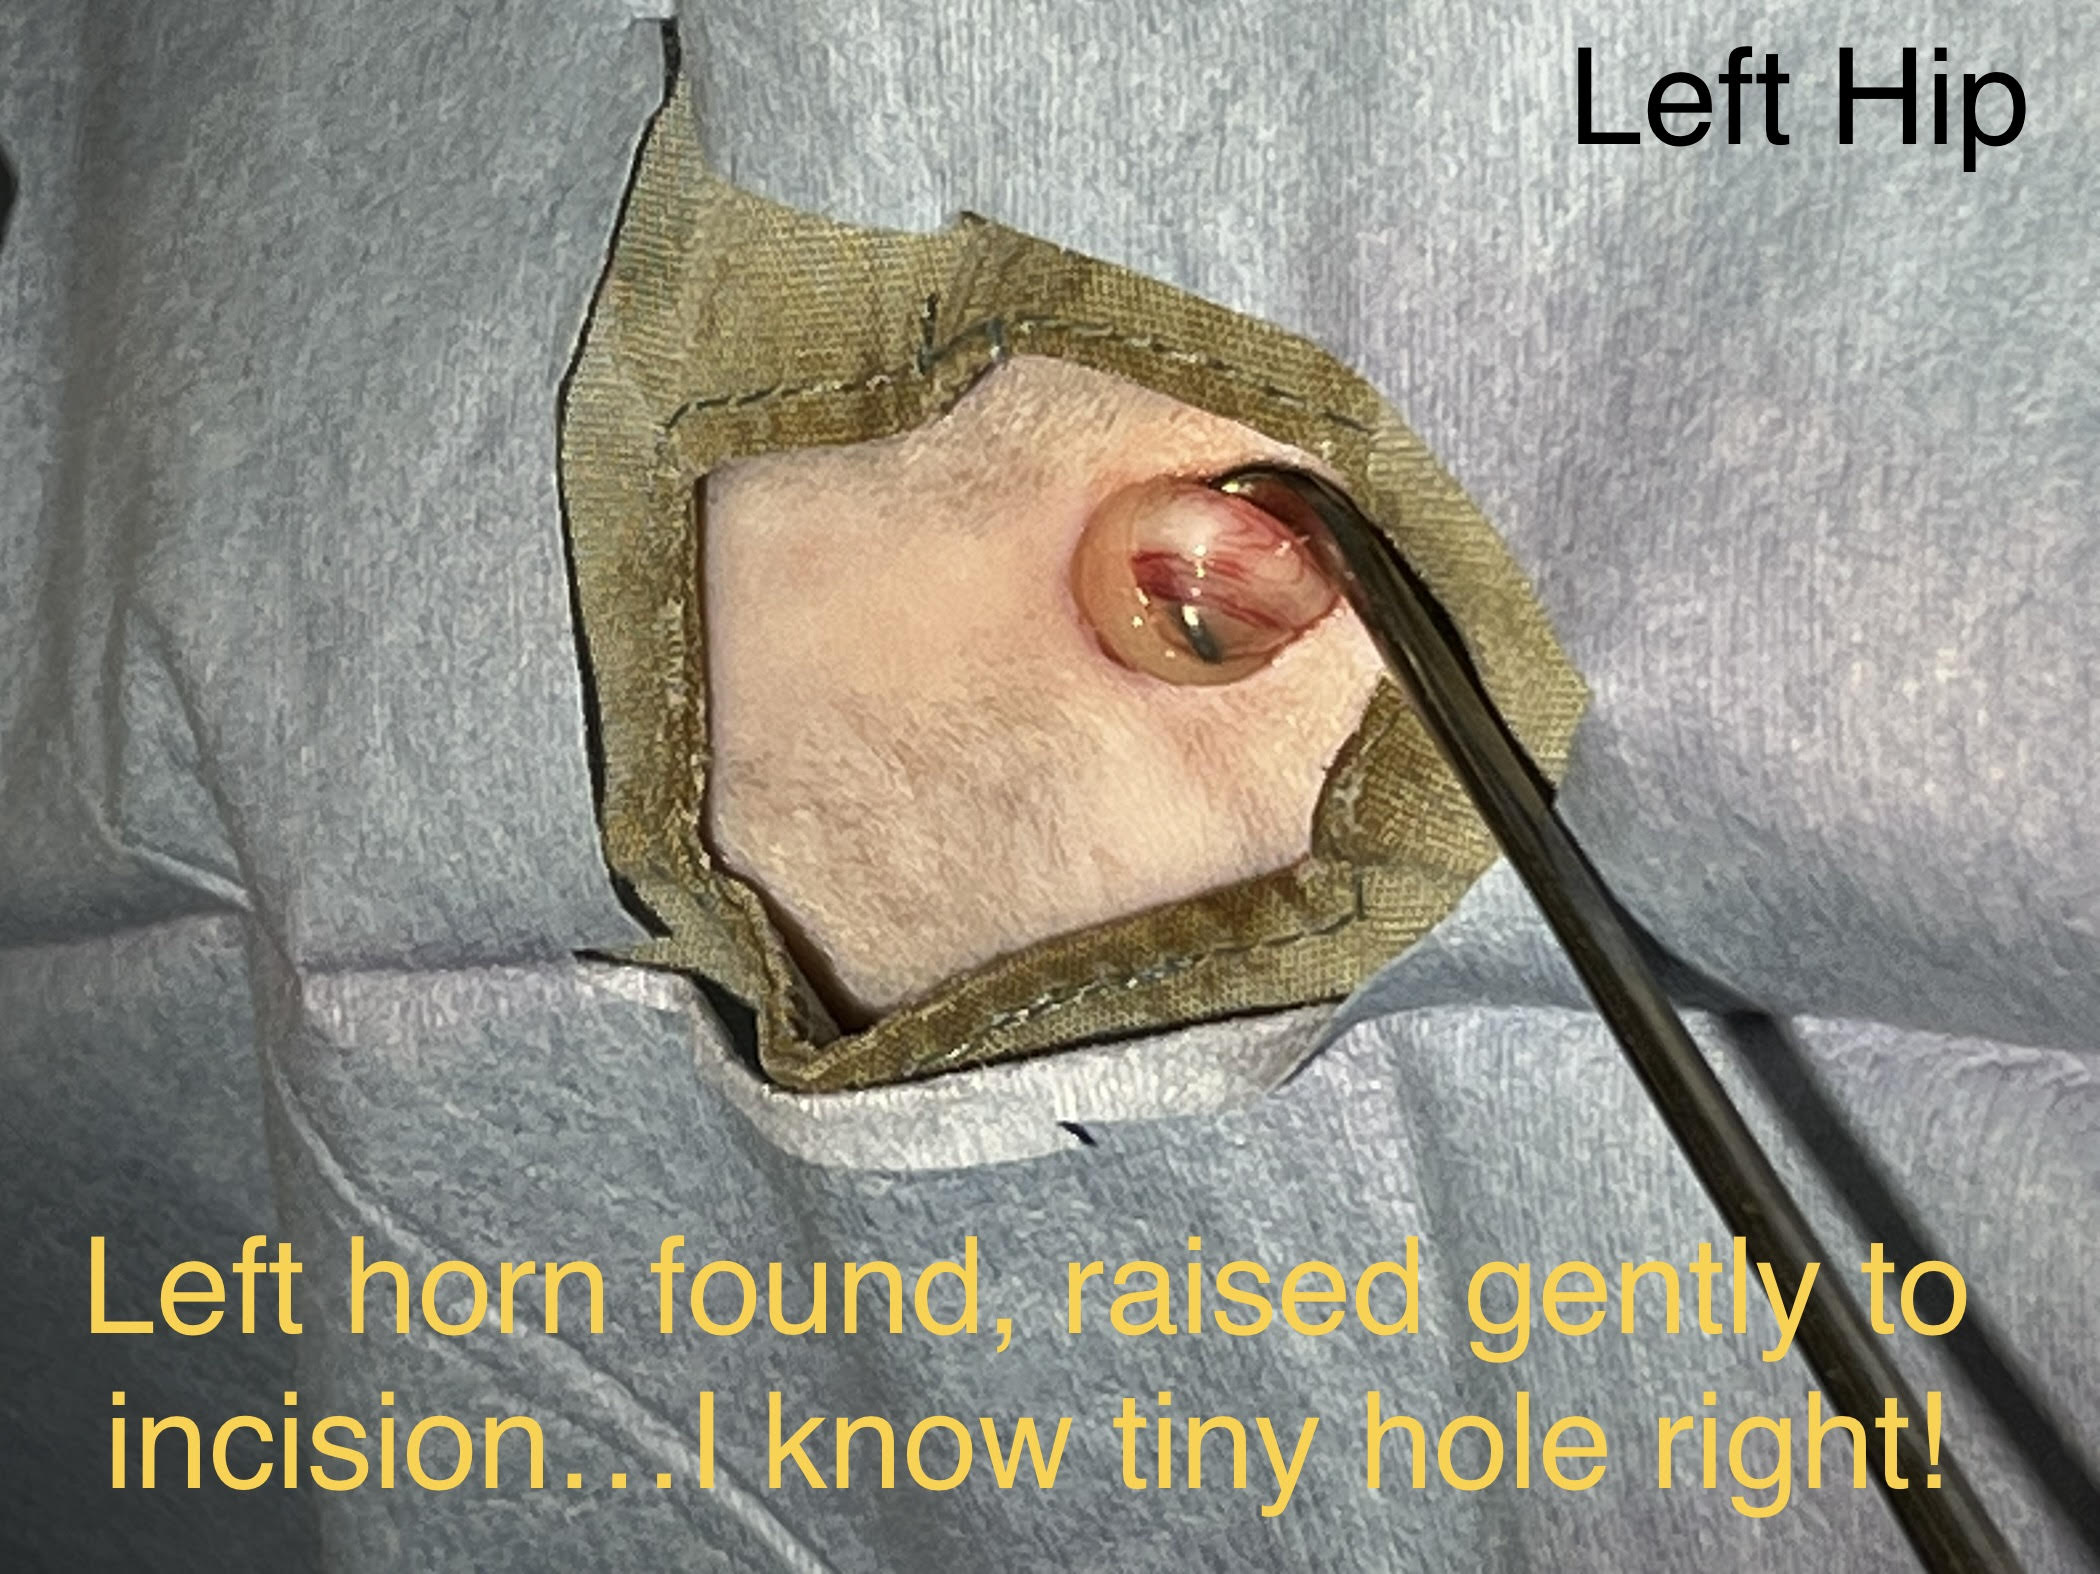
( ) Gently move descending colon on the left side closer to midline with non dominant index finger, and direct spay hook along the body wall towards the left hip (haha yes this is how tiny a spay/neuter surgeon’s incision is-don’t worry yours’s will be longer!) from ventrum to dorsum, hook facing caudally, then when close to dorsum, on midline, turn hook 90 degrees so the open end of the hook is facing toward surgeon, and then gently direct hook carefully toward midline to capture the left horn as the hook is raising ventrally. Use a light touch w/thumb and index finger VIDEO of this spay hook action using a model-make sure this makes sense to you! Additionally, you can gently redirect the omentum as needed-be careful not to rip the omentum, fingers only! Tidbit Use gentle rocking toward and away from surgeon motion as you gently lift up (the hook of the spay hook is the fulcrum) as this helps any entrapped bowel and omentum to fall off the hook as uterine horn is thinner than intestines and tends to stay within the hook, larger diameter intestine fall off. Gently lift the omentum or intestine off the hook with gloved fingers, or often best to unhook tissue and restart…better safe than sorry! ALWAYS be gentle 2 fingers only, NEVER pull too hard! Avoid using instruments to grab intestine or omentum as risks puncturing serosa or ripping the omentum- should not be ripped or punctured as intestinal loops can become entrapped so use gentle fingers! If you have an overweight patient it is best to elongate your incision to make things easier rather than struggle!
Alternatively if your incision is large enough, you can use your right index finger in lieu of the spay hook and hook the left uterine horn with tip of index finger between P2 and P3 and gently bring up (ventrally). I’ve always found its easier for me to palpate and hook the right uterine horn with my right finger as I am right handed. Generally you can feel the difference between the thinner uterine horn and the intestines.
( ) Verify you have the horn by finding ovary cranially, and the bifurcation caudally. Determine if any adhesions, determine if you need to lengthen incision. Don’t force things, you can carefully elongate incision if needed-always protecting the abdominal contents as you make the initial incision into skin, then part SQ fat and incise the abdominal wall using the same technique as when you started!
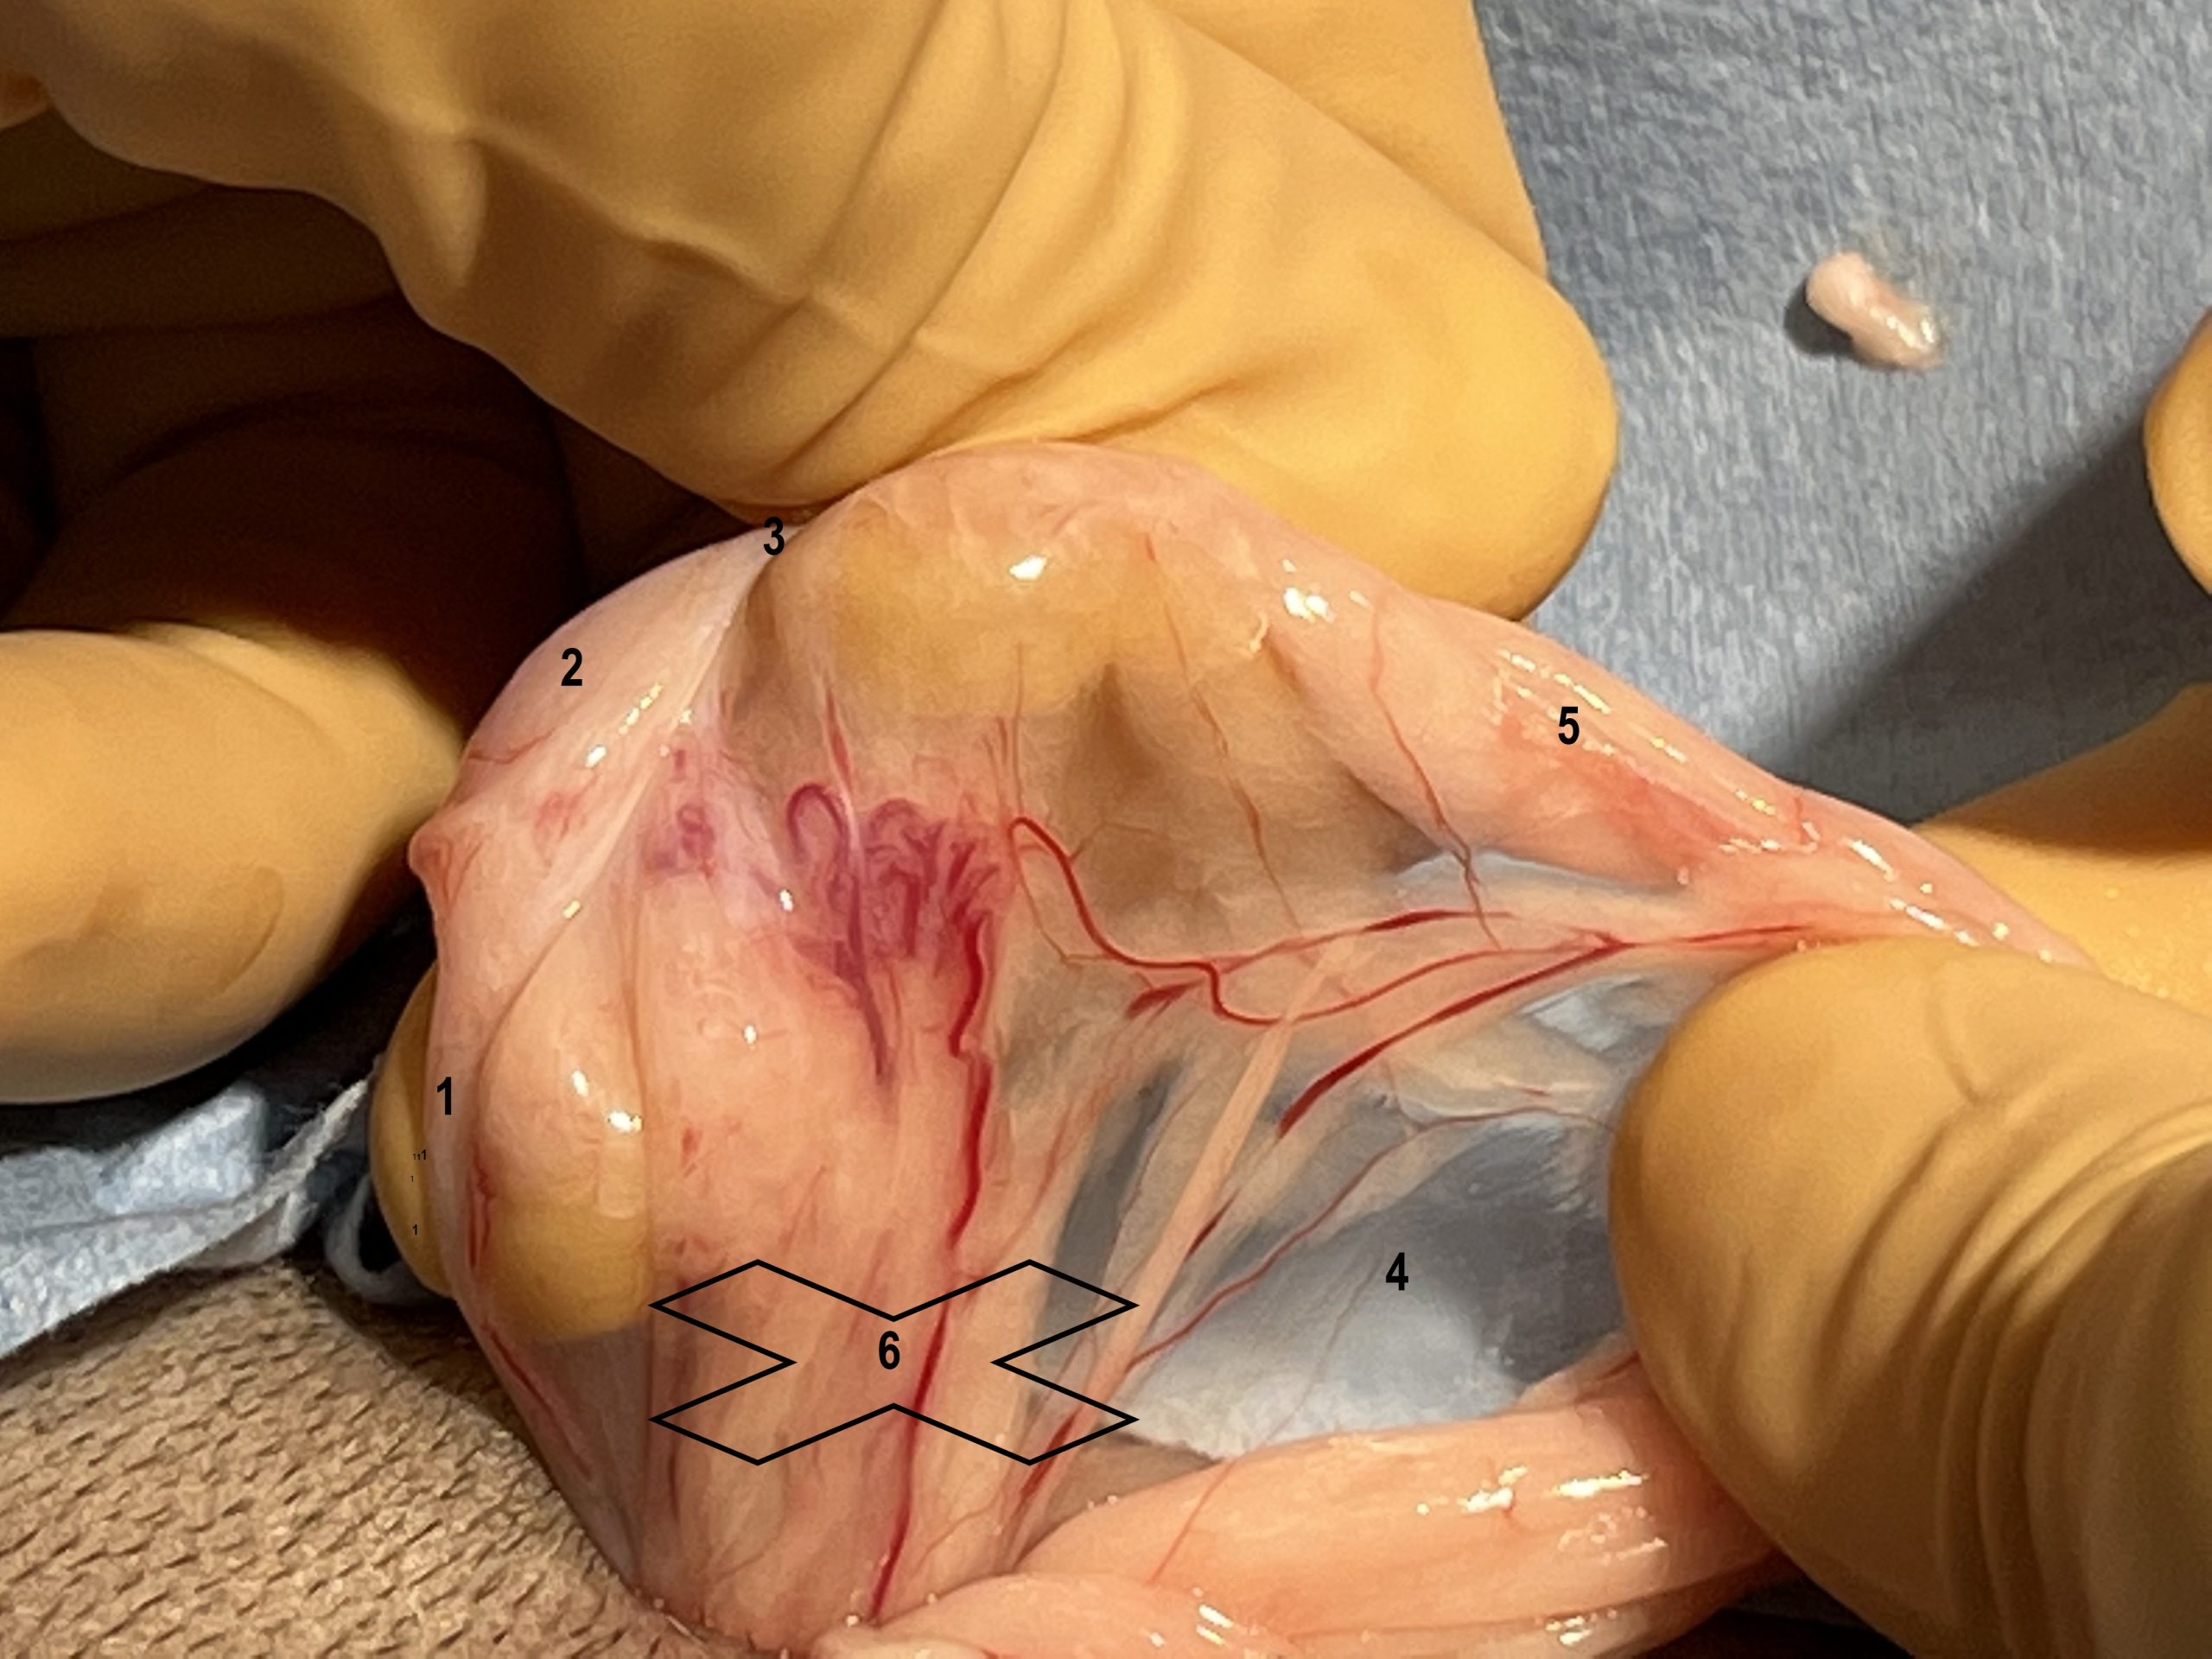
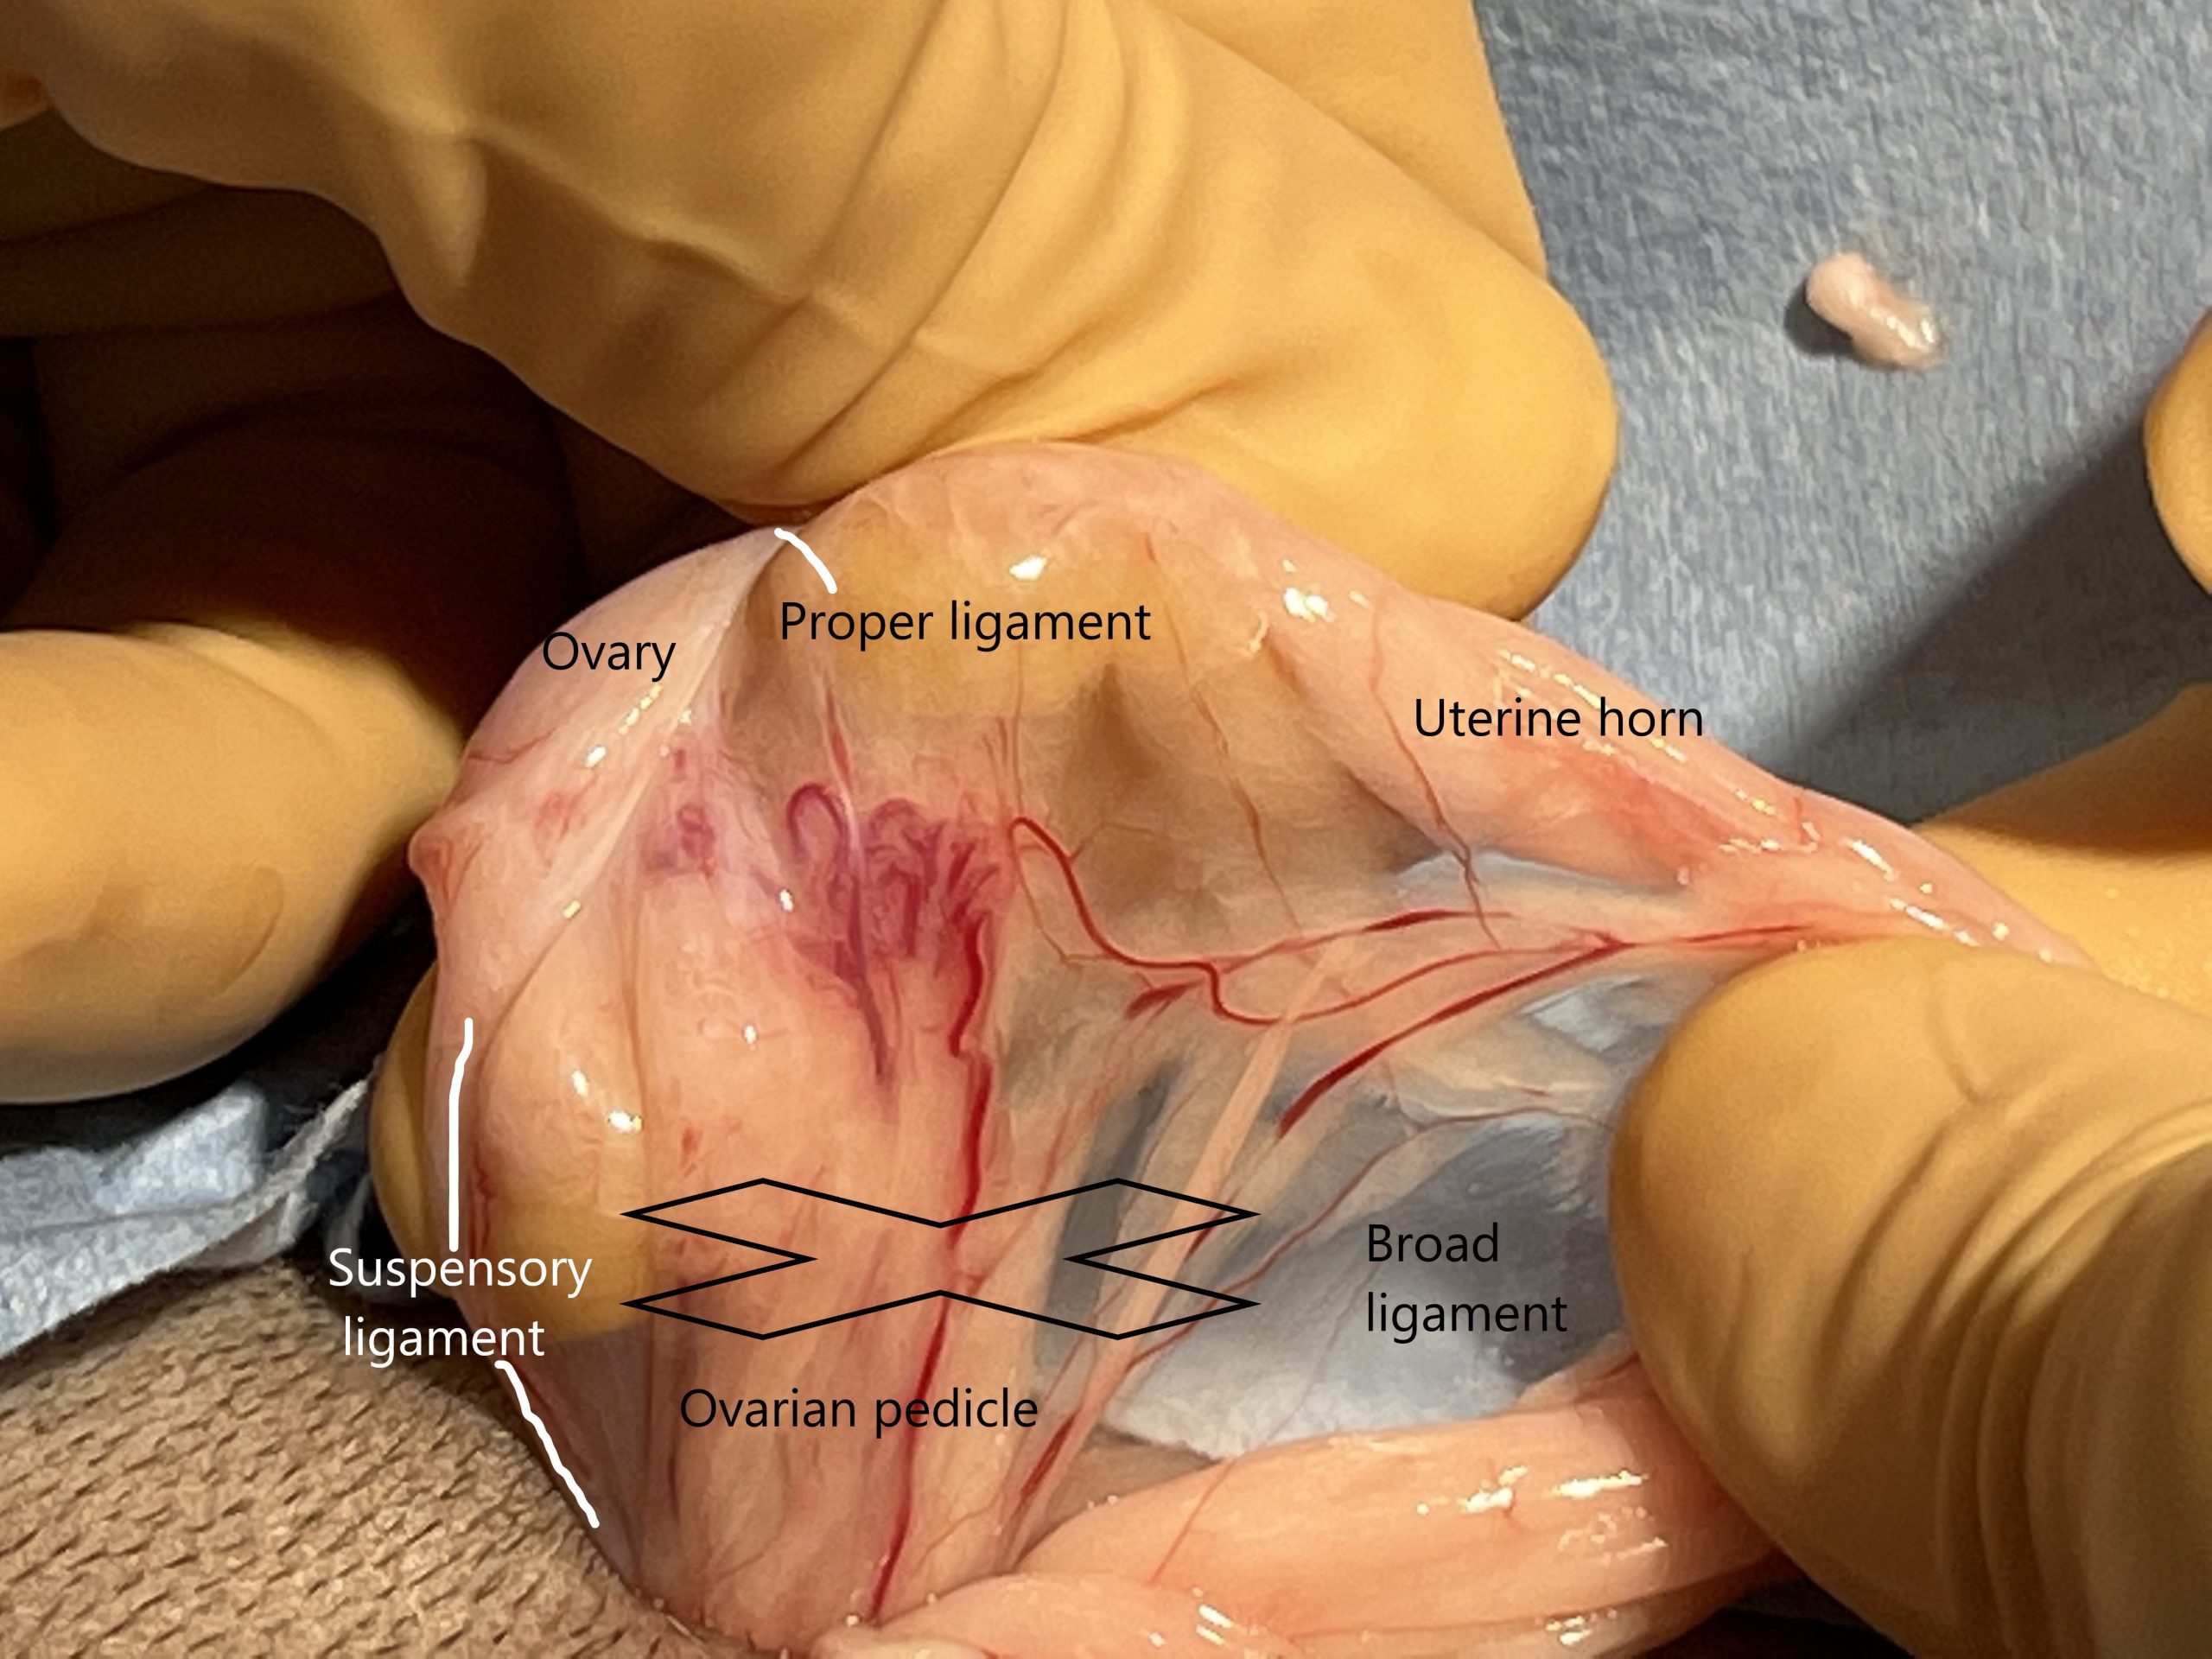
5) ID Suspensory lig, Ovary, Proper lig, and Ovarian pedicle, Broad lig, then ligate ovarian pedicle Often can gently lift ovary out far enough w/out releasing/strumming the Sue Spencory lig 🙂 Pictures identifying reproductive structures (Suspensory lig, ovary, proper ligament, ovarian pedicle and broad lig pictured laying down on abdominal viscera and raised up by holding proper ligament behind the ovary during spay, also demonstrates good technique to breakdown the suspensory ligament from lateral to medial through a GINORMOUS incision to clearly illustrate anatomy.
( ) Identify structures in this picture labeled 1-6. Gently hold the proper (ovarian) ligament caudal to the ovary with thumb/index or clamp and (use sterile light handle on sx light to backlight the area if needed) to ID structures.
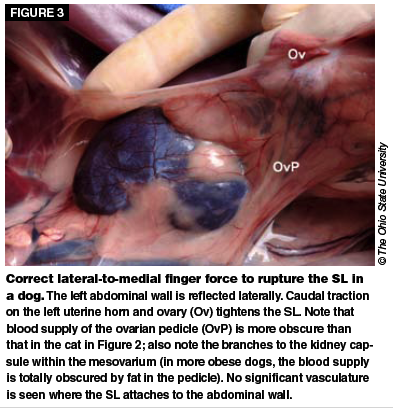
( ) Use steady tension on the proper (ovarian) lig w/o crunching the ovary! then strum the suspensory ligament with the other hand from lateral to medial as cranially as possible as further away from the ovarian pedicle. PLEASE NOTE you may not need to break the suspensory ligament if the ovary can be exteriorized by gently stretching the suspensory ligament…each case is different! The suspensory ligament can also be nicked slightly to facilitate breaking down the suspensory ligament with open metzenbaum scissors. Tidbit be careful as if you use an instrument on the proper lig it can tear from the ovary-less likely if you use thumb/index finger to hold, and remember the suspensory ligament courses cranially + dorsal (deep when patient is in dorsal recumbency) from the ovary. Make sure you know where you are DON’T strum the ovarian pedicle!
( ) An advanced technique can be used once surgeon’s have gained experience in tissue handling; the suspensory ligament can be nicked with a blade…CAUTION! do not cut the ovarian pedicle! This technique is used by HQHVSN when performing an ovarian pedicle tie (auto-ligation using the ovarian pedicle, similar to auto-ligation tying spermatic cord with associated blood supply on itself during cat neuter. Link to recent JAVMA article regarding OPT “Retrospective review reveals few complications of ovarian pedicle tie in 15,927 cats undergoing ovariohysterectomy at a large HQHVSN clinic and training facility in the United States: 2017–2018″ Link to You Tube Video showing OPT from Harmony Vet Care
ANSWERS TO PICTURE LABELED 1-6 above
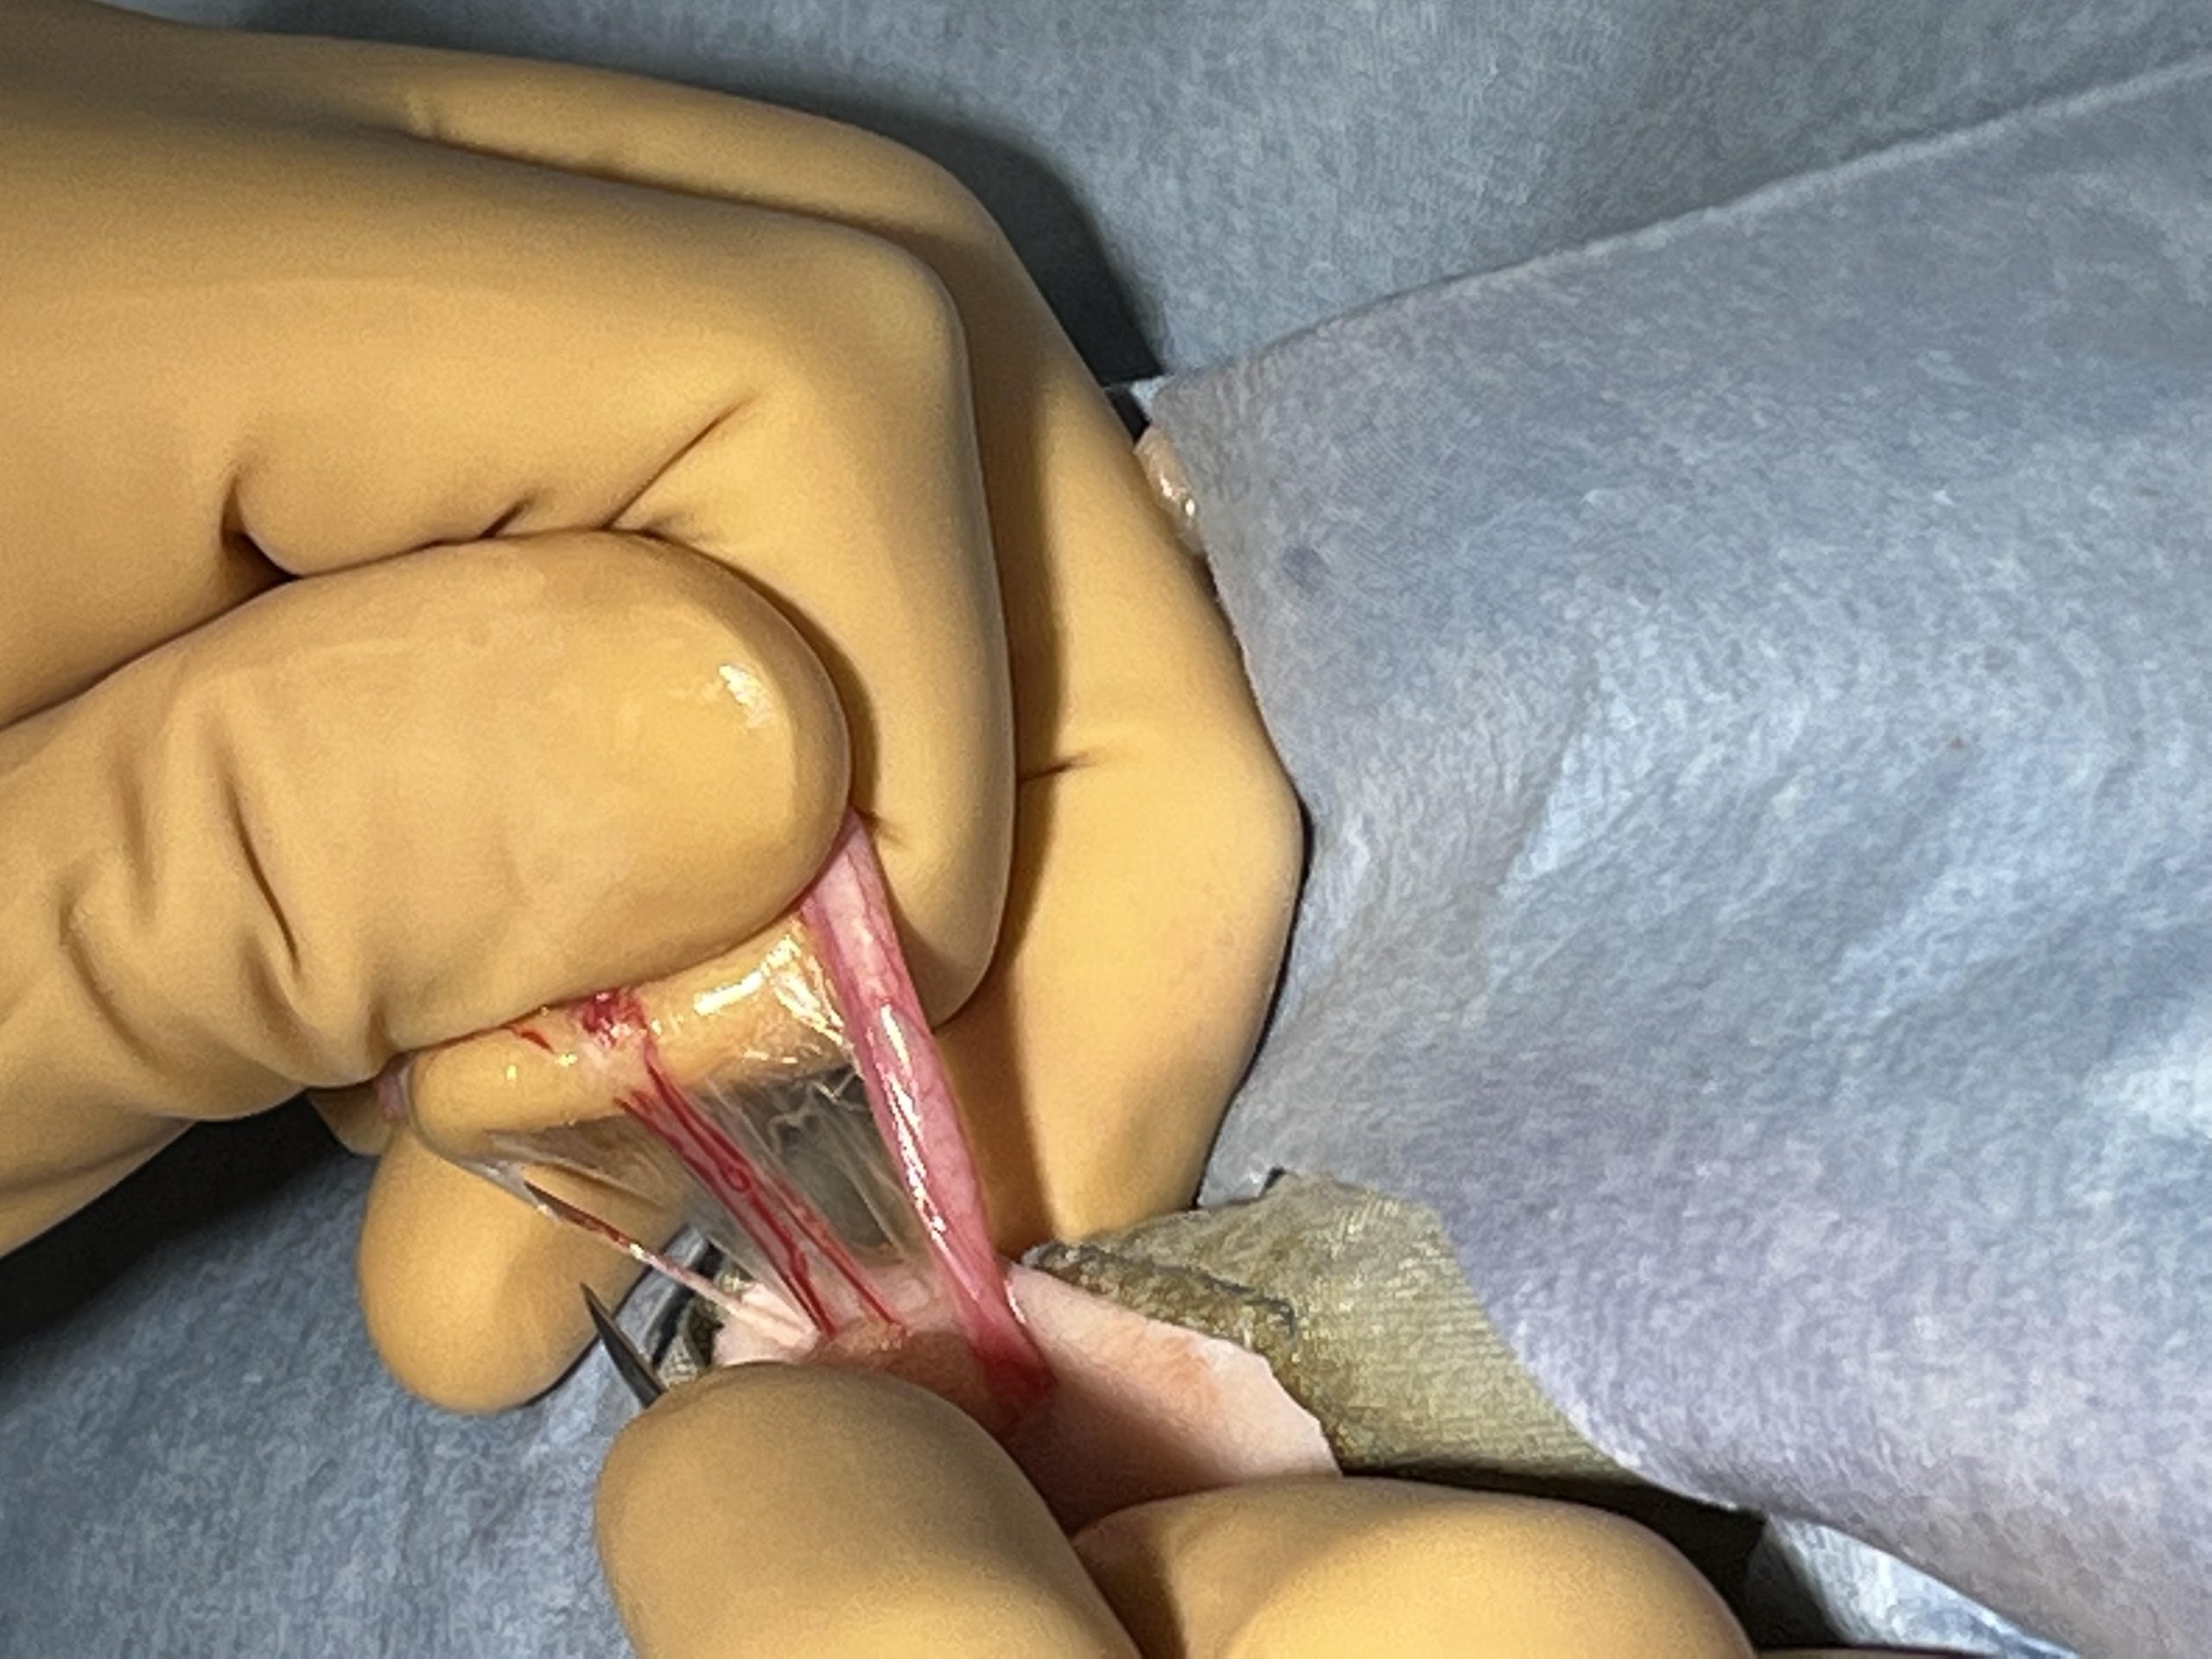
( ) Gently make a fenestration through the broad ligament caudal to ovarian pedicle and ventral to the ovary using tips of mosquito forceps, held perpendicular to broad ligament and carefully open jaws in ventro-dorsal plane to create a window. Be mindful that enlarging the window may create force upon the ovarian pedicle and broad ligament and potentially tear vasculature within the broad ligament or the uterine vasculature which courses along its length. The window creates room for clamp and ligature. Use your discernment skills to determine the best placement area for the clamp and ligature to capture important branches within the broad ligament. Tidbit avoid crushing any stray follicles that maybe within the broad ligament-they can fall in the abdominal cavity, obtain blood supply and secrete hormones!
( ) Think about 3 things when planning to do circumferential ligation of ovarian pedicle
1) What clamp will I use? size of ovarian pedicle largely determines this choice, as well as how brittle the pedicle is! can I even use a clamp or will a clamp cut through the tissue? Often older overweight dogs have this issue Mosquito, Kelly, Carmalt?
2) Which method will I use? autoligation of ovarian pedicle is best performed after you have performed multiple neuters and spays when your skills are honed and ready no clamp, one clamp, 2 clamp or 3 clamp technique?
3) Suture size and knot? Suture choice and Knot type should match the size and texture of tissue being ligated (structure-function) do you use a regular knot, surgeon’s, or Miller’s? Often one suture pack is used for entire procedure 4.0 for kittens and 3.0 for cats is a good start TidBit keep your suture in its foil pack until you see the ovarian pedicles and uterus, then make your decision-this is more common in dogs than cats as their size of uterus can vary widely with breed and age. ETHICON handy suture selection guide-there are a lot of choices and opinions! check out this excellent suture guide and be sure to ask vets about their suture selection-you’ll find a lot of opinions! We will pick and provide suture for live animal spay/neuter lab for you 🙂 Handy suture comparison chart-luckily most companies use same color coding!
Use efficient circumferential ligation technique videos w/ RH and LH (description of a technique to manage the suture for efficient ligature placement, and right handed + left handed VIDEOS using model)
*You may need to Flash or release the clamp while placing ligature to allow for compression of tissue by ligature which sometimes can not occur if the clamp is spreading the tissue flat-there can be enough tension from the clamp that you can not tighten the ligature properly . This is a different technique than placing the ligature in the crush of the clamp!
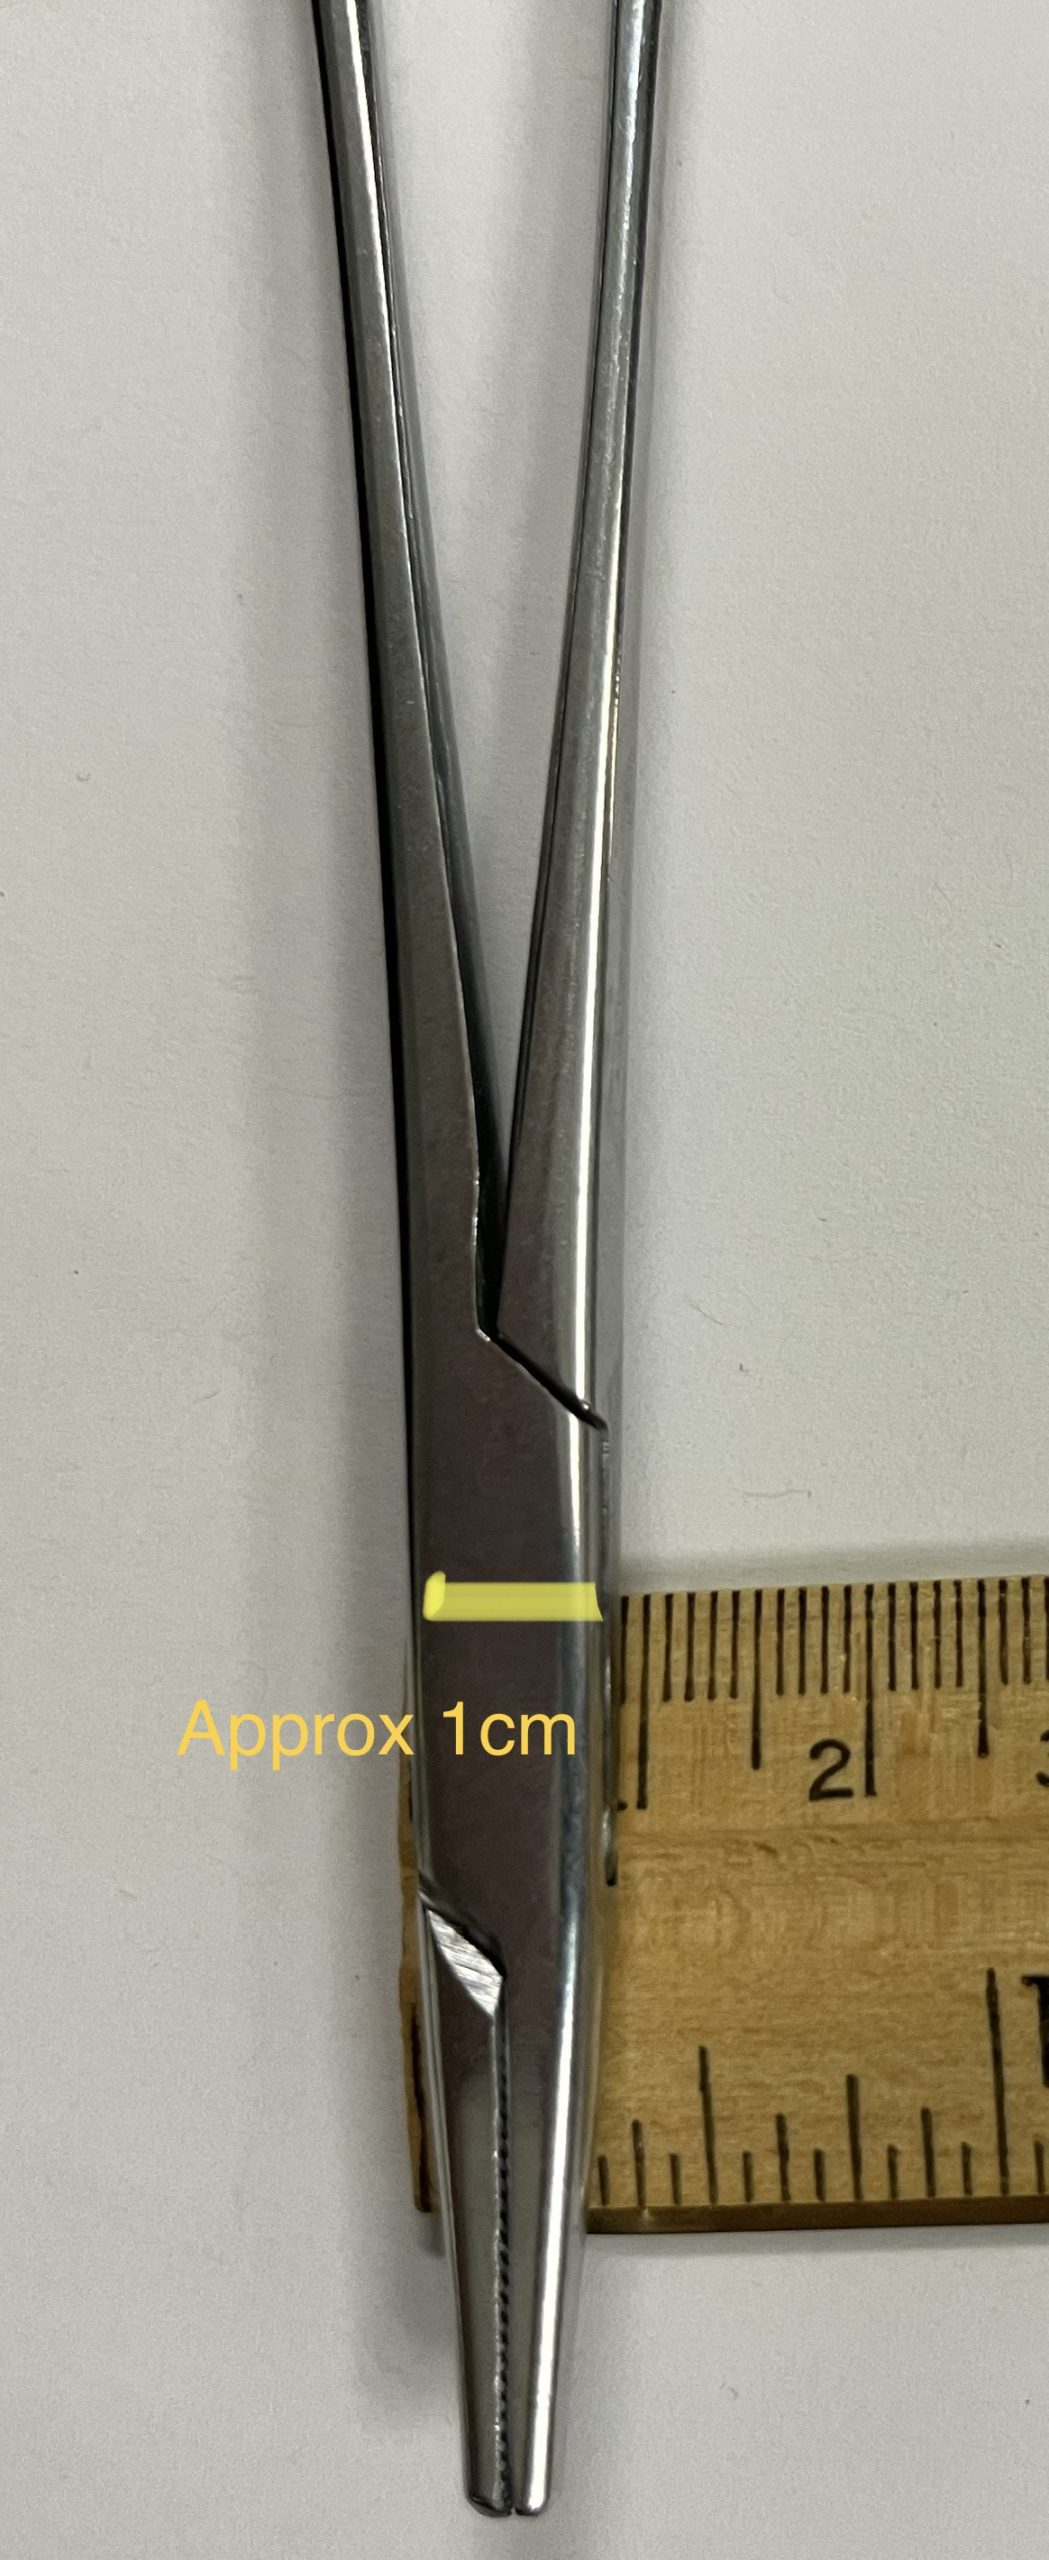
BEFORE tightening the first throw, assure proper location, adjust if needed, then tighten the first throw. Carefully apply 3 more throws, each time being sure to have driver between the long and short end of the suture, and assure no peritoneum/omentum is within the knot-try not to press against the body wall where the peritoneum is… Is this a good ligature? cut tags 3-4 mm long. Tidbit Your needle driver can be used as a handy measuring device, take a moment when cleaning instruments to measure tip of needle driver in several orientations 5 mm, 1 cm so you can easily measure length of suture tags and distance between suture bites etc… IMPORTANT as stated earlier, be sure no entrapped omentum or peritoneum is in your knot, as when pedicle is released it can get hung up on peritoneum which will pull the ligature off! Check your knot before, during, and after you make the knot-this habit will become automatic and takes very little time. An once of prevention is worth a pound of cure!
For a “standard” 4-5 month feline spay consider this approach; Place straight mosquito generally perpendicular to ovarian pedicle a distance deep to the ovary such that another clamp can be place on top or ventral to it without interfering with the ovary, and not so deep that it is difficult to get a circumferential ligature easily placed-here’s the concept using a model. Also, leave enough space for second curved clamp (helps direct blade between clamps to incise between) to be placed ventral to first clamp (on top), with just enough space for blade to fit between after ligatures are placed and ready to move to next step. Factors involved include tissue size, compressibility, fragility, etc…PREPARE, THINK, PLAN, THEN DO with each situation.
( ) When assured both ligatures are good, place the second clamp just ventrally to the dorsal or deep clamp ( curved clamp on top of straight clamp) as described above, cut between the clamps. Reflect the clamp closest to the ovary to the side. Tidbit Hold the side of the deep end of the pedicle gently, with Brown Adson thumb forceps, not by holding onto the knot! Try not to have any force on the pedicle, then gently remove the clamp, hold the clamp at the ready and keep close by so you can re-clamp if needed. Gently blot any blood initially present, hold in neutral position, examine for 10 sec, if no bleeding let go. If bleeding, gently re-clamp and re-ligate, this can be challenging, so doing it properly the first time is key.
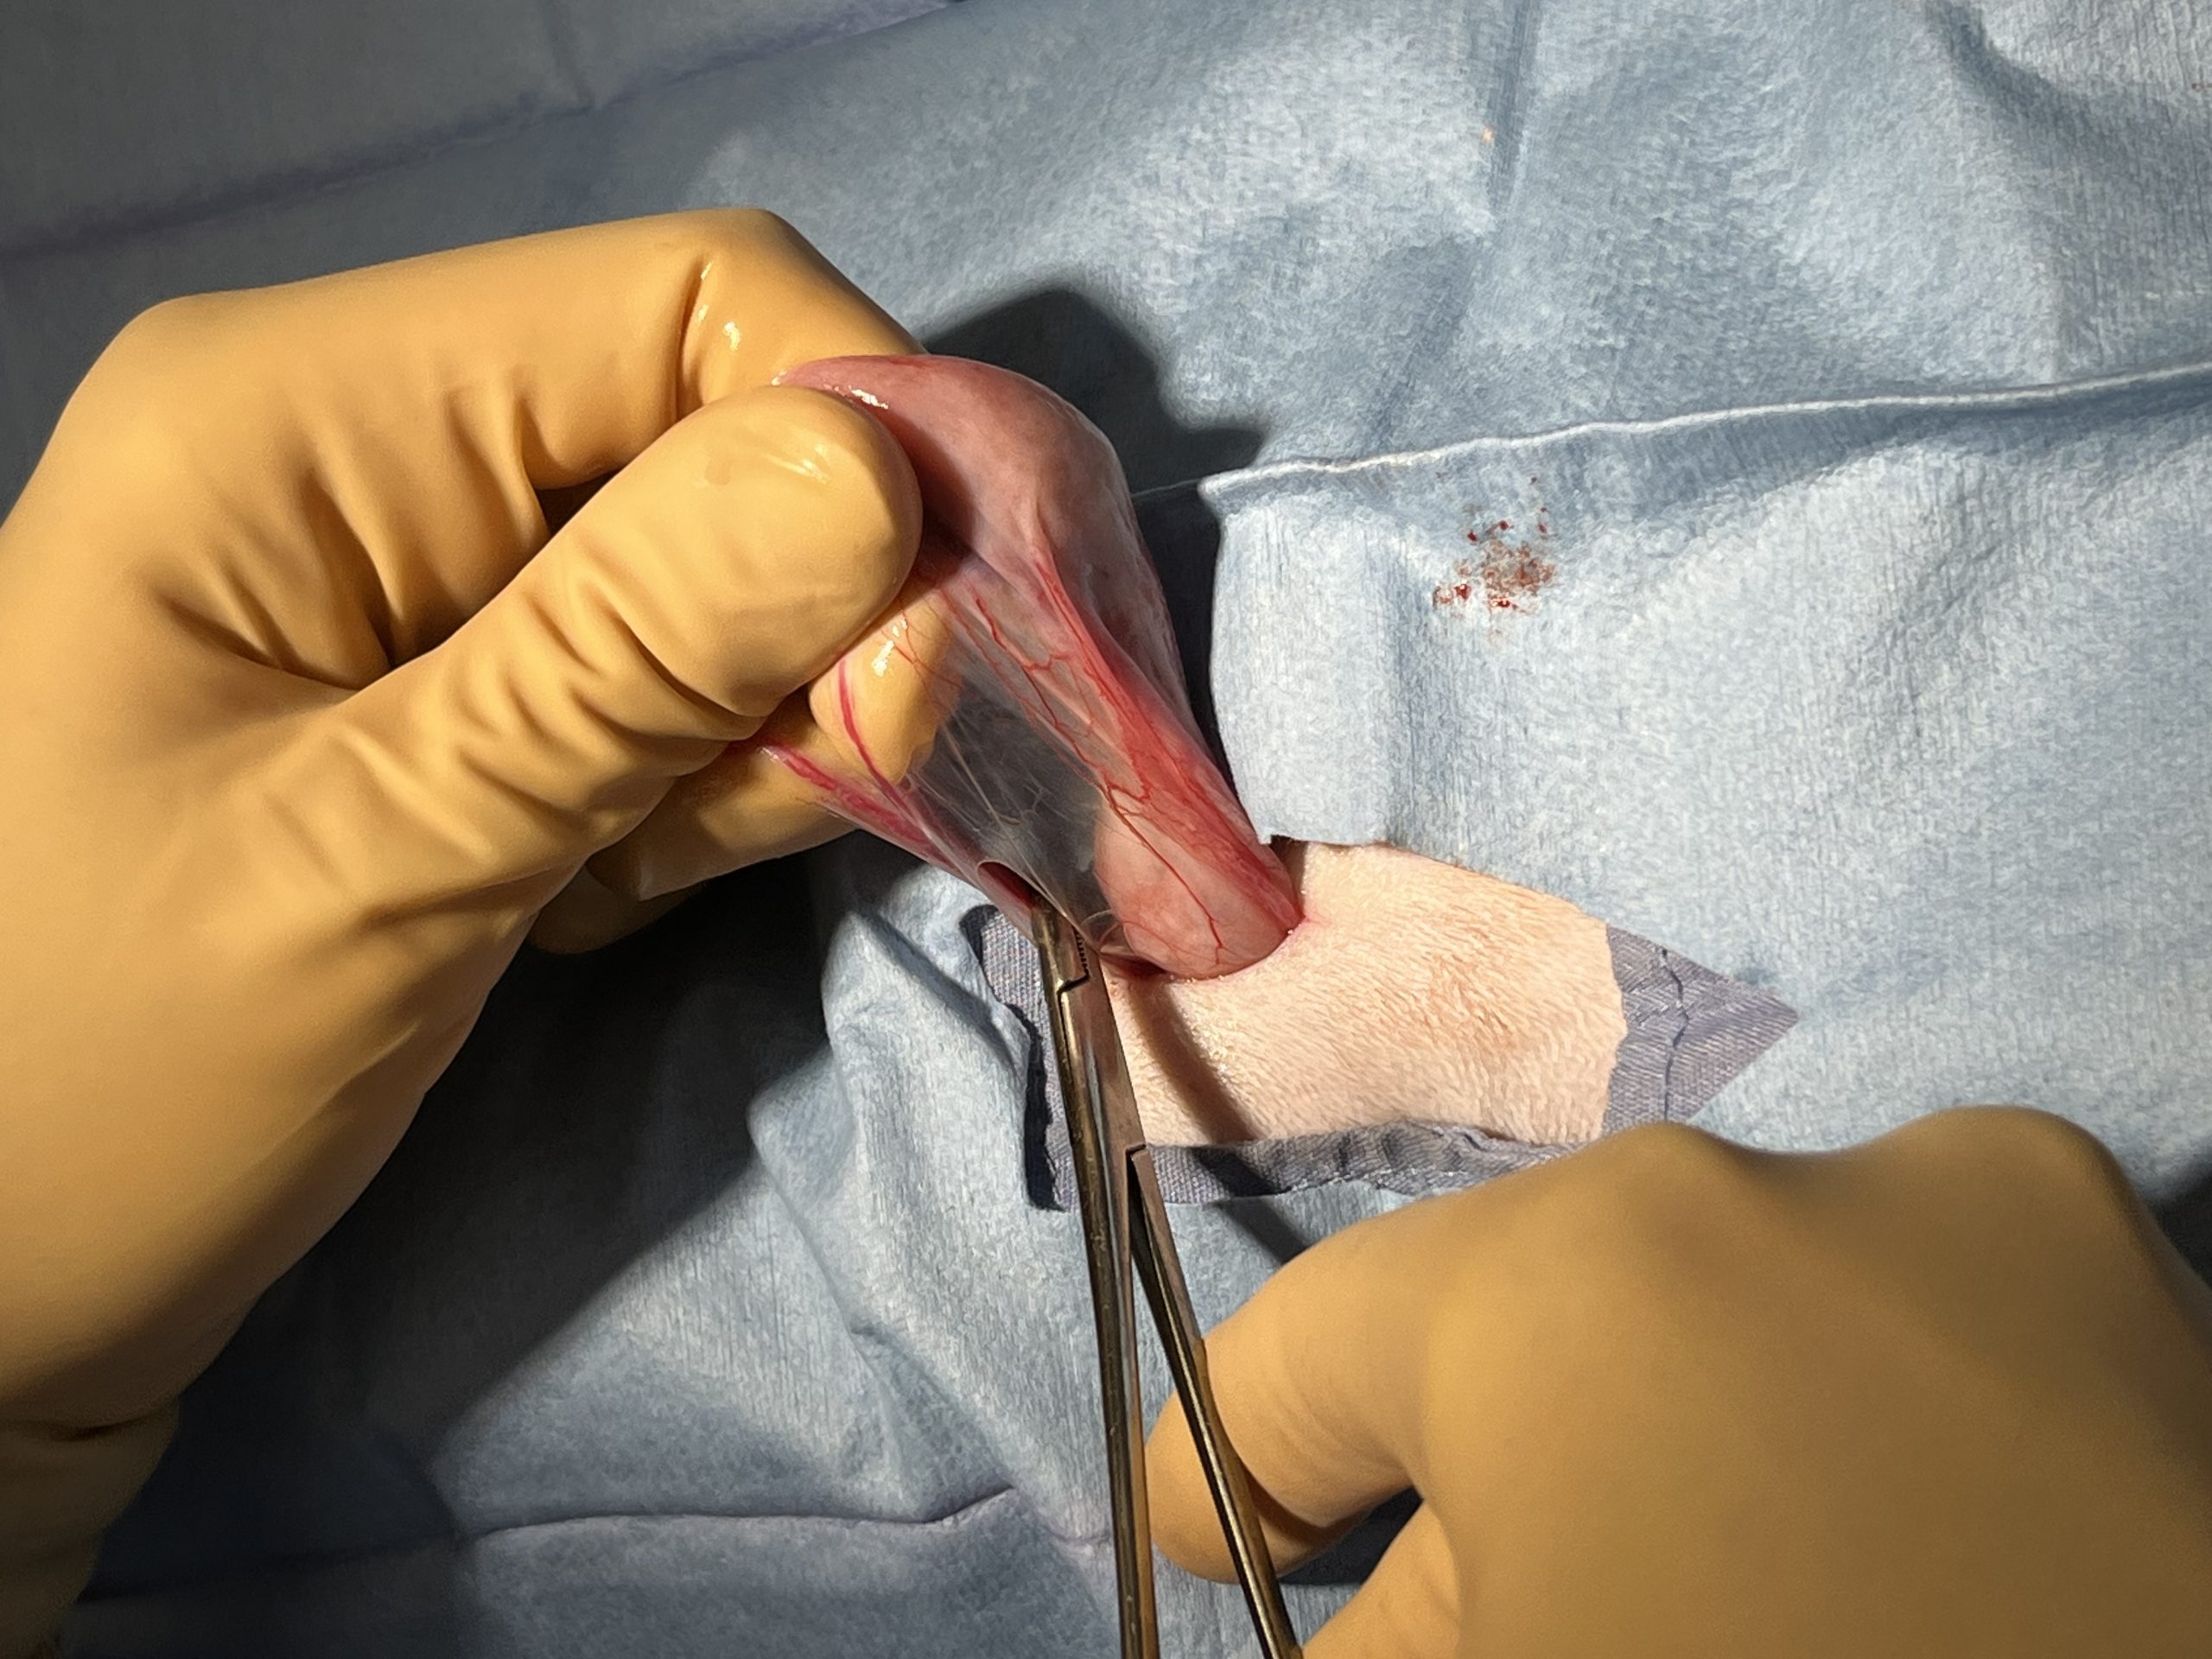
( ) Examine the broad ligament and determine if it can be broken down digitally. NOTE! quite often the broad ligament is very thin and breaks down on its own in cats and young puppies. However you will likely need to break the BL digitally in pregnant cats medium/large breed puppies and adult dogs. Gently stretch the BL between the thumb and index fingers of both hands and having hands touch, also keep your elbows to your sides-this prevents hands from slipping and causing an uncontrolled rent which can damage the uterine vessels that run along the long axis of the uterine horn.
TidBit Gently apply traction on broad ligament, in manner described. This method causes tiny vessels to stretch, retract, and seal by clotting. If vasculature is cut it will bleed! If a patient has larger blood vessels and fat within the broad ligament, ligate as needed combined with digital breakdown of BL. Protect uterine vasculature when breaking down the BL close to the uterine body-if you’re not careful you can rip the vasculature! Occasionally, ligation of the broad ligament en masse (all together) using a miller’s knot or surgeon’s knot is used. Rabbits have a robust vasculature within the broad ligament which is quite lipid laden-IMO broad ligament should be ligated en masse vs. breaking down digitally!
6) Ligation of uterine body and associated uterine vasculature, Final check of abdominal cavity prior to closure
( ) Choose hemostat size of hemostat/carmalt (overview of hemostats) depending on the size and turgidity (stiffness) of the uterus. Tidbit Be aware that a turgid uterus can also be damaged by placing a thin suture to ligate-it can act like a wire cheese cutter, as would a thin low surface area clamp…Remember structure-function Choose a softer suture of larger diameter, and use a cinching suture (Millers) to spread the force over a larger area to prevent cutting through tissue, as well as a large surface area clamp such as a Carmalt to prevent clamp from cutting a turgid uterine body. Tidbit try placing clamp on uterine horn to test what clamp will do as easier to control a rent in horn vs. the uterine body which will dive dorsal and can be difficult to recapture using a hemostat!
( ) Ligature(s) can be placed in a crush of hemostat, however, be careful as sometimes the tissue will fall apart when you remove the clamp! Make sure to leave the cervix intact in the patient it is an important barrier to retrograde infection. Ok to remove only the ovaries only, and is common procedure in Europe. Sometimes it is difficult to extrude uterine horns enough to visualize bifurcation, it is acceptable to clamp and ligate horns separately. Always maintain an appropriate distance of the suture from the hemostat around 1 cm on average in the cat-remember if the ligature is too close to the clamp the clamp will press down on the horn/body and the ligature will not be tight enough. Tidbit Can release the clamp called “flashing” and then tie knot, reclose the clamp, then add 2 more throws. Flashing releases tension/squeezing of uterus allowing the ligature to be tightened a bit more. This is not the same as placing ligature in the crush area where clamp was.
( ) Check ligature for adequate tightness-1) tissue compression, 2) blanching of tissue and 3) secure knot (checking if ligature can spin is controversial as by checking if ligature can spin one may loosen the knot!) 4) no bleeding from cut edge when held not under pressure. Once surgeon is certain ligature is sound, add a clamp on top of initial clamp, and incise between (often a straight clamp is placed first, then a curved clamp on top leaving a space for blade to fit between clamps and oriented in same direction as straight clamp), use the curve of the top clamp to help direct the blade between the tips and incise between the clamps. Hold the edge of the uterine stump from side, gently blot any blood on end, hold in neutral position, check for bleeding for 10 seconds, if none-release and watch closely for another 10 seconds. Tidbit Have a DVM check your ligatures when you are first learning surgery skills-important to self assess, so you need to know the rules and Halsted’s principle right!, then, get another opinion-this is how we build our repertoire!
( ) Check ovarian pedicle stumps in the area referred to as the “gutters” dorsal curve of the abdomen in area where the ovarian pedicles were clamped and ligated. Remember ovarian pedicles are close to the caudal pole of the kidneys. Left-under proximal colon, right-under duodenum, uterine stump under the bladder. Perform gentle sweep of gutters with folded small gauze protecting the tip of a hemostat placed deep in these areas, recheck in a few moments to detect any continued oozing of blood vs. blood from broad ligament. Also if possible actually visualize the ligatures. Again proper hemostasis in skin/muscle/fat prevents confusion of source of blood in abdomen due to ovarian pedicle/uterine ligatures. TidBit Double checking ligatures before closure is an important step for the new surgeon and provides conformation and confidence in a job well done vs. assuming without checking. Early in your surgical career it is vital to be exacting and do a great job vs. worrying about speed… doing it properly comes first, speed builds with experience. Also check by the bladder that uterine stump is not leaking!
III) CLOSURE
7) Closure of Linea alba Closing the Linea alba video (right handed)
( ) Be sure the linea is clearly visible, that there is no fat attached to where suture bites will be made and that layers to be closed are distinct. TidBit-to assure that the linea along each side is well delineated so that no mistake is made as to what layer should be closed, make a little nick in SQ fat where it attaches to the linea with the tip of metzenbaum and with scissors slightly open, gently push along the length of the incision-do NOT extend more than 2 mm into the fat side to side to limit creation of dead space! Tidbit be sure to make sure fat is removed from both ends of the incision, especially if the incision has been elongated. Best to do this initially right!
( ) Right handed surgeons suture from right to left, and left handed surgeons suture from left to right. Even spacing between throws 3-4 mm, and even spacing from the incision 3-4 mm in the linea is a good place to start for cats. Tidbit Use the tip of your needle driver as a handy measuring tool! We recommend all students learn and practice simple continuous suture pattern. Remember holding power is in the muscle sheath not the muscle itself. Better to grab a little bit of muscle with sheath vs. poor bite of sheath. NOTE when I graduated from vet school in 1994 we were instructed to capture all 3 layers of body wall-peritoneum, muscle, and muscle sheath, as we suspected, the only holding power is in the muscle sheath! That being said, its better to get a bit of muscle with a good bite of sheath than no muscle and a poor bite of sheath…
( ) Start distally if right handed, cranially if left handed. Initial bites the needle is perpendicular to the linea, then the needle is redirected horizontally to avoid underlying musculature, no need to also include peritoneum. Bites can be perpendicular to the long axis of the incision or have some degree of angle which should be maintained.
( ) Hold Body wall up slightly with brown adson thumb forceps and inspect inner surface to avoid grabbing any fat or abdominal contents. On far side, use curve of needle and flick of the wrist to go into sheath at 90 degrees and deviate needle to exit just under the sheath and avoid the muscle. It is better to grab a bit of muscle with the sheath in order to get a good bite of sheath, than to get a poor bite of sheath. Then on near side, enter needle just under the sheath directly across from other side use curve of needle and flick of the wrist to exit the same distance from the incision as the initial bite. Reset needle driver on needle after each pair of throws, and ideally have an assistant to hold the suture line tight, to assure appropriate tension throughout the line. Suture in the linea can be quite tight as linea is quite tough tissue and little swelling occurs, however do not overtighten as is evidenced by wave pattern and divots where the suture goes into linea. Back track 1mm with each throw as for skin.
( ) Before tying the final knot, make sure the line is tight, adjust as needed throw by throw using closed mosquito pulling up under each loop to take up slack. Do this test before tying final knot! Mosquito should not fit between throws in the linea, and should not be able to get a mosquito tip underneath the throws-this is how we know line is tight enough!
8) Closure of SQ fat (if present) Closure of SQ fat video right handed, Closure of SQ fat video left handed
( ) Prior to subcuticular closure of epidermis, close SQ fat using a simple continuous pattern start D-S, S-D to bury the knot on both ends, this keeps the knot deep so it doesn’t interfere with the subcuticular/intradermal knot.
( ) Identify and use the superficial membrane covering fat to facilitate SQ fat closure; you don’t need bites to be as close together as they are when closing skin or linea-they are designed to reintroduce fat after being separated, incised or removed in some case, fat itself has no real holding power…a bite every 2-3cm is often sufficient. Tacking fat to the sheath below-called quilting, helps close dead space, generally every other, or every third bite.
Tidbit– Cool technique used in HQHVSN (High Quality, High Volume, Spay Neuter). Close SQ fat starting cranial D-S, S-D knot w/2 throws, leave tag 1.5 in long then close fat using simple continuous as described above from cranial-caudal. Once close to the apex of caudal skin incision, using the same suture line, return cranially within the Epidermal-Dermal junction using subcuticular pattern. When close to the cranial apex of incision, take a superficial-deep bite, on each side, then tie this deep line to the deep tag left on the SQ fat knot and smurf as below. Most spay neuter vets use this time tested technique!
9) Intradermal/Subcuticular closure of skin epidermal-dermal junction where the follicles are quite superficial in the cat!
Intradermal/subcuticular closure of skin video RH, Intradermal/subcuticular closure of skin video LH
( ) TO START SUBCUTICULAR if right handed start at the caudal aspect of incision, (if left handed start at the cranial aspect) approximately 1 cm from the apex. Remember, the key to a buried knot is to start and end deep in the SQ fat in middle of the incision as your knot will be where you start and end. Start the subcuticular pattern perpendicular to long axis of incision Deep-Superficial on the near side, Superficial-Deep on the far side, using curve of the needle and flick of the wrist, vs. pushing or driving the needle through the skin, tie knot-4-6 throws, square knots, no daylight between throws. To make good square knots place driver between long and short end of suture wrap suture around driver, rotate driver to pick up end, bring short end to other side, form loop, then keep suture flat as tighten knot, trim short end to 3-4mm then dive the needle under the knot, and emerge at the caudal apex of the incision-the line is now deep.
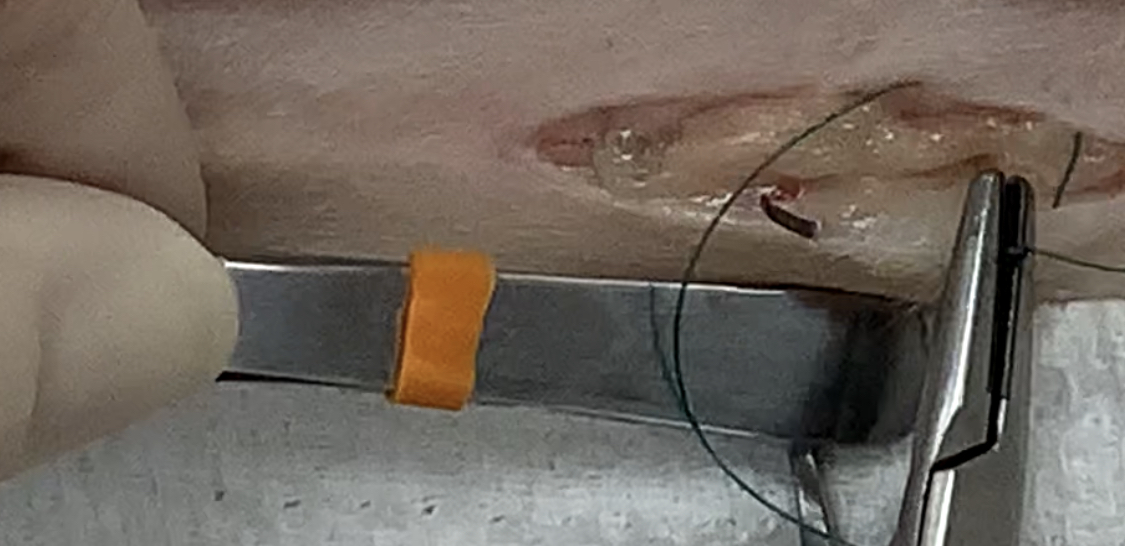
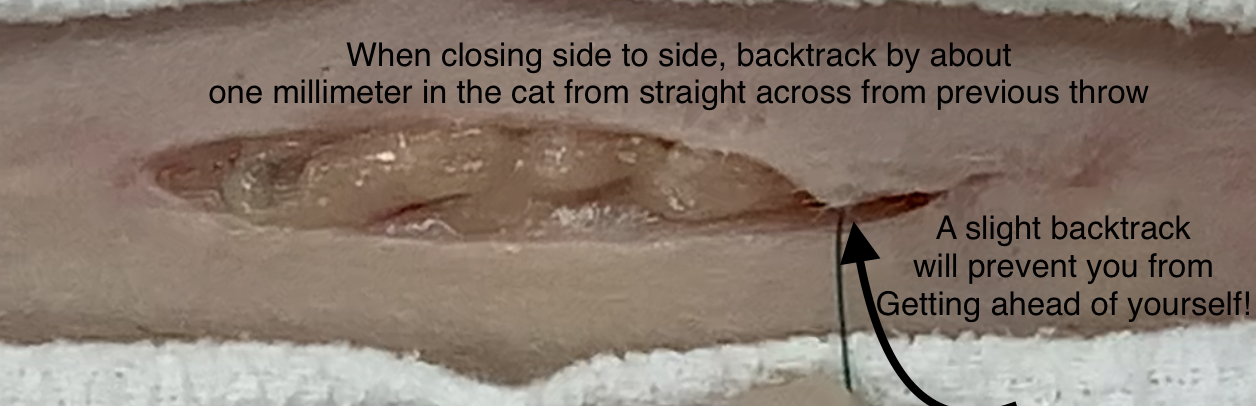
( ) Subcuticular/Intradermal closure from caudal to cranial, bites ⅓- ½ length of the needle into and out of subcutis at same level parallel to long axis of the incision, essentially this is snaking back and forth from far side to nearside-taking a larger bite laterally into the epidermal-dermal junction to oppose the skin edges ( big bite-big bite lateral) OR taking smaller bites in same plane however perpendicular to the long axis of incision little bite, (little bite-little bite spiral). I have always preferred the big bite, vs little bite, both are acceptable as long as proper technique is followed. Tidbit The subcutis/intradermal target area is at the epidermal-dermal junction, this is where the hair follicles bulbs are located-you can feel this is the best point of strength of the skin and double check it is a good bite-when you take a bite into the E-D junction and tip of needle is out, KEEP YOUR NEEDLE IN PLACE-then tug slightly with your needle driver to confirm you are in the sweet spot-not too deep (through the deep dermis or SQ fat AND not to superficial (through the skin). Tidbit backtrack by about 1-2 mm after each throw. To do this-line up straight across from exit point on one side to entrance point straight across on the other side, then back track 1-2mm depending on patient size-this prevents you from getting ahead of yourself as the tendency is to keep moving forward. Although a bit awkward initially, this becomes automatic!
( ) Ideally skin closure is performed without use of forceps (Halsted’s Principle-delicate tissue handling), but of course it is acceptable to use non traumatic forceps especially when one is a beginning surgeon. The key is to use a gentle touch and hold skin 1-2cm away from where the needle will go and envision the new angle or plane of where the skin is as you are lifting the edge. Tidbit Surgeons can press lateral to the skin edge to cause it to roll open using the handle of thumb forceps to change the plane of the skin edge so can see where needle should enter and exit being mindful that the plane of the skin is at an angle as when held although in a less traumatic fashion. Remember! check each throw when needle still in skin to catch errors before pulling through-this one trick eliminates a lot of errors caught early enough to easily change vs. having to back out multiple sutures to repair a gap, or redoing an entire line 🙂 A little self assessment goes a long way and leads to excellent skills 🙂
( ) TO CLOSE SUBCUTICULAR heads up! When approximately 1.0-1.5 cm of incision is left to close, put your thumb at the last throw and ask yourself “can I close what’s left with a bite on each side?” To start, a set up suture is used on one side of skin edge perpendicular to the long axis from Superficial-Deep. Then, this deep suture line is used to close the apex of incision in the same manner as it was started Deep-Superficial on one side, perpendicular to long axis-save this the loop that is created by placing a mosquito forceps through the loop and set aside- do not clamp loop as will weaken suture! Then, place last suture from Superficial-Deep again perpendicular to the long axis on the other side. Make sure the loop and log line are side by side and that the long line is nor laying over the bridge formed that will close the sides of skin together. Tie the deep loop to the deep long line along the long axis of the incision, trim loop to 3-4mm OR use an Aberdeen knot video (Scottish accent) To smurf the knot; Hold remaining long line above the knot to create a tent, place the needle between the edges of the skin at 90 degree angle next to the knot, go deep into SQ fat and out the skin surface past the apex in prepped skin of course, and NOT going into musculature, as far as needle will allow, and flick the needle with wrist action through the skin. Push the area down with finger as pulling suture up to bury the knot, hold tension on the long end while pushing skin/body wall down with finger tip, and cut suture at level of the skin. Sometimes you feel a pop under your finger, sometimes knot 🙂
( ) Gently clean skin with sterile IV fluid, slightly soapy water, or H2O2, on gauze sponge. Cleaning the skin now is much easier to do when the patient is still sleeping than when fully recovered! AND BEFORE YOU PLACE TATTOO INK if shelter or rescue pet!
( ) SHELTER/RESCUE ANIMALS TATTOO make an almost full skin thickness skin incision approximately 1 cm adjacent to or inline with incision and place the sterile end of paper suture pack or non-sharp edge of scalpel blade (some of us shelter surgeons don’t use a blade handle) into a tiny drop of tattoo ink and gently part the skin and place ink in gap. Some place drop of tissue glue on top to prevent ink from being rubbed off! Tidbit generally green food animal ear tattoo ink a single drop is often used almost all day so not much is needed, better to reapply than make a mess 🙂
TADA!
Make sure to continually monitor patient as most anesthetic mishaps happen after surgery!
Documentation is the key to happiness, anesthesiologist record parameters being monitored, treatments given intra op in response to monitoring and patient response. Write a succinct yet descriptive surgery report and include any complications and how they were managed and monitored, plan for ongoing pain meds, and a written post-op home care guide including emergency contact information and phone to gain after hours care-which should be discussed in person with owners to assure full understanding and always ask if there are any questions or concerns.