Want to create or adapt books like this? Learn more about how Pressbooks supports open publishing practices.
11 Abscess Management in the Cat/Dog
8 important steps regarding Bite abscesses 3 versions
1) Detailed description of evaluation and treatment of bite wound abscesses as most common cause.
2) Nutshell for me version
3) Super nutshell of important points
Definition of terms
ab·scess
/ˈabˌses/
noun
noun: abscess; plural noun: abscesses
a swollen area within body tissue, containing an accumulation of pus.
pus
/pəs/
noun
a thick yellowish or greenish opaque liquid produced in infected tissue, consisting of dead white blood cells and bacteria with tissue debris and serum
DETAILED Description of Bite Wound Abscesses and Treatment
Bite wounds are a common cause of abscesses, as are puncture wounds from sharp objects, or dental abscesses.
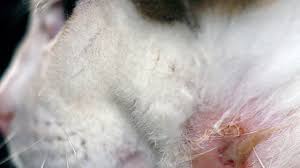
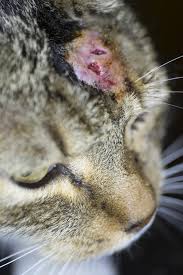
Classically bite wounds from cat fights are on the face and neck area or rear leg/tail base. TIP: Classically wounds in the face are fighting cats, wounds in the rear end are fleeing cats.
Abscesses generally take 2-7 days to form, owners may see pus dripping from the site if abscess breaks open on its own, or may notice new swelling, inappetence, fever, lethargy.
Abscesses can also be iatrogenic (iatro is greek for physicican). These are caused by; improperly sterilized needles or syringes, improper sterile technique, contaminated drug bottle, or a patient reaction to an injectable drug can cause a sterile abscess. Classically, a bite wound penetrates the skin, inoculating the SQ tissue, and often muscle with bacteria from the tooth surface and oral cavity. In response to this insult, endothelial cells, mast cells and macrophages release cytokines, which attract neutrophils or PMNs into the area. This process is called chemotaxis. Bite wounds where the skin punctures seal over are especially at risk for developing an abscess vs those that are able to drain. This process takes a few days to occur. Hence, abscesses can be easily be missed by owners due to the animal’s hair coat concealing the change in symmetry of the body, or owner does not observe the bite or puncture wound occurring. Deep wounds are especially at risk for abscess formation.
Always get a good history and do a full physical exam to assess overall condition. Animal scan be in shock and need supportive care prior to a more full evaluation! Review and consult with trauma specialists if extensive injuries and evidence of bites to the abdomen and/or chest as will require high level of treatment and monitoring vs. single bite. Be sure to examine the patient thoroughly for other signs of trauma, resist the temptation to only treat the abscess without a good physical exam and assessment!
1) Always get a good history and Physical Exam A good history is very helpful especially if a fight or potential puncture wound or previous injection was directly observed. Remember your clients are not veterinarians and deeply attached to their pets so may not recall, or may give great detail.
Perform a full physical exam to assess overall condition and ASA status for sedation/anesthesia. Again, resist the temptation to dive in and just treat the abscess-this becomes easier with clinical experience so teaming up with experienced vet is very helpful!. Always look for opposing occlusion bite marks and evidence for high level bite-multiple bites in different areas. Let owner know that to do a good evaluation you may need to shave a large area, and be mindful that evidence of wounds can take some time to show up. Bruising takes longer to show up in animal skin vs. human skin. Sedation or Anesthesia? depending on overall condition of patient, degree of abscess, location, location location of abscess and other factors. Hmmm, what could you do if very little funds available and still practice good medicine? Ponder about it and ask in lab!
2) Know the anatomy of the area to avoid damage to important structures and perform wide surgical clip- (blood vessels, nerves, etc…) in the area beneath or close to the abscess when making a drainage incision. Grab a text book illustration or online image if needed, better to be safe than sorry! Perform wide clip to explore extent of injuries and always check for opposing occlusal wounds! Be sure to extend clip below the planned draining stab wound to make clean up easier and avoid contamination from hair! Let the owner know you are doing this!
3)Scrub drainage incision site, Incise and drain abscessScrub the shaved area being mindful that you’ll need shaved area below your stab incision to prevent hair from contaminating the drainage hole, and keeping area easier to clean of the drainage material. REMEMBER pick a dependent area to make incision for drainage when animal is in normal position. Your incision should should allow gravity to drain the abscess passively if possible. If you figure this wrong-no worries just suture closed and choose a more appropriate site! The use of active drains is beyond the scope of this chapter. FYI side note…Dr. Sue’s Favorite Scrub Technicare Surgical Scrub
4)Flush the abscessed area to remove pus and any gross contamination. Flush solution should be tissue friendly, aid in removal of bacteria, and ideally isotonic to preserve normal function of cells to promote healing. Adding antibiotics is not recommended due to increased knowledge of proper antimicrobial stewardship, and frankly its not been shown to help!
5)Place drain? Is it necessary to allow continued drainage of pus while the wound heals from the inside out? Largely based on size of abscess which comes with clinical experience-this would be a good private practice study! Choose the type of drain PASSIVE (uses gravity) or ACTIVE (uses negative pressure) beyond the scope of this chapter.
REMEMBER: A Penrose drain (typically latex tubing) simply keeps the dependent hole open to allow drainage, the pus doesn’t flow through the lumen of the tube, but around it. This requires gravity! Jackson-Pratt drainage “grenades” OR a redtop tube with butterfly catheter extension both work to provide suction using negative pressure and can be used for areas where gravity alone may not be sufficient. Jackson-Pratt active drainage system
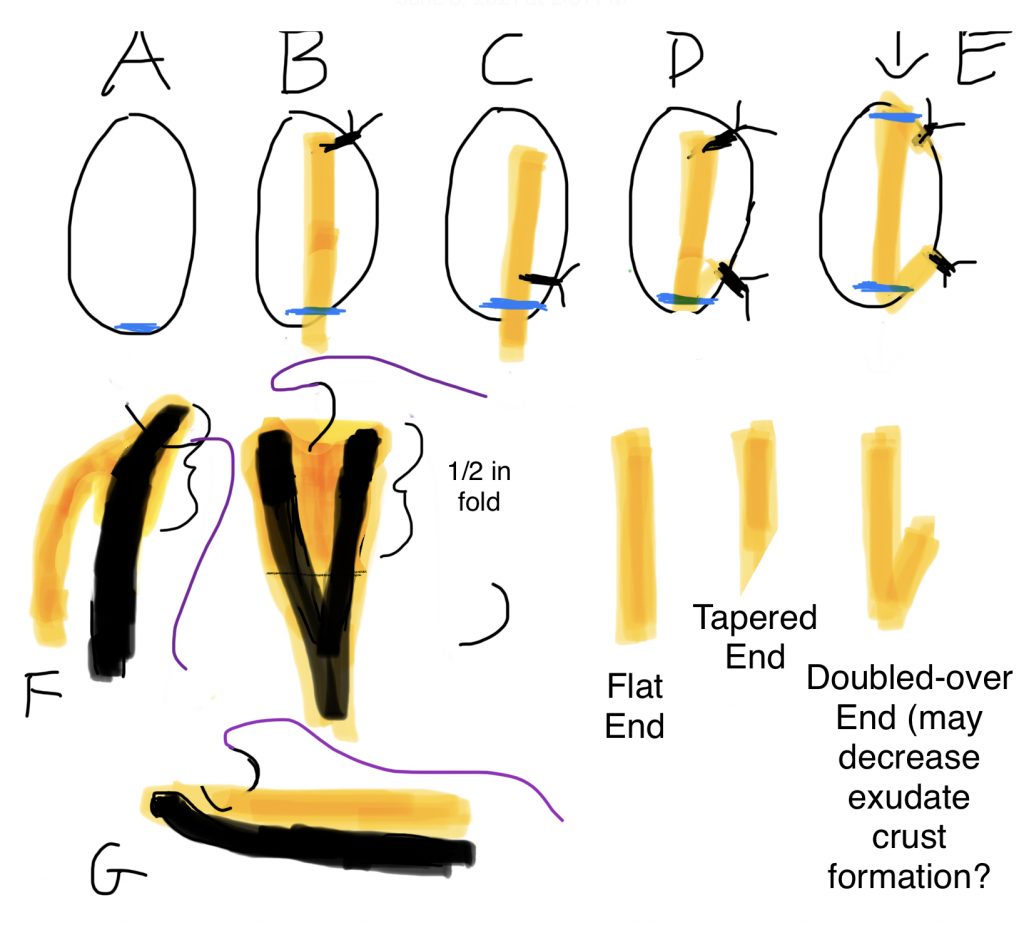
There are 3 basic ways to drain an abscess:
I) ONE INCISION TECHNIQUE, FLUSH, NO DRAINBECOMING MORE COMMON Dependent incision to allow good drainage, flush, useful for small abscesses-drain not needed as will heal quickly. Cover with absorbent dressing and bandage to collect drainage and encourage pocket to close. See A in diagram below
II) ONE INCISION TECHNIQUE, FLUSH, PLACE DRAIN MOST COMMON one dependent incision, flush, place penrose drain through this hole. One incision less chance for contamination than 2 incision, this technique now more popular than 2 incision technique. Today, repeated flushing through a second dorsal incision is not thought to be necessary for an already drained and flushed abscess. *See B-D in diagram below
III)TWO HOLE TECHNIQUE, WITH DRAIN LEAST COMMON This technique is easy and fairly fast and was the standard way of placing a drain in the past and is still used today by practitioners who are most familiar with its use. This technique was used to be able to flush from the dorsal incision and out through dependent drainage incision. This option of flushing from dorsal to dependent incision in an already flushed abscess is not done very often today. Make a dependent incision, flush abscess, then place curved hemostats through the dependent hole and aim hemostat in opposite direction (dorsally), press tips of curved hemostat against the skin, open jaws slightly, then make a stab incision horizontally between the tips through skin-push hemostat through this newly made incision, grasp end of drain and pull through this newly made incision, and out through the dependent incision. Then secure drain on both ends by bending drain over and placing a suture through skin and drain. This will be more clear in lab! See E in diagram below
AND MANY WAYS TO SECURE THE DRAIN! SEE A-G BELOW
Various drainage tube securing options in an abscess (drawn with see-through skin to visualize drain placement) Blue-dependent incision, Black lines w/tags- sutures , Yellow-penrose drain, Curved thin black lines w/purple-needle and suture Thick black lines represent curved hemostats A dependent incision no drain, B drain secured dorsal to drainage site skin-drain-skin C drain secured close to drainage site skin-drain-skin , D same as B, although drain folded (to fold or not to fold?)E Two incision technique-used more in past in order to flush from top to bottom. F Dr. Sue’s new favorite way to place a drain and G a formerly very common method, of grasping penrose to create a flap in hopes of capturing a small portion with needle…very tricky! Also shown are various ways to cut the drain end: flat across the bottom, at an angle, and also folded up and over in attempt to sl. enlarge the drainage hole.
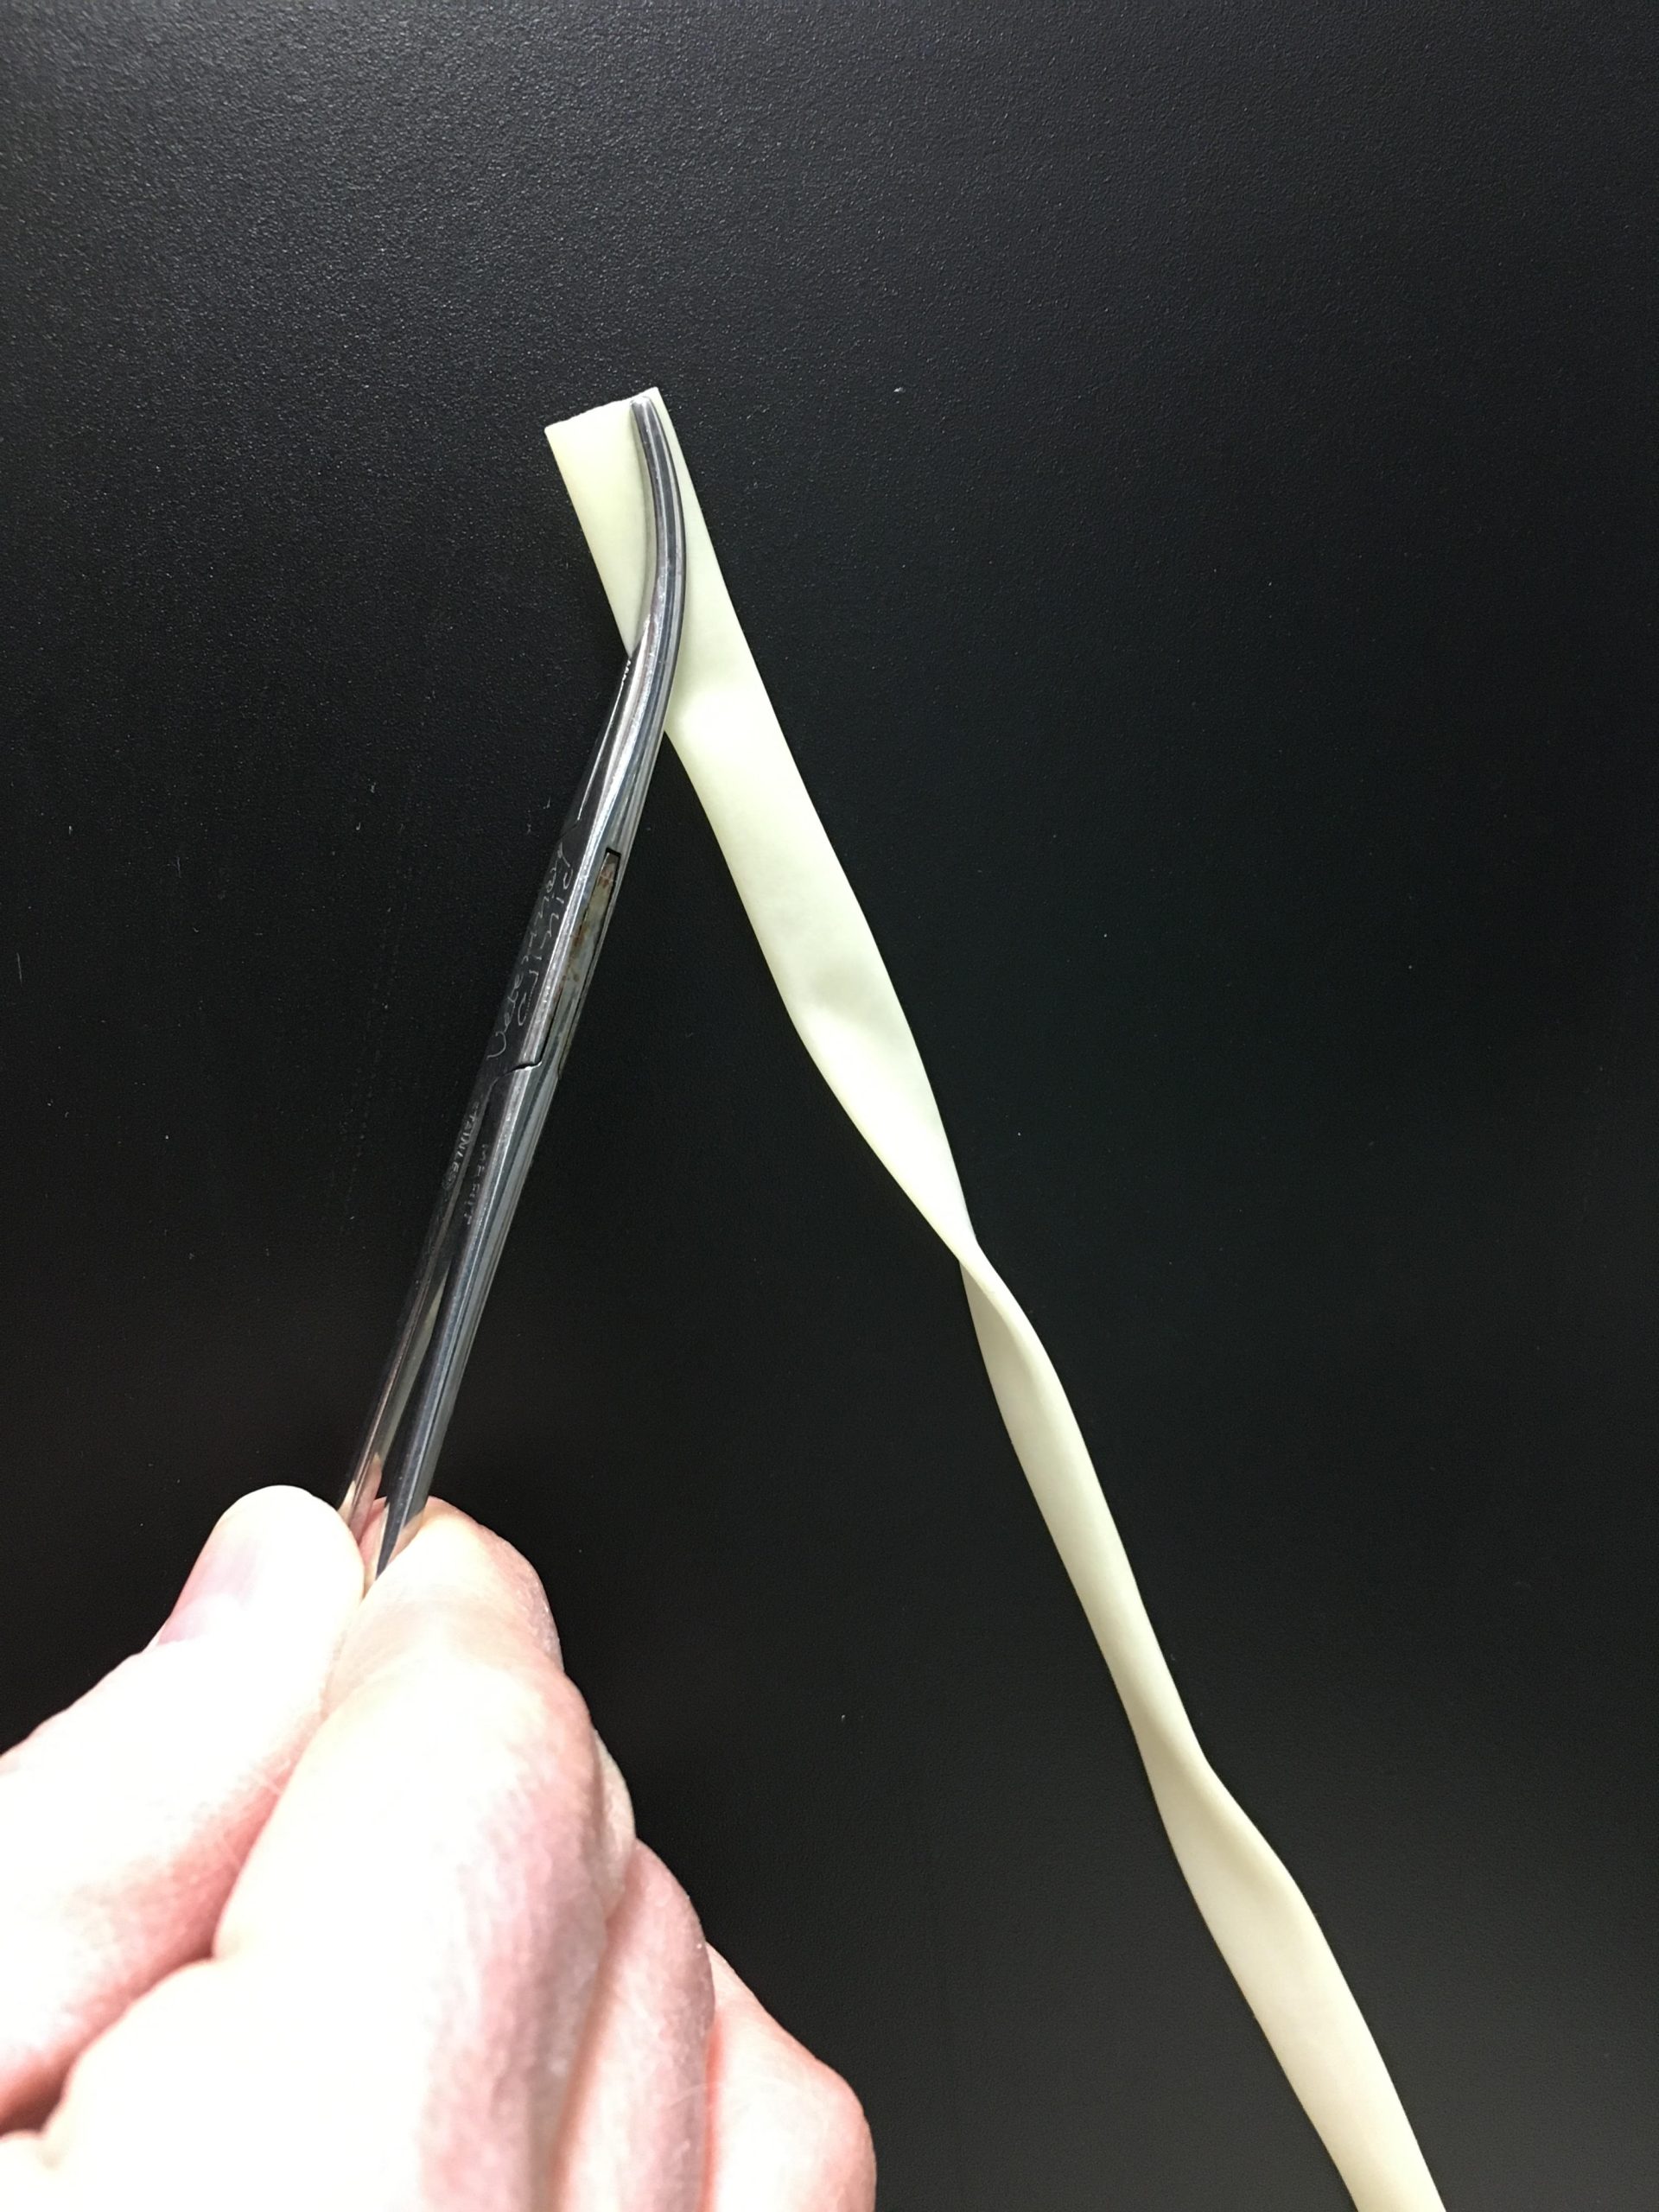
F) Easy with a bit of practiceFAVORITE/FABULOUS/FUN
Penrose drain placed about 1 inch into end of curved hemostat (Carmalt, Kelly or Mosquito depending on size of abscess)
Excess penrose folded behind the concave part of curve, opened sl. to equal width of drain, is inserted into drainage hole
Tip of instrument with concave curve facing surgeon pushed against the skin toward the surgeon at the most dorsal point of abscess cavity
Press tip against the skin toward the surgeon and open the curved hemostat about ½ in wide, place suture through skin and between the palpable tips of the curved instrument and through to the other side of skin. Be sure to remove the hemostat, hold both ends of suture and tug on the drain to assure you have a good bite before tying the knot!
Tada! Some place a cruciate vs. one bite.
TIP: The 1/2 inch of folded drain will flip over so this overlap should not be too long! VIDEO OF METHOD F HERE
Next step for A, B and C is to Cut drain to appropriate length (sticking out of hole approximately 1-2 in depending on size of abscess and patient) straight across or angled. Some veterinarians folding the drain up and tacking to dorsal skin to encourage skin incision to stay open vs. allowing the drain to lay over hole where crusts may develop impeding drainage. There are likely many other versions of similar techniques that have worked for veterinarians over the years! TIP: A quick drawing or picture of the drain showing suture placement is a good idea in case you are not the one who removes the sutures to take the drain out when ready!
6)Explain these options and judge owner’s capability, DVM or experienced CVT call to check on how things are going! Ideally demo at pick up time
A)clean the dependent part of the drain hole several times a day to keep clean and dry, apply Vaseline or other non-toxic skin protectant below drainage hole
OR
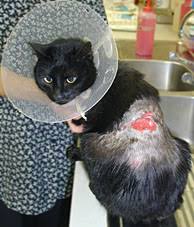
B) Bandage drainage area with absorptive materialto be changed by owner. Menstrual absorbent pads (Maxi pads) work well to absorb fluid, keep skin dry, and are way cheaper than human medical absorptive dressings! Wrapped with cast padding gauze on by bandage and removed and checked daily/several times a day depending on the severity of the abscess or wound). Not sure what the owner is capable of-describe how to clean the wound during pick up appointment and see how they do with cleaning area-if cleaning is difficult for them, offer feedback on how to do it or place a bandage and have them stop by the next day to check/change it. Experienced CVTs who love bandaging can do this and love it! WARNING: Fluid scald on skin can be caused by fluid dripping from the drainage incision on normal skin below the drain site!
7)WHEN TO REMOVE A DRAIN?Best to remove drain when amount of fluid starts to decline dramatically usually 2-3days…If you leave the drain in too long it starts to irritate the tissue and will induce fluid formation, and can also lead to resistant infections! Checking the amount of discharge in absorptive pad or how often o needs to clean can be good gauge as to when drain needs to be removed. TIP: Can have clients send pictures or videos of dressing changes for the right client! Some clients can handle cleaning some cant and need quick daily recheck and bandage changes.
8) ALWAYS send home written care guidelines and go over cleaning with owners in hospital at discharge time (no pun intended) to be sure they understand what you mean-some clinic develop video demonstations regarding home care Dr. Sue’s bandage Story
If an abscess has an existing puncture wound, DO NOT USE IT TO PLACE A DRAIN-the edges are contaminated and may not be in most dependent area. Best to make a fresh incision in dependent area. If a large hole in viable skin, debride edges and suture closed, if unsure if skin viable or not may need staged closure.
Have a look at this interactive video and ask yourself…do you think this cat needs a drain placed?
In A Nutshell (well my version of nutshell) see below for Super Nutshell Version
Always get a good history and do a full physical exam to assess overall condition. Animal can be in shock and need supportive care prior to a more full evaluation! Let owner know that to do good evaluation may need to shave a large area, and that evidence of wounds can take some time to show up. Bruising takes longer to show up in animal skin vs. human skin. Review and consult with trauma specialists if extensive injuries as will require high level of treatment and monitoring vs. single bite.
Know Anatomy and wide and surgical prep of area around an abscess, especially dependent area! Look for the opposing tooth marks in a bite wound, and of course especially in unobserved attack may require shaving a large area. Be sure to shave below drainage stab incision to prevent hair from contaminating drainage hole and to make cleaning easier! Bites to abdomen can damage internal organs even without puncture wounds especially in Big dog-Little dog encounters and should be carefully examined, and monitored over time ideally using serial FAST exams to determine if any internal bleeding or fluid production secondary to trauma.
Scrub, Incise and Drain Abscess Locate dependent area of abscess when animal in N position and make stab incision generally horizontal so wider area for drainage. Aim for pocket of pus, not down into healthy tissue. If you figure this wrong-no worries just suture closed and choose a more appropriate site! Use light pressure only wearing gloves to prevent Staph aureus ( if too forceful can drive pus into deeper and unaffected areas. Wet table or disposable pee pad makes clean up easier.
Flush abscess through the newly made stab incision w/Sterile N Saline, very, very dilute chlorhexidine ( has been shown to be not so tissue friendly) some DVMs can not resist adding a bit of Chlorhexidine to water or sterile N Saline or use dilute povidone iodine solution (NOT SCRUB as detergents are not toxic to exposed tissue-ok for intact skin). If very large abscess volume, can use tap water for initial flush, followed by Dilute povidone iodine or sterile isotonic solution. Wet tables are a good place to perform flushing with stainless steel grid covering with gaps to allow drainage and easy cleanup.
Decide if abscess large enough to require drain placement? Consider chronicity and size relative to patient, and ease of placing drain, anatomical considerations ease of bandaging? Is a tie-over bandage warranted? Place drain through newly made stab incision and place suture through skin-drain-skin. NOT THROUGH PRE-EXISTING PUNCTURE WOUND! Take a picture or make drawing and put it in the record! it in the chart! e a picture and put it i
Management of drainage site1)Have owners clean drainage site multiple times a day, or 2) place absorbent pad to be changed daily at home or in hospital-emailing pictures w/the right owner can work to judge when to pull drain. Vaseline below drainage area to protect skin.
Generally remove the drain in hospital…1) be sure it is time to remove drain, and things improving, 2) assure sutures are removed properly before the drain is pulled (sometimes can leave a small piece of drain inside the pocket which will create more fluid production) 3) don’t want to go past 2-3 days in most cases and if leave in too long will act like a foreign body described above. When to remove? when dramatic decrease in fluid (usually 2-3 days). If left in too long, the drain itself will act like a foreign body and cause more fluid production! For the right client who is cleaning or changing bandage at home, they can send pictures of what it looks like every day, and you the DVM can decide when to come in.
ALWAYS send home written care guidelines and go over cleaning with owners in hospital at discharge time (no pun intended) to be sure they understand what you mean-some clinic develop video demonstrations regarding home care Good idea to call next day and recheck in 2-3 days in hospital In case you haven’t heard my TRUE bandage story here it is…Dr. Sue’s Bandage Story
Super Nutshell Version
Good Hx and Thorough Exam, ASA, Sedation/Anesthesia
Know anatomy and wide clip to properly assess
Scrub, Incise and drain wear gloves, dependent area when in N position, clip and prep below drainage area!
Flush-sterile saline, water appropriate (resist using chlorhexidine very very dilute only)
Drain needed? size and experience-ask, place try F method Favorite, Fabulous and Fun
Management of drain? o clean several times a day or absorptive pad bandage change in hosp. or o?
When to Remove? when dramatic slow of fluid (2-3 days) check in 2-3 days and assess, pics 4 right client
Abscess care handout and demo/have o show you what they can do or may have already decided to have clinic do everything, make appt for recheck! Dr. Sue’s Bandage Story
Abscesses are fun to treat-consult with your colleagues on your first few abscesses until you feel comfortable evaluating and treating! KNOW YOUR UNDERLYING ANATOMY-don’t guess, pull out a textbook or go on line!