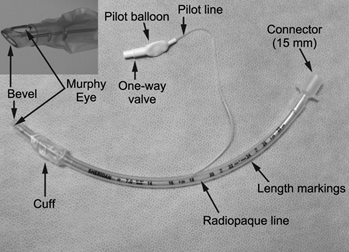
23 SA ET TUBE PREP AND PLACEMENT
WHY IS SWALLOWING DANGEROUS? quick video describes the act of swallowing can be dangerous if patient does not have a working gag/swallow reflex using a human oral cavity model.
Fluoroscopy of a Dog eating– note the food passing DORSAL to the tracheal opening, the wonder of the laryngeal region!
ET TUBE PLACEMENT-2 steps, ET Tube set up, and placing ET tube
FOR ET PLACEMENT ONLY SCROLL DOWN TO SECOND STEP IN GREEN
During lab lets think about what is needed before you place an ET tube as it matters in a clinical situation. This will help you learn things in order and help with your flow in live animal lab next year and help you be a more active learner during this coming summer at externships, volunteering and working in clinics! We’ll presume your patient has had adequate premed and placement of IV catheter, pre-oxygenation, and induction, patient is unconscious and ready for ET tube placement.
FIRST STEP-ET TUBE SET UP
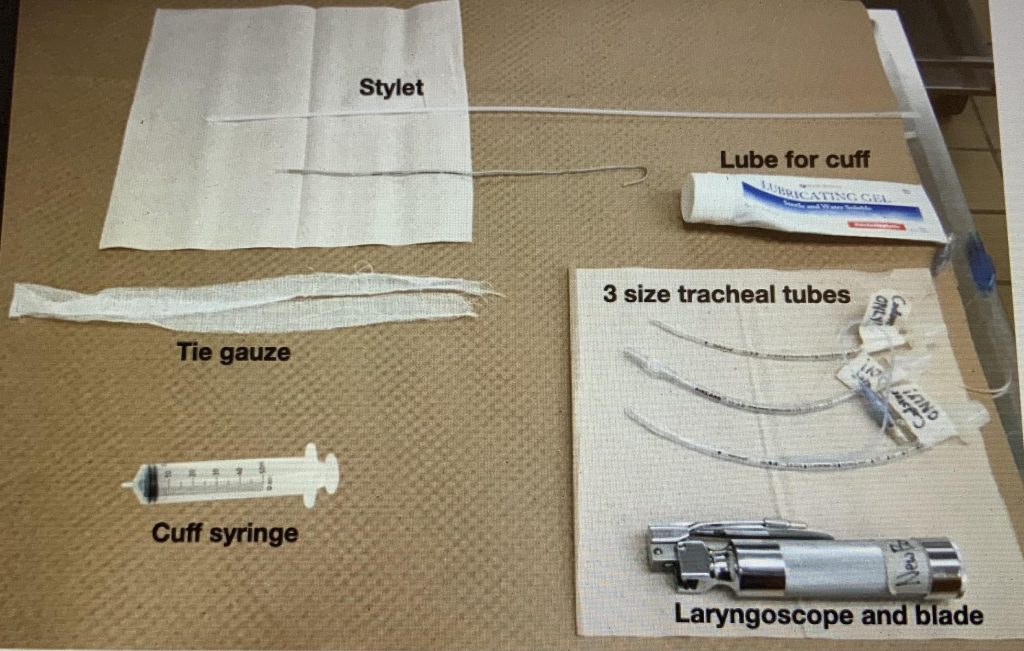
While waiting for premed to work, the anesthetist does the following:

Here are a couple ET sizing charts…realistically they are not very helpful due to breed differences and BCS variability:
- Pre-measure length of ET tube- from incisors to between the point of shoulder and thoracic inlet. Ideally a clinic would remove the connector and cut tube to proper length and replace the connector to have a variety of lengths to fit tube more accurately for a given patient. Realistically many clinics do not do this for a variety reasons. Having a tube that is too long is called apparatus dead space. This is an issue for small patients as they have a small tidal volume, so when they take a breath, the added space of a long ET tube, takes away some of the volume of air undergoing air exchange. AND determine the width of ET tube- determined by light tracheal palpation, visualization of the opening between arytenoids, the idea is to use the biggest tube that fits easily into the trachea. ET size-weight charts are place to start… but honestly there are so many bred and BCS variabilities, they are not very helpful. Remember overweight animals don’t have bigger tracheas! The space between the nares has not been found to be accurate determinant of proper tube width, yet many still start with this general gauge-likely years of experience comes into play here. The width of a tube that determines its size. Cats generally 2.5-4, Dogs wide variation, depends on the width of the trachea.
- Generally we recommend to get 3 tubes ready– all same length, but varied in width. Generally a size above and a size below our best guess, so you are ready for variations which do happen more than you think!!
- Check cuff of ET tube for any leaks – can the cuff hold air? or does cuff slowly deflate? Good idea to do this first!
- Measure how much air to inflate the cuff and note size of cuff when inflated (remember there is no relationship between squishiness of pilot balloon and the amount of air in the cuff at the tip of the tracheal tube! EXCEPT IN SPECIALLY DESIGNED HUMAN ET CUFFS THAT HAVE BUILT IN MANOMETER. You can buy special adapters or special syringes that only allow 20 cm of water (measurement of pressure-not mm Hg!) to go into the ET tube cuff. But this does not replace the need to perform an ET tube fit check. Often called MOV-Minimal Occlusal Volume-the minimum about of air to physiologically prevent a leak around the ET cuff. (see below)
- Lube tube cuff when inflated, then deflate-lubrication when inflated gets the whole surface coated. Be careful not to lube the eye hole at the end of the ET tube. Why do we lube the cuff?
- Attach tie? -Some prefer to attach tie now, others prefer tying in after tube is in, reasonable to wait especially if your not quiet sure about the size.
- Place on clean paper towel so ready to go! Paper towel from a dispenser is quiet clean due to high temperature processing of paper pulp.
SECOND STEP-ACTUAL ET TUBE PLACEMENT-very quick! *Do you have a FELINE patient?
- Handler holds patient in ventral recumbency in sphinx-like position, head elevated head and fairly straight neck. Clinical tid bit-sometimes brachycephalic breeds or elongated palate breeds are easier to intubate when they are on their backs-allows soft palate to drop for better visualization-this is how humans are intubated.
- Handler holds sides of head in cat/small dog or sides of muzzle in larger dog with one hand, and open patients mouth with other hand.
- Handler grasps tongue with gauze and gently pulls the tongue straight out and then ventrally, careful not to injure ventral tongue on incisors!
- Anesthetist pushes base of tongue down with blade of laryngoscope-this flips epiglottis open-DO NOT TOUCH EPIGLOTTIS!-can cause inflammation and swelling causing potentially dangerous dyspnea these are very delicate tissues!
- *SPECIAL STEP FOR CATS-place 1-2 drops lidocaine on arytenoid cartilages to prevent spasming, wait 30-60 seconds, then repeat 4. and go to 6. CAUTION! Lidocaine does not take the place of adequate sedation.
“Whoa…Hey Doc I’m not sleepy yet”
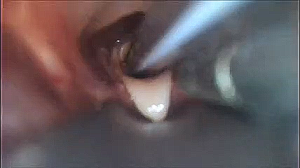
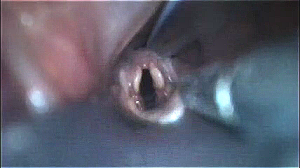
6. Insert prepped ET tube into trachea between the arytenoid cartilages/laryngeal folds say “I’m in.” When using a stylet have the end of the stylet 1 cm protruding from the end of the ET tube, carefully place the stylet between the arytenoids, hold the stylet still, and push the ET tube off the stylet into the trachea, and remove stylet. This does take some practice and awareness of being gentle!
MAKE SURE YOU KNOW LENGTH OF TUBE NEEDED TO THE INCISORS, IF TUBE IS TOO LONG, TO AVOID INSERTING TUBE TO FAR AND INTUBATING ONLY ONE SIDE OF THE RESPIRATORY TRACT!
 |
 |
 |
|
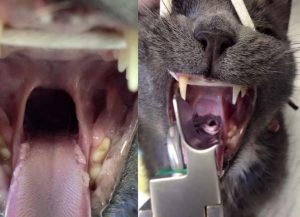
Pardon the poor quality of images these are screen shots from the videos at the end of this chapter-do take a look at them to understand technique of proper placement! |
||
7. Confirm placement Is the ET tube in trachea?
- Direct observation tube going into trachea,
- Condensation seen on inside of tube with a breath
- Feel breath from end of ET tube on hand
- Chest moves outward with slight compression of reservoir bag to 20 cm water
- Capnograph unit on end of tube registers high CO2 being exhaled
- Cant palpate tube next to trachea because it is in the trachea
8. Tie the tie-in around the muzzle tying on top with bow to release easily for most dogs or at the back of head for cats and smaller patients. *There are many variations of tying in ET tubes, so be on the lookout for your favorite! Always have scissors and syringe close by in a live patient to remove air from cuff and cut the tie if needed when animals wake up suddenly.
9. Oxygenate patient push the safety valve closed or close the pop off valve, and squeeze the O2 bag gently being careful not to go over 20 cm of water pressure and immediately open the pop off valve.
10. Perform Minimal Occlusive Volume check-this is the preferred method to determine how much air to put in the ET tube cuff vs. just putting in a bunch of air! Many clinics skip this important MOV step! Once you are accustomed to preforming a MOV it goes quickly). This is an actual physiological way to place the minimum amount of air in the cuff to prevent a leak around the cuff at 20 mm water. There is no other way to determine this! NOW SAFE TO TURN ON THE VAPORIZER!
- O2 on, Push the safety valve closed, or close pop off valve, gently squeeze re-breathing bag, and watch the manometer on anesthesia machine-don’t go above 20 cm H2O pressure.
- Listen closely for leaks around the cuff when you give a breath then IMMEDIATELY RE-OPEN POP OFF VALVE!
- If there is a leak around the cuff (air leak sound), add a little bit more air in the cuff and repeat steps above.
- Make sure you see the chest rise with every inspiration and every breath you give with reservoir bag-assures ET tube is in the proper place.
- This technique ensures that the minimum amount of air needed to seal the airway is used (i.e., the Minimal Occlusive Volume) and that the cuff is not overinflated and possibly placing excessive pressure on tracheal mucosa (which would create ischemic damage or direct physical damage). OPEN pop-off valve immediately after sealing the airway.
11. Removal– untie or loosen ET tube tie, have scissors ready in case cant untie fast enough, and have a syringe ready to deflate cuff of ET tube. Timing is important! Patient should swallow a couple times and starting to move a bit to assure proper gag reflex=patient able to self regulate and prevent aspiration of fluids. Remove air from cuff and slide ET tube gently and swiftly out.
If you wait too long to pull ET tube-patient may bite tube or may be too fractious to pull ET tube safely!
If you pull ET tube too early-patient may aspirate as unable to protect own airway until able to swallow. Be ready to cut tie with bandage scissors, if needed-as is faster than untying, generally remove air from cuff, untie and gently pull tube, observe patient closely! Tip Sometimes cuff is left inflated and used a squeegee, to remove accumulated fluids such as saliva, vomitus, blood etc…having suction close by is always an excellent preparation measure as well! One must be careful to not damage the delicate ciliary cells lining the trachea, and the epiglottis and arytenoid cartilages!
Answers to questions above:
We lube the cuff to prevent cuff from sticking to inside tracheal surface, and to allow for lubrication between inside tracheal surface and the cuff in case ET tube moves during surgery. Just the cuff is lightly lubricated NOT the end of the tracheal tube! Applying lube to inflated cuff assures entire cuff is lightly lubricated.
ET TUBE PLACEMENT NUTSHELL
- Tube Size selection: palpate trachea to gauge width of tube needed (width printed on side of tube). Pick 3 widths (one larger and one smaller than the estimated).
- Tube length (how far to insert): Measure length from incisors to thoracic inlet.
- Leak check cuff of all 3 tubes (fully inflate their cuff without overfilling it, and let it sit while you prepare the rest of the materials); confirm no leaks in cuff, and note volume to fill.
- LIGHTLY Lube cuff of tube to be used while inflated (do not lube the tip or Murphy’s eye).
- Good restraint – have holder grasp maxilla by K9s and pull tongue out & slightly ventral. GENTLE -can put gauze over incisors to protect tongue?
- Use the blade of the laryngoscope to press base of tongue down (opens epiglottis), then place the ET tube between the arytenoid cartilages and into the trachea. CONFIRM IT IS IN
- Cats – spray/drip lidocaine on arytenoid cartilages can help prevent spasming, wait 30 seconds then place the ET tube.
- A stylet advanced 1 cm can be used as a guide to slide the ET tube over the stylet into the trachea.
- Check placement – visualization, condensation, feel for breath on end of tube, chest rises with breath, capnograph to check. Light palpation at thoracic inlet indicated if suspect long tube to assure not in single bronchus.
- Tie in ET tube
- Oxygenate patient Turn on O2, Connect ET tube to anesthesia machine, use safety valve or close pop-off valve, gently squeeze reservoir bag and give a breath not exceeding 20 cm H20.
- Perform MOV amount of air to add to cuff to have a seal at 20 cm H2O with an anesthesia machine. WE WILL EXPLAIN THIS IMPORTANT STEP WITH A DEMO IN LAB.
- O2 on, push safety valve closed or turn off Pop-off valve, squeeze reservoir bag gently to give a breath up to 2- cm H2O
- Listen for sound of air escaping around the cuff simultaneously, immediately open pop-off valve
- If air escaping around the cuff is heard, add a small amount of air (0.5-1 ml) and repeat steps 1-3 until no sound is heard.
- Make sure you see the chest rise with every breath taken by patient or that you give via reservoir bag
- This technique ensures that the minimum amount of air needed to seal the airway is used (i.e., the Minimal Occlusive Volume) and that the cuff is not overinflated and possibly placing excessive pressure on tracheal mucosa (which would create ischemic damage or direct physical damage). OPEN pop-off valve immediately after sealing the airway.
- Tube Removal: Scissors and syringe close by!
- Untie or loosen ET tube tie/rubber band.
- Watch for a few consecutive swallows to assure good gag reflex (brachycephalic breeds-generally keep ET tube as long as possible as potential breathing difficulties
- Remove air from the cuff and gently and swiftly pull the ET tube out.
ULTRA NUTSHELL
- Proper length and size (3), and lube best guess tube-ready on paper towel
- Place and Check– push base of tongue down LIDOCAINE FOR CATS, wait 30 sec, push base of tongue down-ET tube between arytenoid cartilages condensation, feel breath, chest rises with breath, capnograph!
- Hook up to anesthesia machine O2 on, give breath 20 cm H2O
- Tie ET tube in place
- MOV determine how much air to put in cuff-hold off emergency pop-off, give breath 20 cm H20 via manometer, listen for leak? if leak add a bit more air in cuff and repeat until no leak. MAKE SURE POP-OFF VALVE is OPEN after giving breath!
- Remove– Untie, scissors/syringe ready, deflate cuff, -gently pull after swallowing several times
Video Measuring Length of ET tube for Cat
Video Placing ET tube w/Stylet in Cat-intraoral view and observer’s vie
Check this product out V-gel an alternative to ET tube in a rabbit!
Size and good fit are important-the V-gel fits snugly into the laryngeal area creating a seal blocking passage to the esophagus so air is able to travel into the tracheal opening.