5 In Which I Model the Writing Box Workshop Process
The following is a step-by-step description of the Mapmaking Workshop.
Imagine me standing in front of you. Imagine a table full of face out titles—picture books, chapter books, poems, adult books, atlases. An easel with chart paper and Sharpies stands next to me. There are tables with chairs around them, and a stack of clear shoebox-sized boxes with lids.
The Writing Box
Any plastic container with a lid will work well; it should be big enough to hold the contents easily without crowding. A clear or translucent rectangular box is best for keeping materials in order and is also visually appealing. It can be big enough to hold paper and supplies, or shoebox size, to contain supplies only, with paper available separately. Writing Boxes are to be shared by the writers; place one or two boxes on each table.
Organizing the Contents
Take the supplies out of their original packaging and place them in resealable plastic bags, one bag of each material for each Writing Box. Using a permanent marker, label the contents on the side of each bag; this will make it easy to clean up and to check contents.
Begin on a small scale, with markers, pencils, sharpeners, and erasers, and add other items as time goes on to freshen each Writing Box. I sometimes buy markers in bulk and sort them into resealable bags.
The Writing Box concept can be adapted for 3–6 year-old children by having a separate box available for that age group. Young children communicate by writing and drawing. Large crayons, thick colored markers, masking tape, and rubbing forms are popular items you can include.
Paper
It’s my experience that clean white paper and lined notebook paper are best given out separately, rather than included in the Writing Box. Give children as much paper as they want, and always have a box of scrap paper with old flyers and pieces of leftover construction paper available for children to take from as needed. There is no such thing as “wasting” paper.
Final check
Are your supplies in order? Are there eight differently colored markers in each plastic bag? Do you have paper? Maps can be made on plain copy paper, but for the session on maps you can also have brown paper bags or some heavy stock available. Age some paper for pirate maps by wiping it with damp tea bags.
I place the supplies to the side of the room.
Suggested Contents
- Crayons
- Pencils
- Pens
- Fine-tipped, water-soluble, colored markers
- Thick-tip, water-soluble, colored markers
- Erasers
- Pencil sharpeners
- Colorful stickers
- Post-it notes
- Press-on letters
- Rubber stamps
- Stencils (shapes, numbers, letters)
- Safety scissors
- Glue sticks
- Transparent tape
- White glue
- Clear rulers
- Wooden rulers
- Brass fasteners
- Hole punches
Mentor Texts
I pull a variety of titles and materials that reflect the topic and place them on display the week prior to the program. I may also create a display to publicize the workshop, including the materials, books, and a Writing Box. It’s a good idea to hold a few mentor texts back for the actual event. For the Writing Box session on maps, I select a few titles—picture books about geography and stories that have maps, as well as historical atlases—across the curriculum. For suggestions, see the bibliography of children’s books by topic. I mix fiction and nonfiction.
Creating a Sample
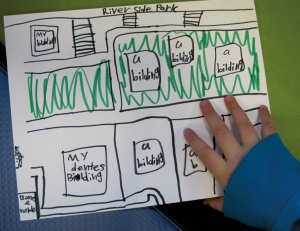
Before each workshop, I create a sample. For this session on map making, I draw a map of my own neighborhood using markers or crayons on a plain piece of paper, and label locations: “my house,” “ fire station,” “pizza,” and “library.” I spend less than five minutes on this sample, and I make a few copies for each table and extras to hand out.
A Sample Writing Box Session: Map-Making
Allow one hour for the session. Have sticky name tags available for participants to write their names on. As participants enter, say hello to familiar faces and welcome newcomers.
I welcome writers into the room ten minutes before the program’s start time to let them get settled. The mentor texts—books, transit maps, and city maps, in addition to reference materials like atlases—are on the tables, but the Writing Boxes are not. Writers may explore the books and materials while they wait for the program to begin.
Step 1: Introduction to the topic
I begin by saying “Hello, and welcome to the Writing Box program. Today we will be making maps. We will talk about maps for about ten minutes, we will write for about 25–35 minutes, and we will clean up for five minutes. We’ll then regroup, and those who wish to share their work will have an opportunity to do that. If you don’t finish your work right now or want to write some more, you can get a Writing Box at our reference desk from 2:00 to 5:00 every day that we are open.
Watching the clock, I spend five minutes on defining maps.
“Can someone tell me what a map is?”
“That’s right, it can be a picture of a place.”
“Maps show us where things are. There are all kinds of maps. We can have a map of our school. We can have a map of our neighborhood. Maps can be of real places [I show a map of Minnesota] or of imaginary ones. I hold up a copy of How I Became a Pirate, showing the interior of a pirate map.
Step 2: Modeling
I spend less than five minutes to model the writing activity. With a thick colored marker, I draw a map on a large piece of paper. (Allow the map to be imperfect; it is important to model imperfection.) As I draw the map, I say aloud exactly what I am doing. I may purposely spell something wrong, like writing “firehous” instead of “firehouse.” Our writers need to practice writing without wearing their editorial hat.
Step 3: Writing Prompts
I then spend less than five minutes listing the writing prompts, and ask the writers for suggestions of the kind of maps they might want to make. They may suggest:
- A map of their neighborhood
- A map of their body
- A map of the inside of their house
- A map of an imaginary place or planet
- A map of a fairytale (where exactly is Sleeping Beauty sleeping?)
- A map of a story they like Where is Harry Potter’s aunt and uncle’s house? What do the grounds of Hogwarts look like? Diagon Alley? We can imagine the world Beverly Cleary creates. How far is Ramona’s house from school? Where do Henry and Ribsy live?
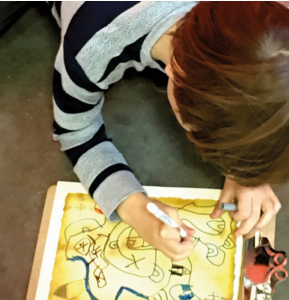
- A map of a buried treasure.
Spend a total of about ten minutes on these first three steps.
Step 4: Writing
Allow 25–35 minutes for this activity.
Next, I announce that it’s time to write. I ask for volunteers from each table to place paper and the Writing Boxes on the tables. (I’ve found that it’s distracting to have the Writing Boxes and/or materials already on the table while I introduce the program ). I gather up a few of the books on display and place those on the tables for inspiration, then circulate and give suggestions if a writer seems stuck.
And then? I stand back and observe for the next 20–35 minutes. It can be hard—keeping quiet, standing back. Occupy yourself by gathering statistics. How many kids? What is the age range? How many adults? Are the adults writing? What kind of maps are the writers working on? Perhaps take pictures of them writing, to use for future displays. (At registration, request permission to reproduce written work and take photographs for displays and promotion of the program. Your institution might require photo release forms.) This is the hardest part. Keeping quiet. Standing back. It is also a good time to encourage grown-ups to draw and write their own maps.
Step 5: Cleanup
Allow five minutes for cleanup. Ten minutes before the end of the workshop, I say, “Please finish your thoughts, we will be cleaning up in five minutes.” And I remind writers when the Writing Boxes will be available for use in the library.
Step 6: Sharing
Depending on the group’s vibe, I may walk around and ask if anyone would like to share their work. Other times, I ask for volunteers. Ask the child or adult to stand up and describe their work: “I made a map of my room, but how I would have it if I could have anything I want. Here is my bed. Here is my desk. Next to the desk is my swimming pool.”
Notes
When calling on writers to share, be aware of internal biases. If you call on a boy, call on a girl next; if you call on an older child, call on a younger one next. If more children want to share than there is time for, let them know that you’ll be available afterward for them to share one-on-one. Never take a child’s writing to keep or for display. A child cannot give informed consent if a figure of authority requests something from them. If you want to document the work, take a digital picture or scan it.
Respect privacy. Do not hover over writers while they are writing. Do not insist on writers sharing their work either in the group or one-on-one.
Resources
Bakis, Maureen. 2012. The Graphic Novel Classroom: Powerful Teaching and Learning with Images. Thousand Oaks, Calif.: Corwin Press.
Duncan, Randy, and Matthew J. Smith. 2009. The Power of Comics: History, Form and Culture. New York: Continuum.
Frey, Nancy, and Douglas Fisher. 2008. Teaching Visual Literacy: Using Comic Books, Graphic Novels, Anime, Cartoons, and More to Develop Comprehension and Thinking Skills. Thousand Oaks, CA: Corwin Press.
Jaffe, Meryl. 2013. Using Content-Area Graphic Texts for Learning: A Guide for Middle-Level Educators. Gainesville, FL: Maupin House Pub.
McCloud, Scott. 1993. Understanding Comics: The Invisible Art. Northampton, MA: Tundra Pub.
Monnin, Katie. 2010. Teaching Graphic Novels: Practical Strategies for the Secondary ELA Classroom. Gainesville, FL: Maupin House Pub.
Morrison, Timothy G., Gregory Bryan, and George W. Chilcoat. 2002. “Using Student-Generated Comic Books in the Classroom.” Journal of Adolescent & Adult Literacy 45 (8):758-67.
Tabachnick, Stephen Ely. 2009. Teaching the Graphic Novel, Options for Teaching. New York: The Modern Language Association of America.
Websites
Graphic Novel Reporter (graphicnovelreporter.com): teacher links and suggestions.
ReadWriteThink (readwritethink.org): lesson plans and activity ideas for graphic novels.
Comic Book Legal Defense Fund (cbldf.org/using-graphic-novels: column on Using Graphic Novels in Education.
The National Council for Teachers of English (ncte.org).
